Administrator User Guide
1.0 Administrator
1.1 Who is the administrator?
The administrator is the person or persons responsible for the whistle-blowing portal within the organization. This role grants access to all incoming cases in the portal.
1.1.1 First-time login
When you are assigned the administrator role, you will receive an email containing:
- Username
- Temporary password
Upon first login, you must change this to a personal password.
1.1.2 Secure login with two-step verification
Administrators and case handlers can enable two-step verification for increased security. Upon login, you will receive a code via SMS which you must enter to gain access. We recommend enabling two-step verification to protect sensitive information.
1.2 What can the administrator do?
As an administrator, you can:
- View and process all incoming cases
- Assign cases to case handlers
- Communicate with the responsible case handler
- Create, edit, and deactivate users
- Edit settings and customize the portal
- Manage the document bank
- Generate and view statistics and reports
- Register new cases on behalf of whistleblowers
- Change or add closure and rejection codes
- Communicate with parties during case processing
- Close cases
- Reject cases
- Edit the portal
- Move files between tabs in a case
2.0 User overview
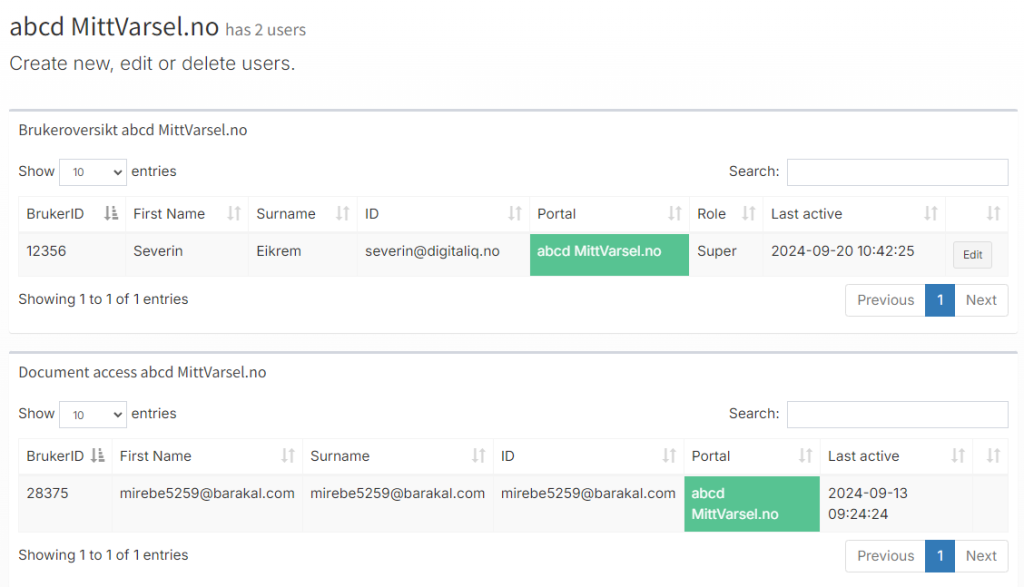
The user overview provides administrators with an easy way to view and manage all registered portal users. Here you can monitor who has access and manage user information and roles. By clicking on “Users” in the menu on the left, you will see the user overview in the portal.
What you’ll find in the user overview:
- A list of all registered users
- Information about users’ roles and status
- Options to manage access and roles
2.1 Creating new users
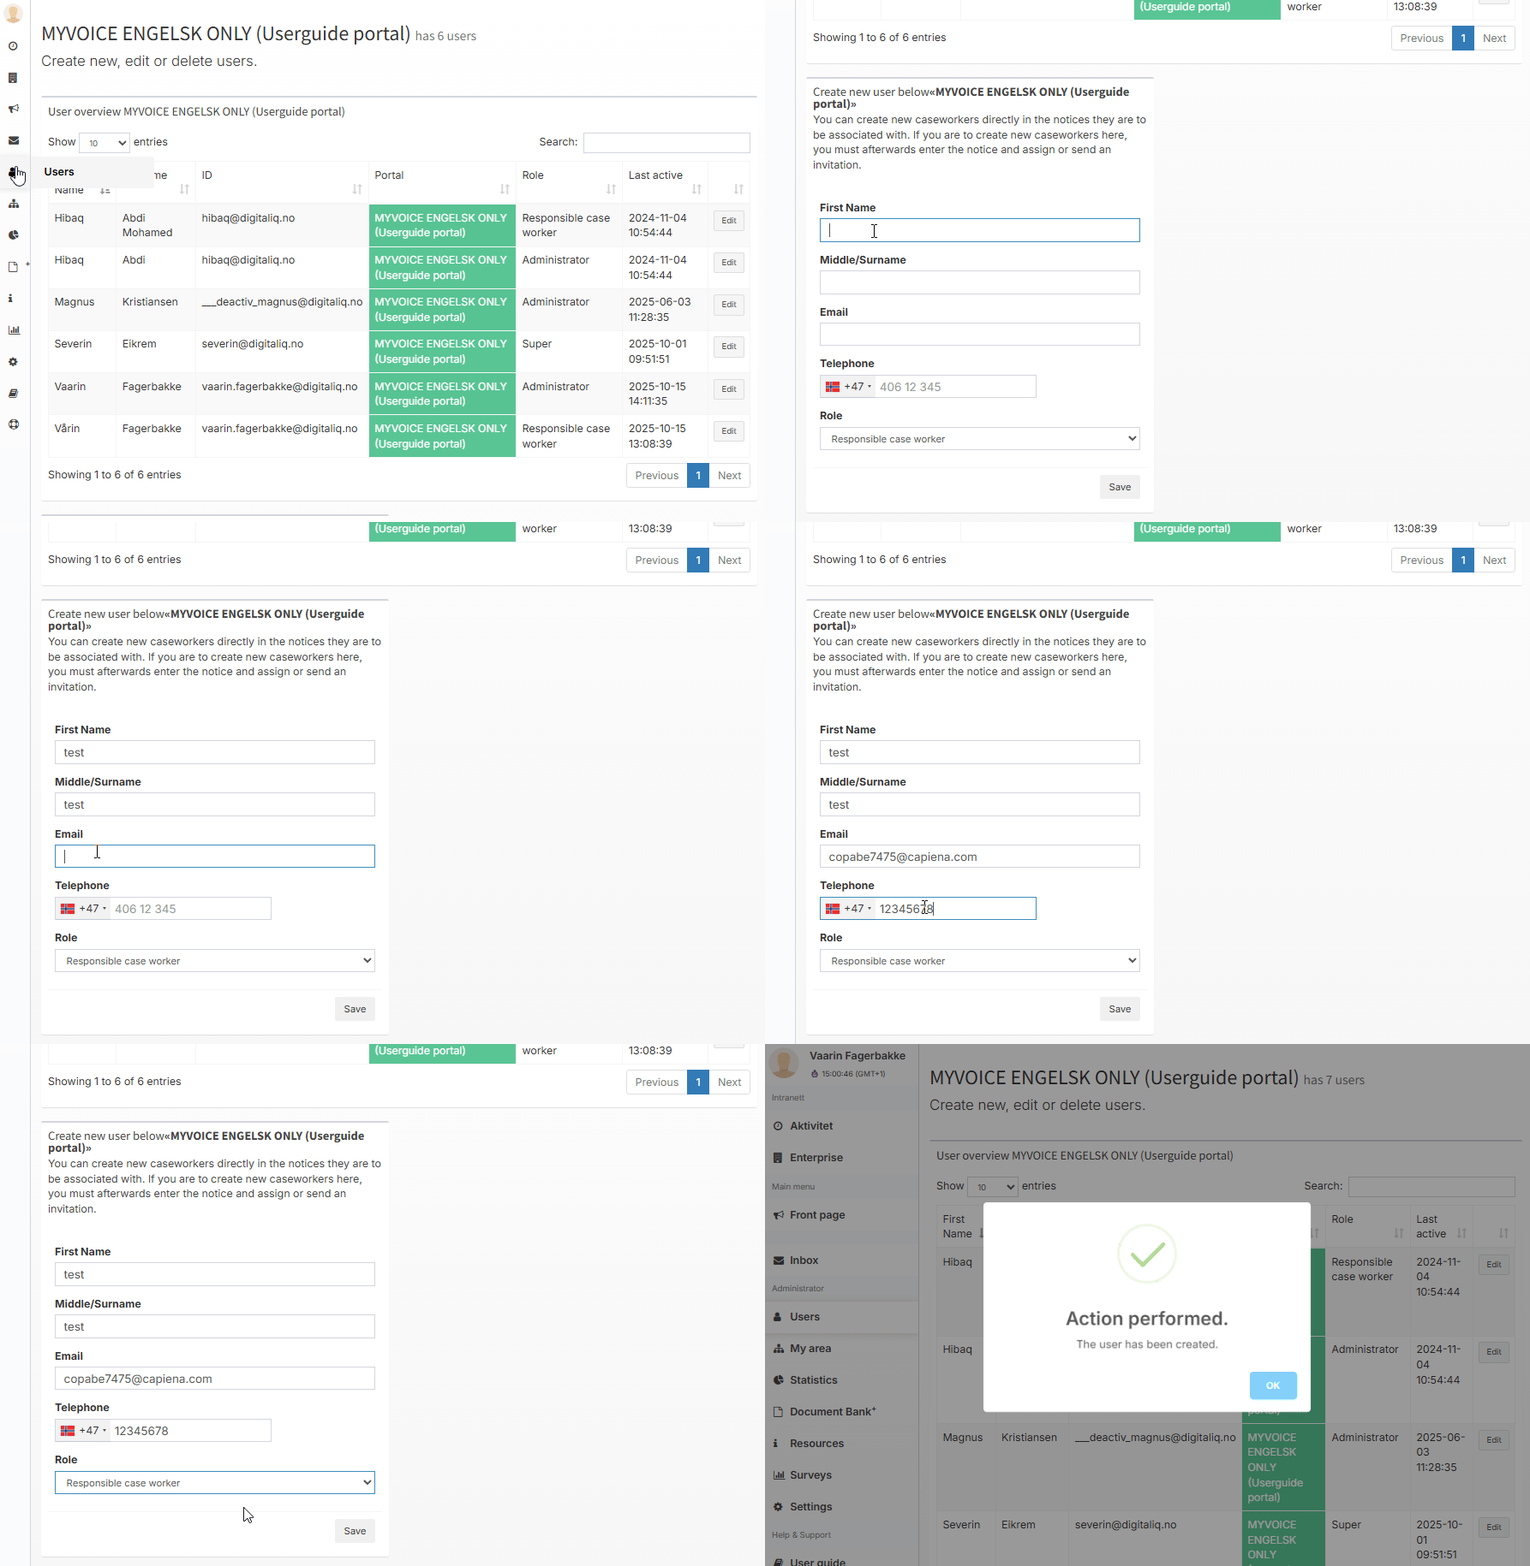
This feature is located under Users in the main menu of the portal.
To create new users in the portal, fill in the person’s contact information.
Then choose the user’s role. You can select one of four roles:
- Responsible case handler
- Read-only user (with access to all cases)
- Read-only user (must be invited per case)
- Administrator
2.1.1 Read-only user
A read-only user is a role with viewing access only. A read-only user cannot make system changes, handle inquiries, or communicate with others.
There are two types of read-only users:
- Read-only user (access to all cases): can automatically view all inquiries
- Read-only user (invited per case): must be invited to view each inquiry individually
2.1.2 Edit or deactivate users
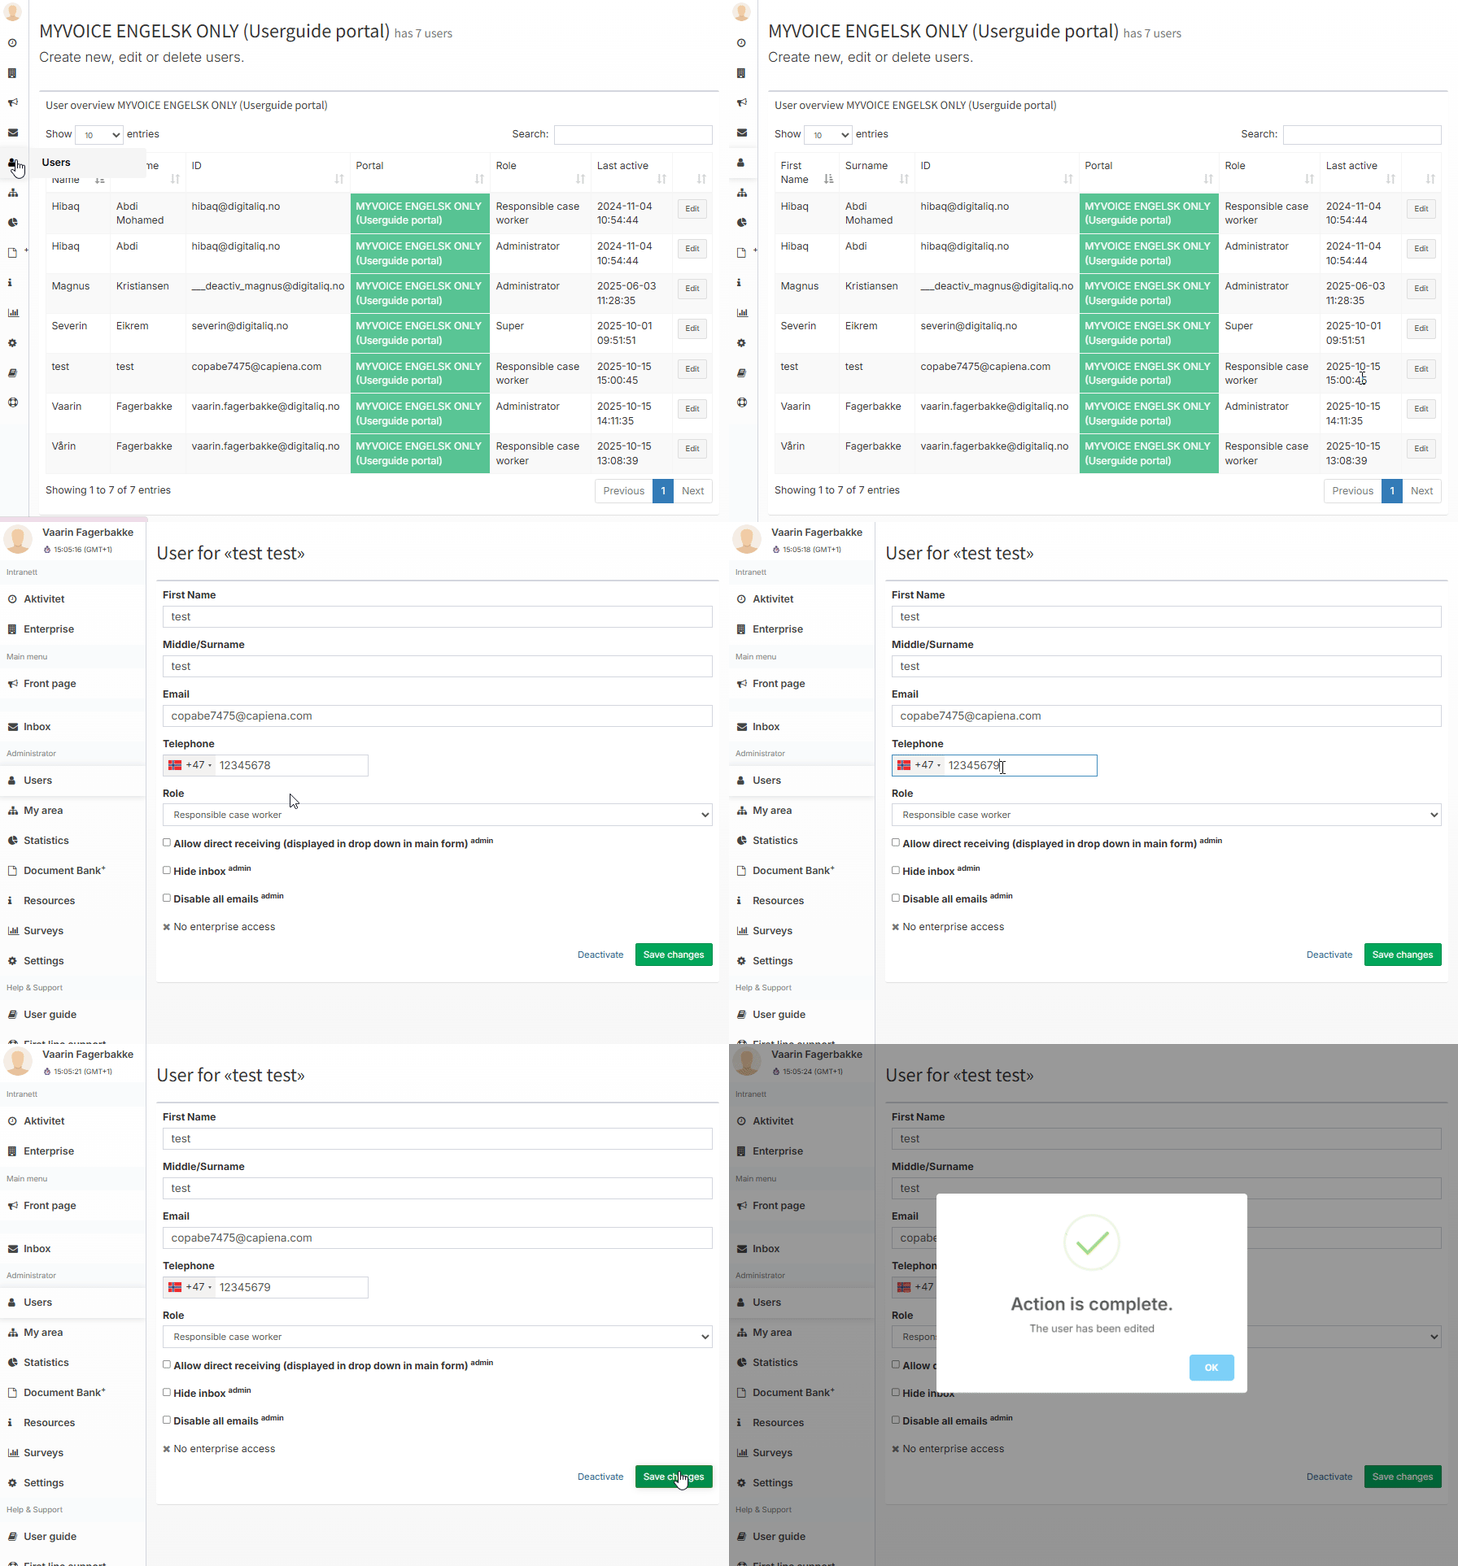
To edit or deactivate a user in the portal, click “Edit” in the user overview menu. Here you can modify user details, change roles, or deactivate a user.
When you have finished making changes, click “Save changes” to confirm and update the information.
3.0 Case handling
When you open a case from the inbox, you can see the full content.
As an administrator and responsible case handler, you have access to five tabs:
- Notification
- Administrator (administrator only, not for case handlers)
- Case handling
- Log
- Communication (if activated)
3.1 Submissions
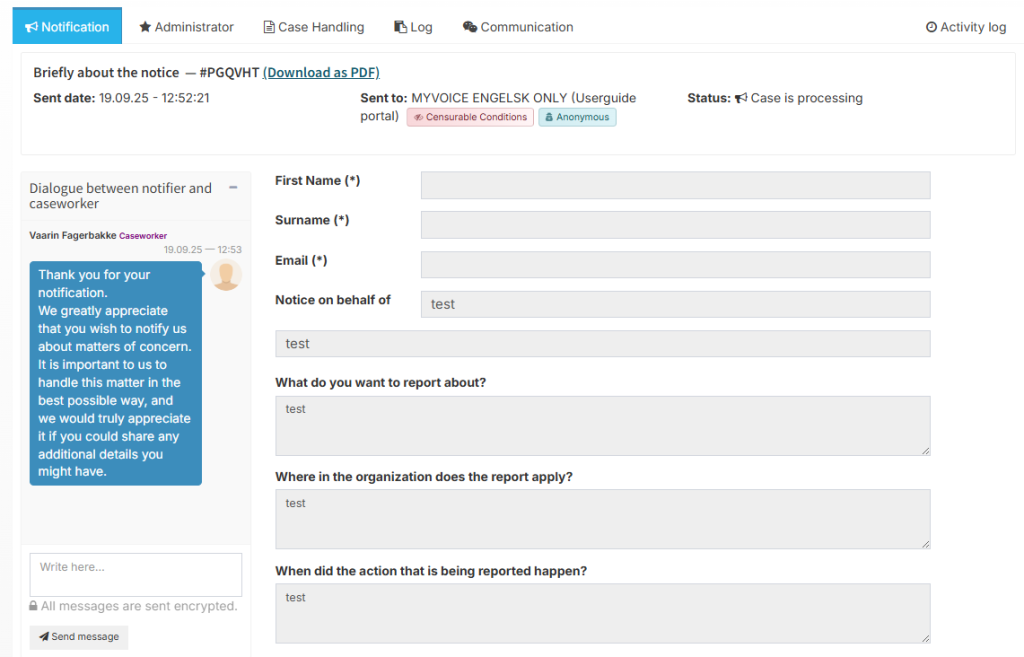
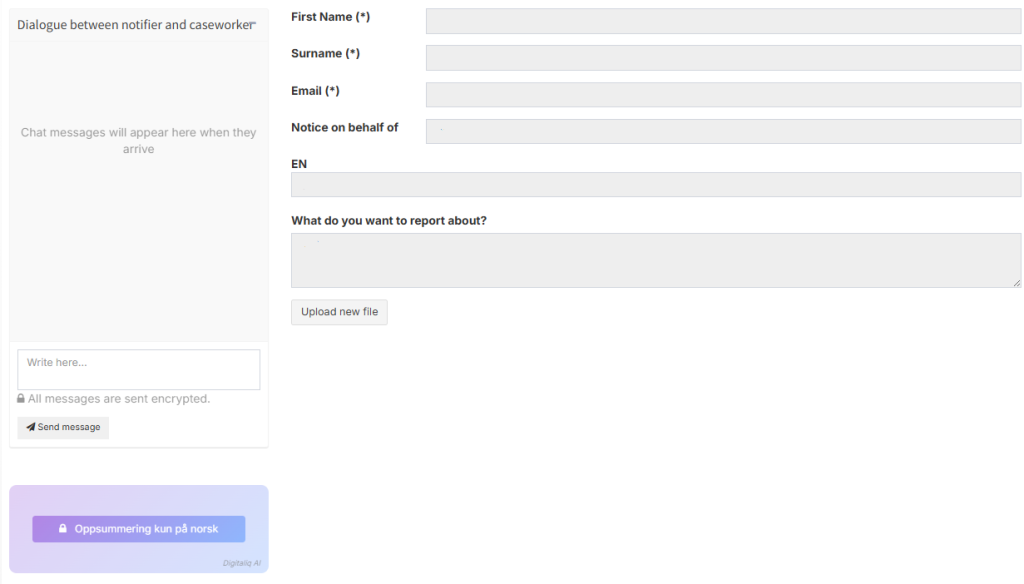
In the notification tab you will find the information the whistle-blower submitted. If they uploaded attachments, these are located at the bottom. The whistle-blower and case handler can upload files by clicking “Upload new file” and selecting relevant files. There are no size or quantity limits, but the file format must be one of: gif, jpg, png, doc, docx, txt. The whistle-blower can see everything uploaded in this section. All text boxes can be resized by clicking and dragging the corner in Chrome, Firefox, and the latest Edge.
3.1.1 Communication with whistle-blower
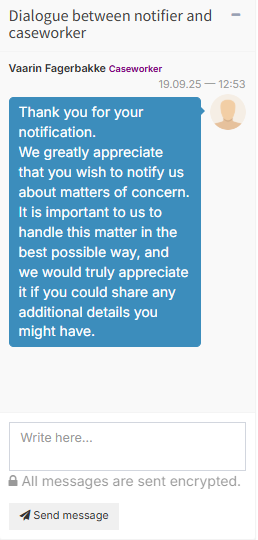
In the dialogue function on the left, you can communicate with the whistle-blower. The whistle-blower will receive an email notifying them that the case handler has sent a message and will be prompted to log in to view it.
3.1.2 Receiving New Notifications in the Portal
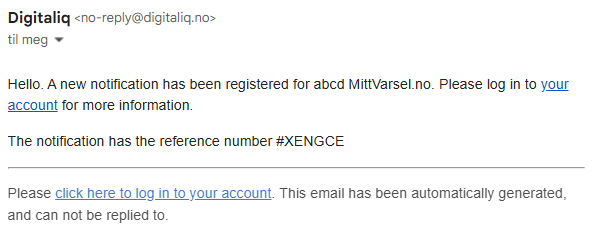
When a new report is submitted in the portal, you as the case handler will automatically receive an email notifying you that a new case has been registered.
The email contains information about the case and a link to the portal, allowing you to easily log in and continue processing the report.
3.2 Administrator
3.2.1 Assign responsible case handler
Click the button “Set responsible case handler.” You will be shown a list of existing case handlers in the portal. Click “Set as responsible case handler” next to the person who should take on the role.
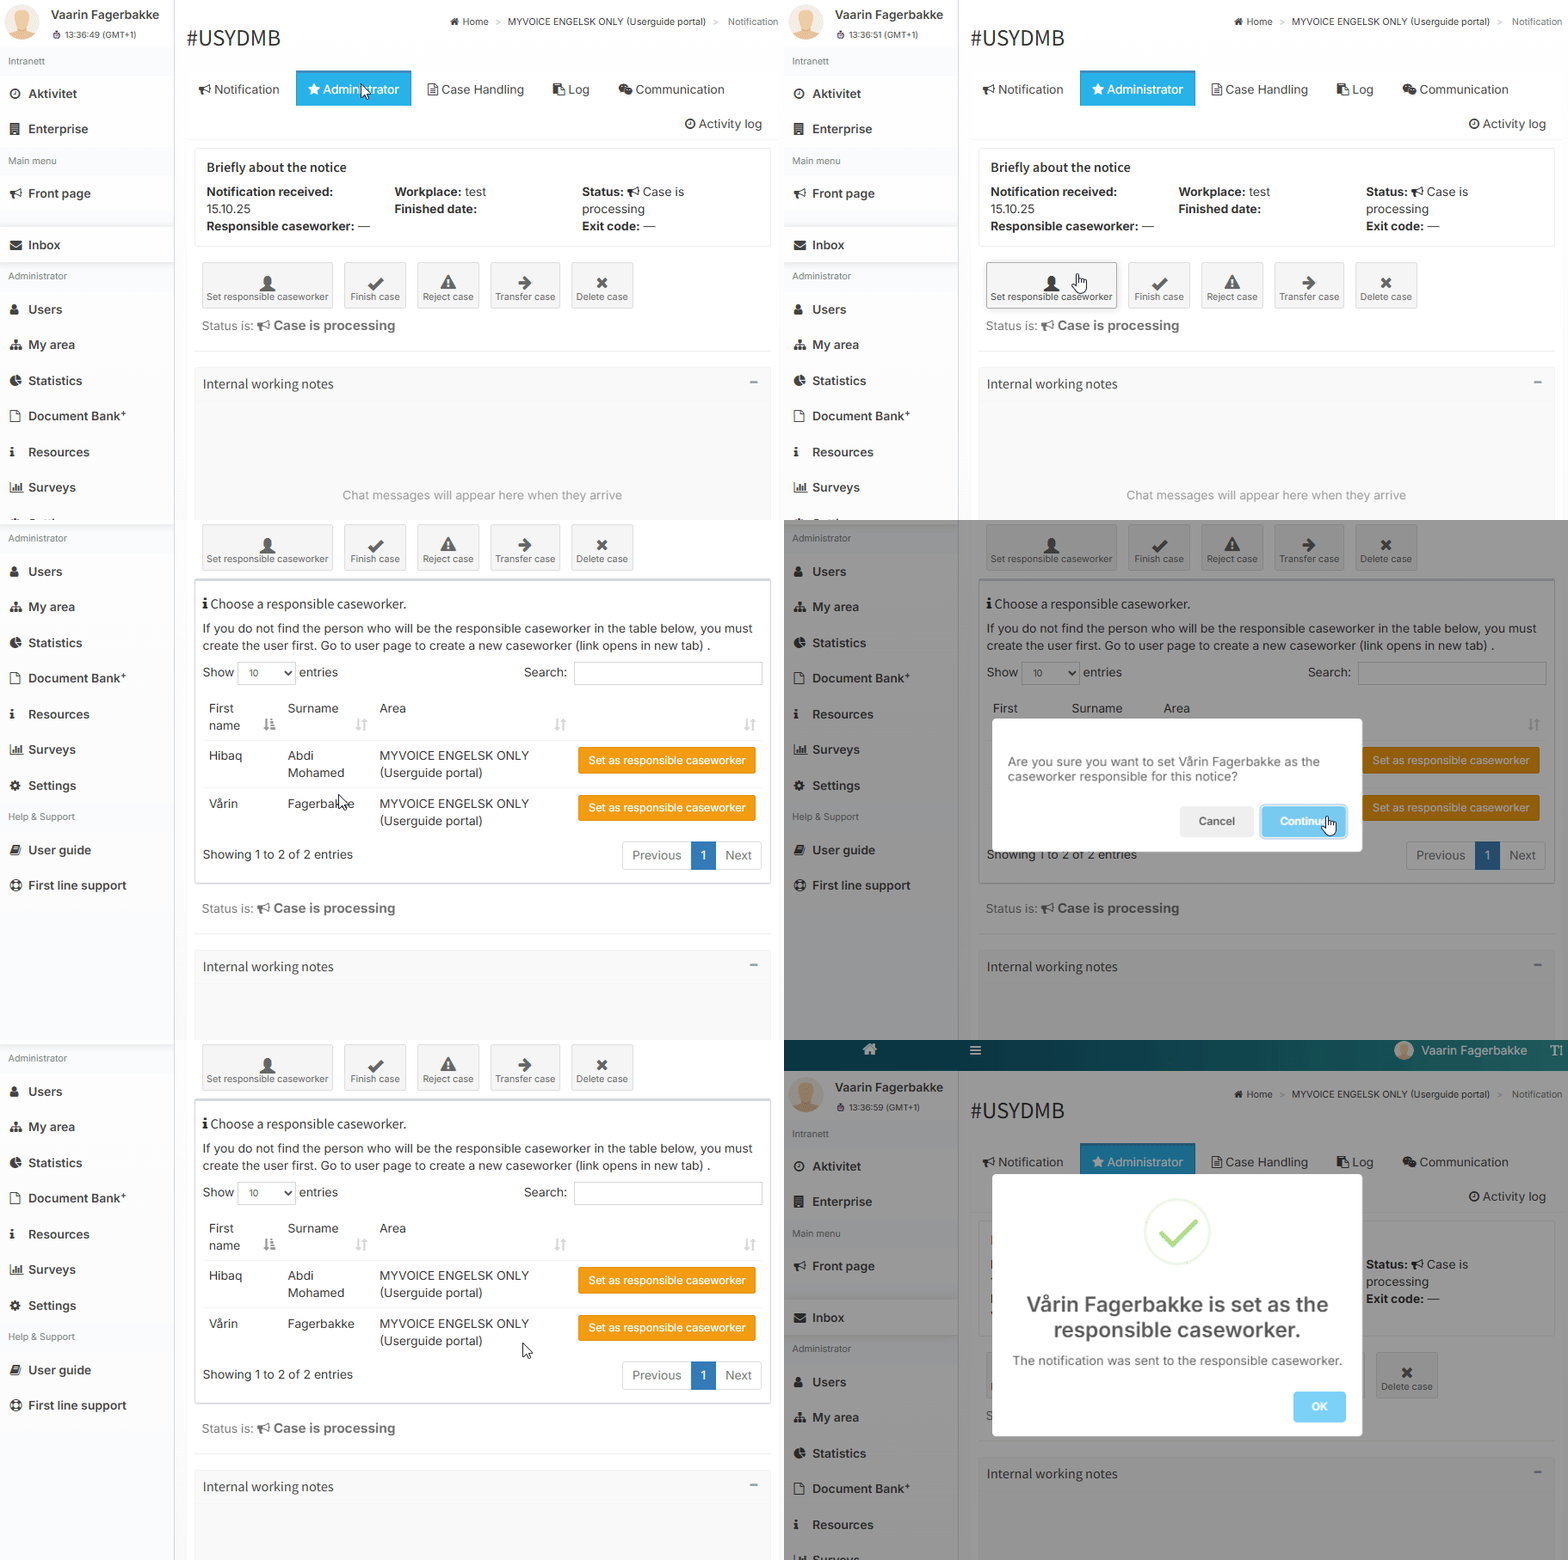
The responsible case handler will receive an email when they are assigned the role of responsible case handler. The case handler will then have access to the notification in their inbox. The notification will remain visible in the administrators inbox.
If you cannot find the appropriate case handler in the list, you can create them as a new case handler.
3.2.2 Finish case
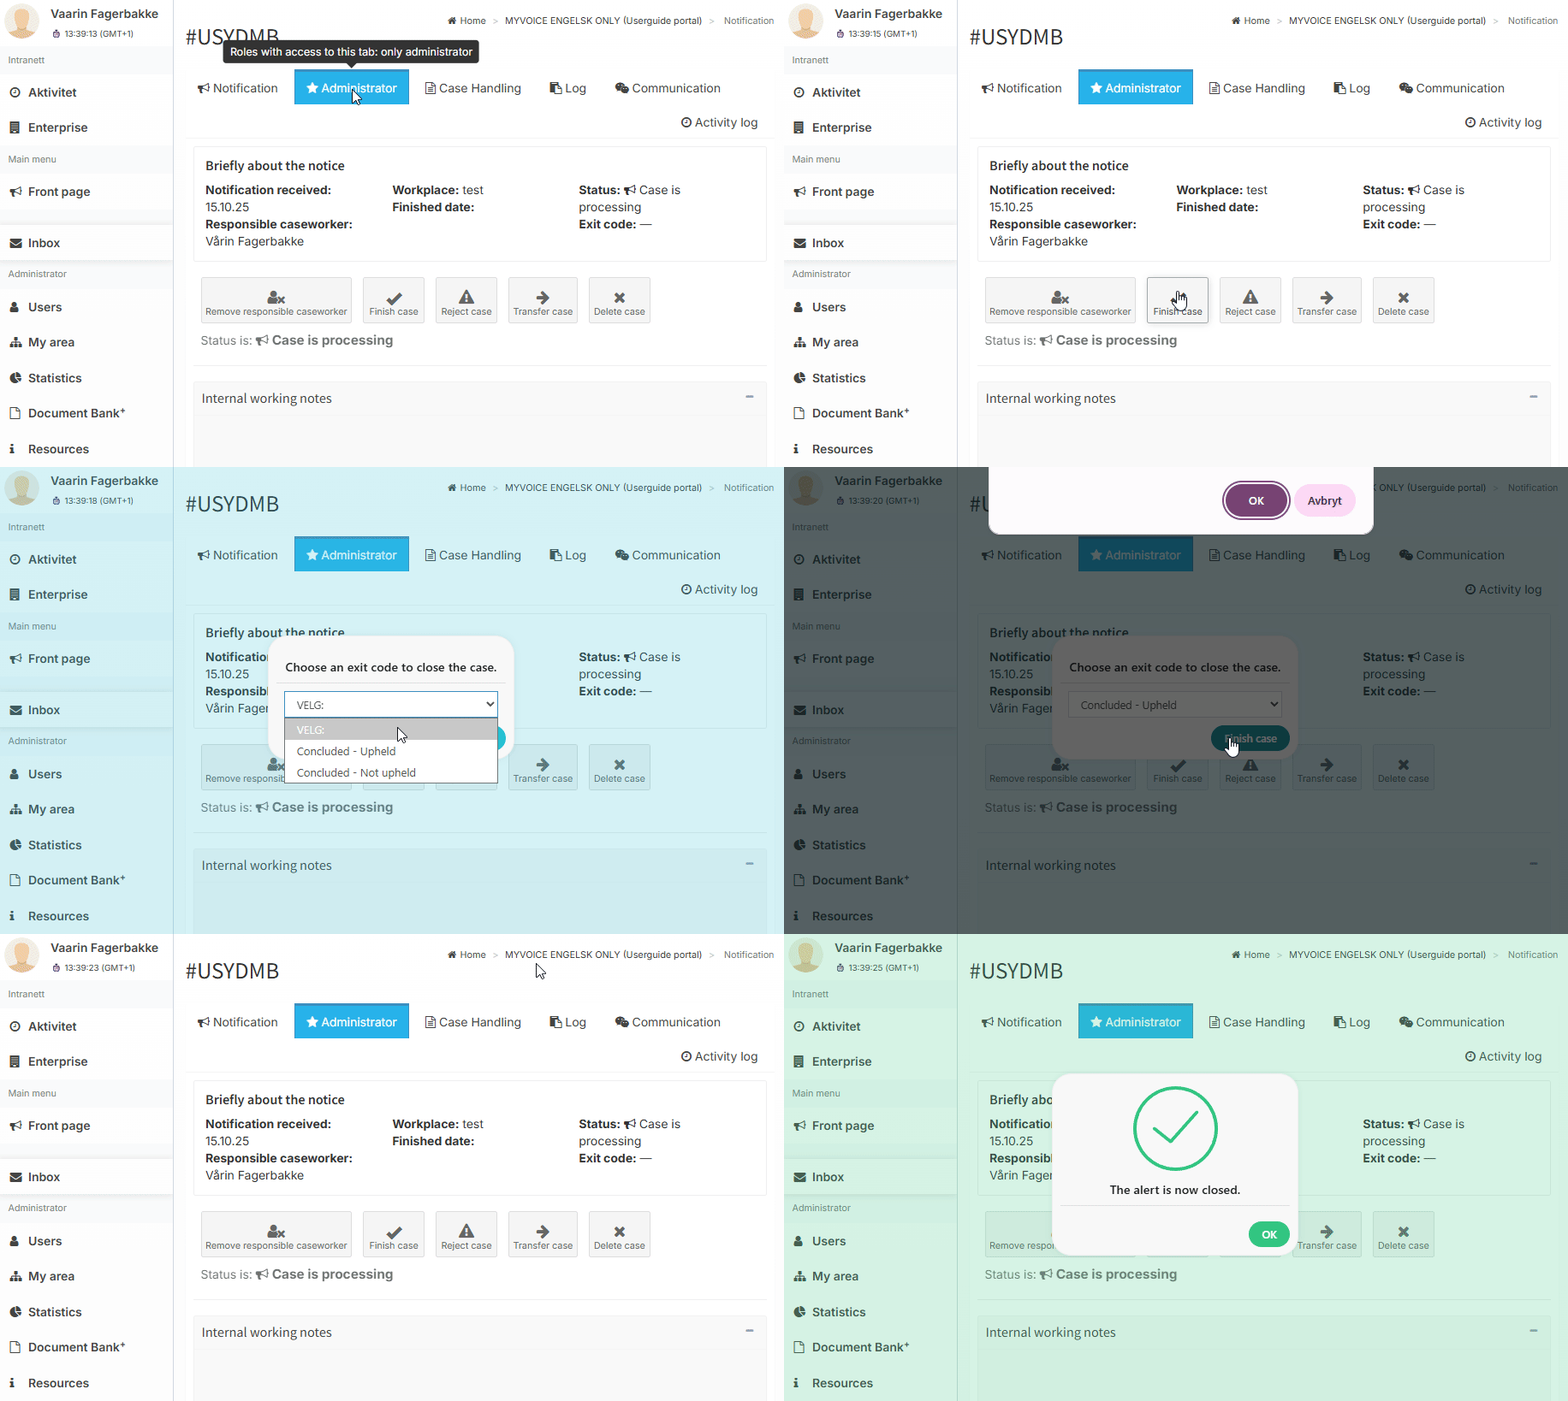
By clicking “Finish case,” a dropdown appears where you must select a closure code. The case status then changes to “Finish case.”
3.2.3 Reject case
By clicking “Reject case,” a dropdown appears where you select the appropriate rejection code. The case status will become “Reject case.”
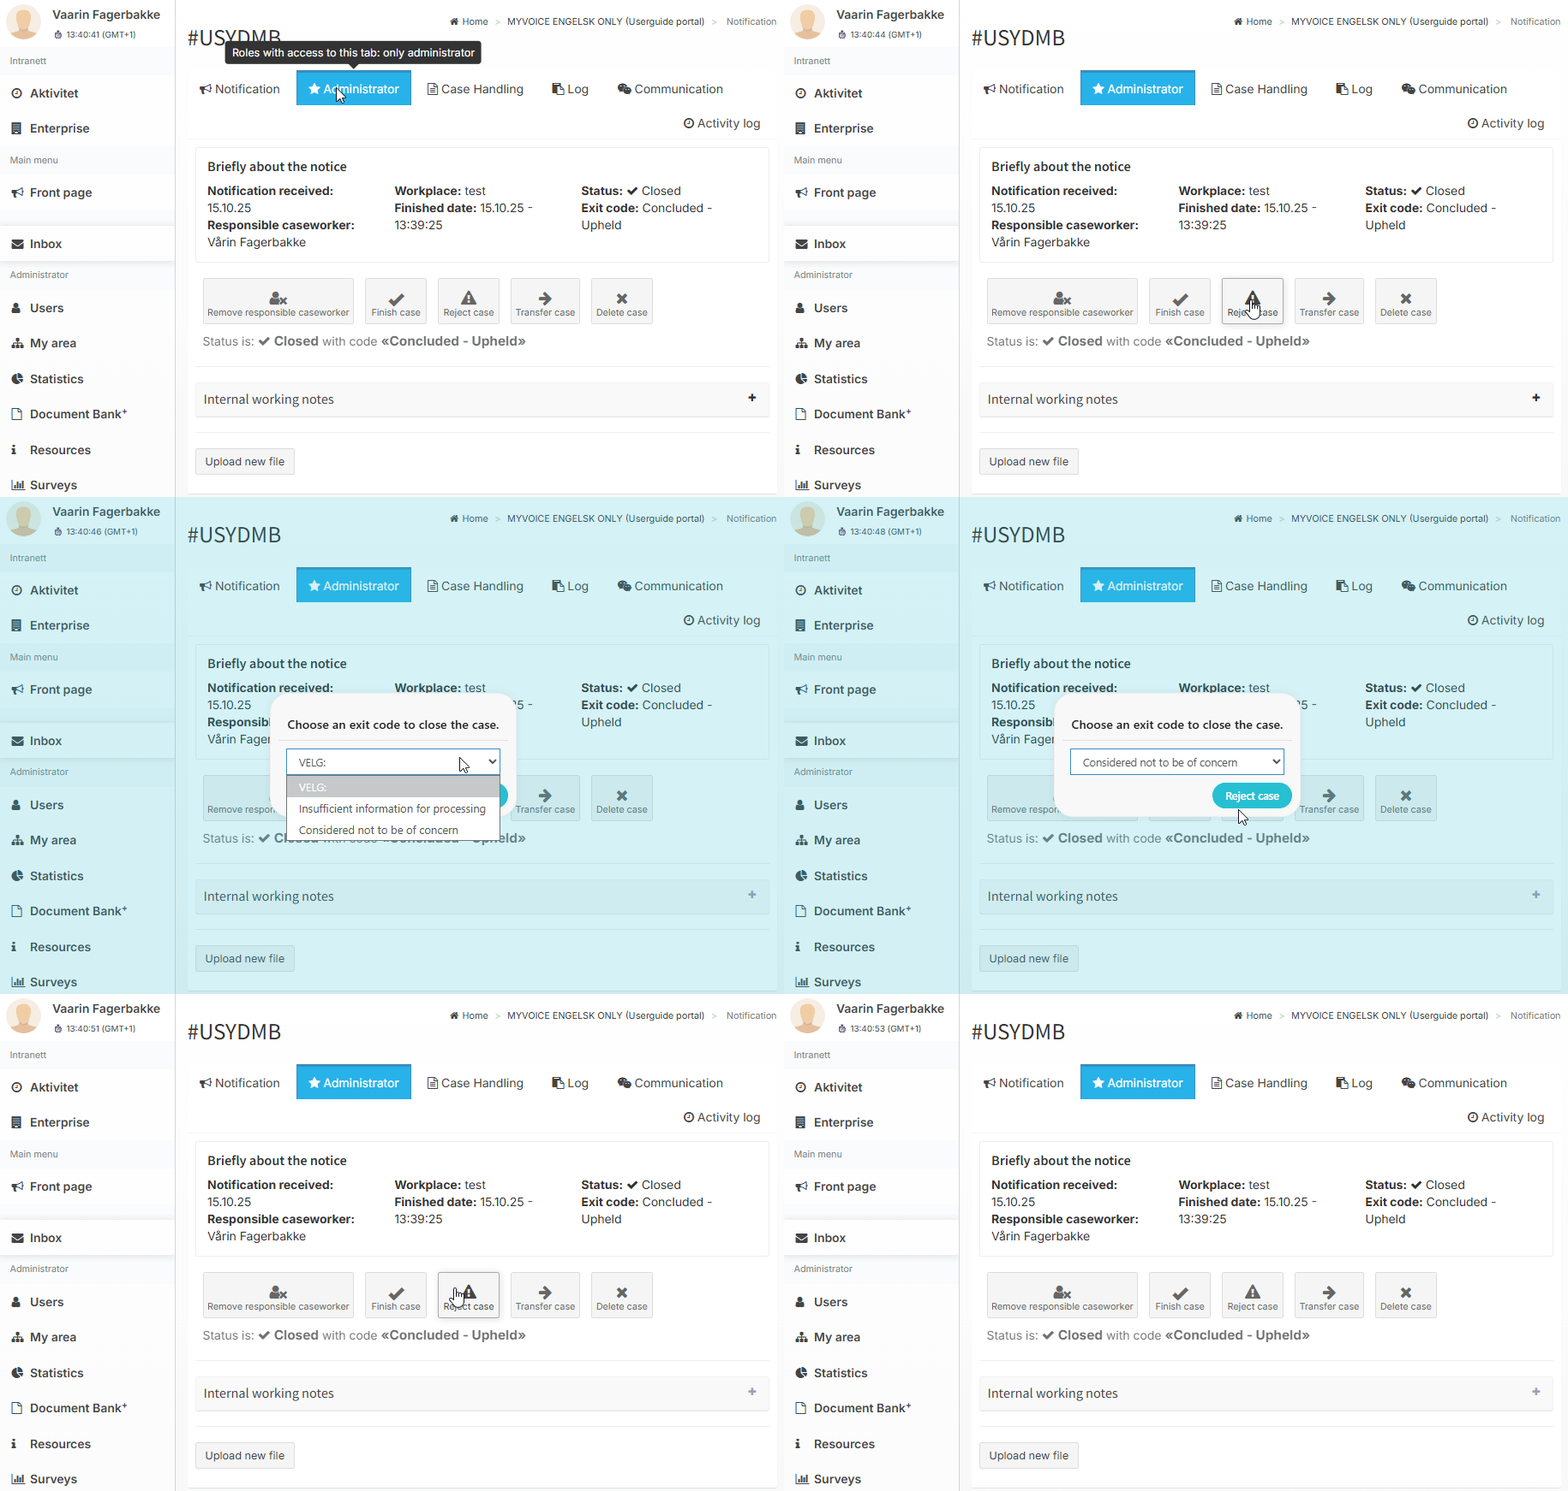
3.2.4 Closure and rejection codes
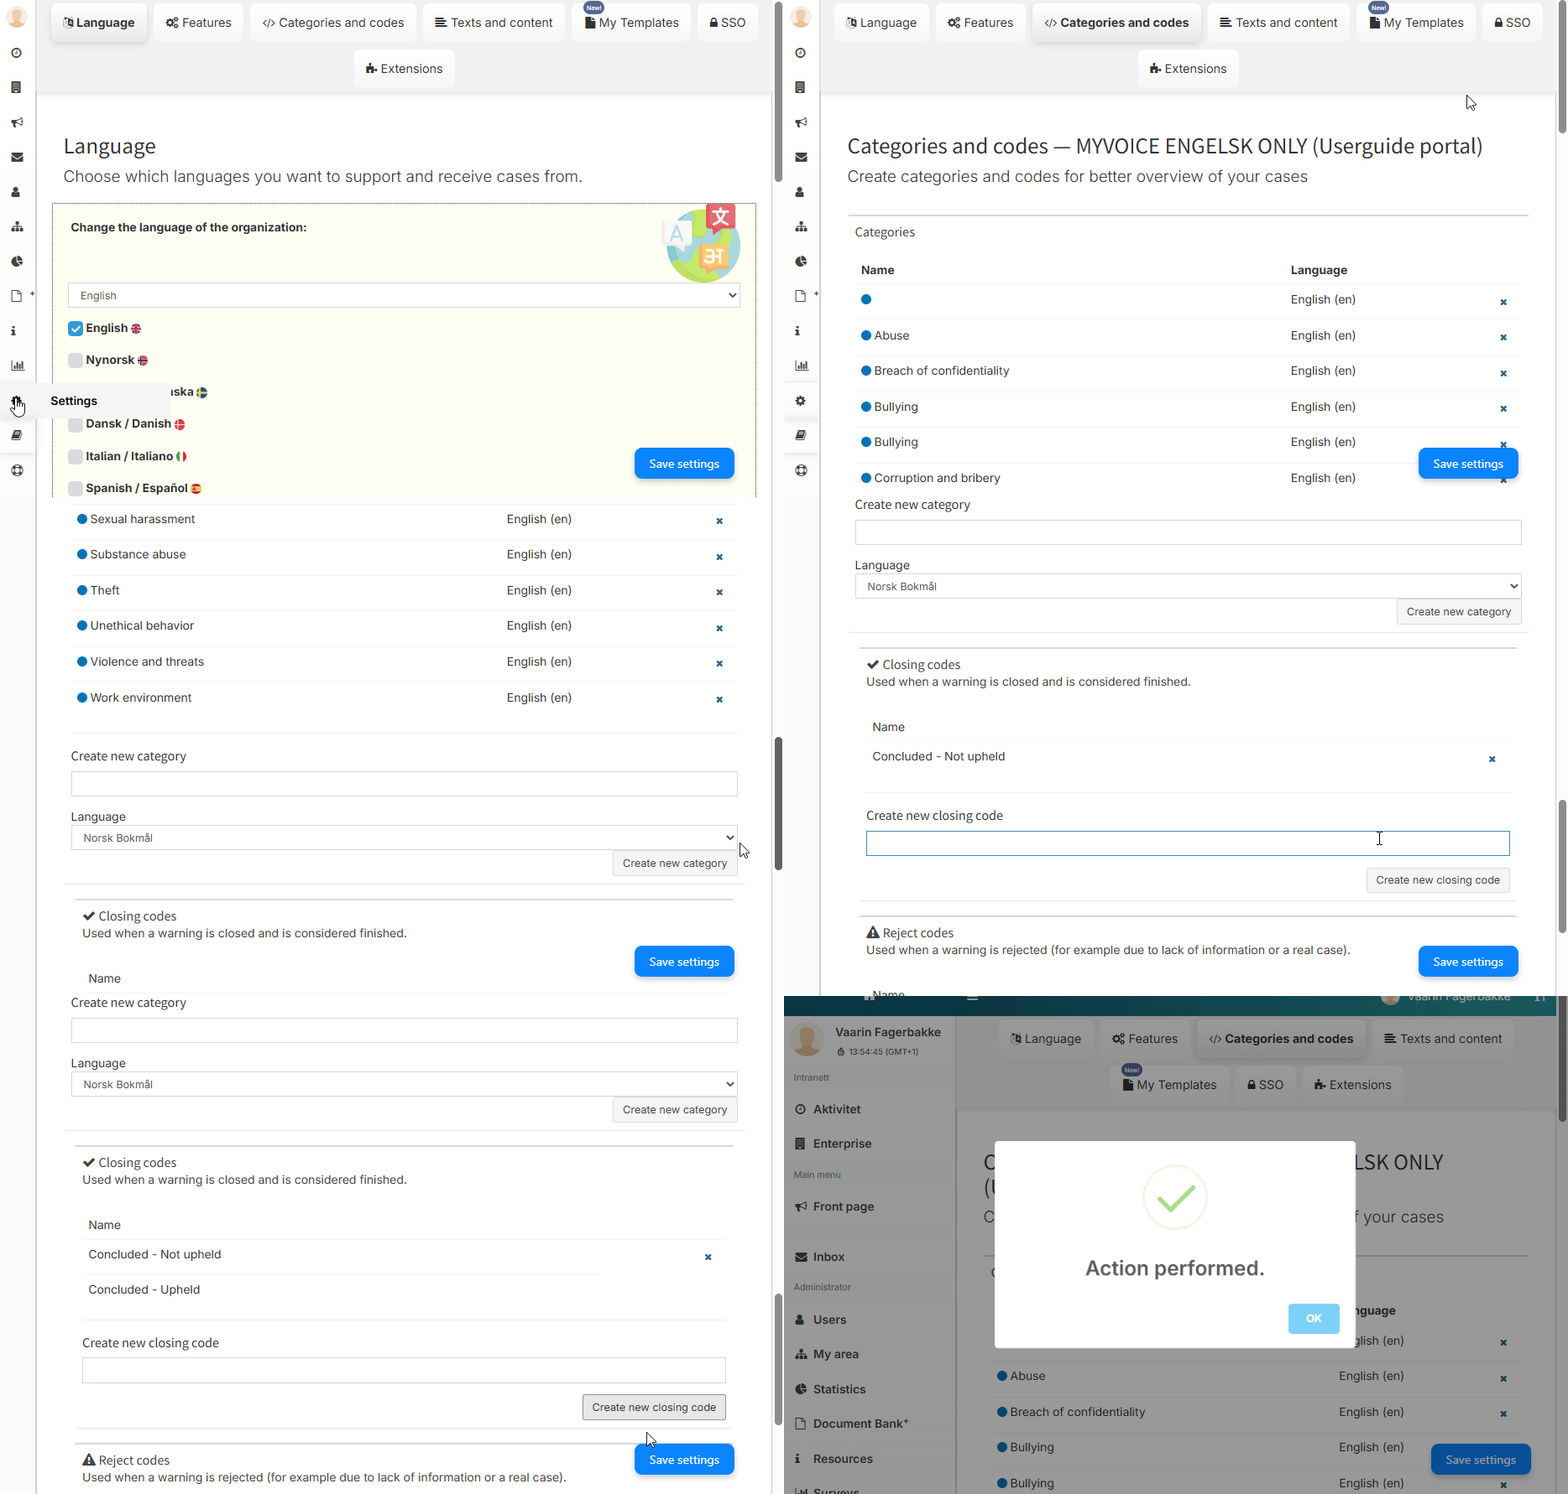
Administrators can modify and add new codes. See Settings.
How to add a closure code:
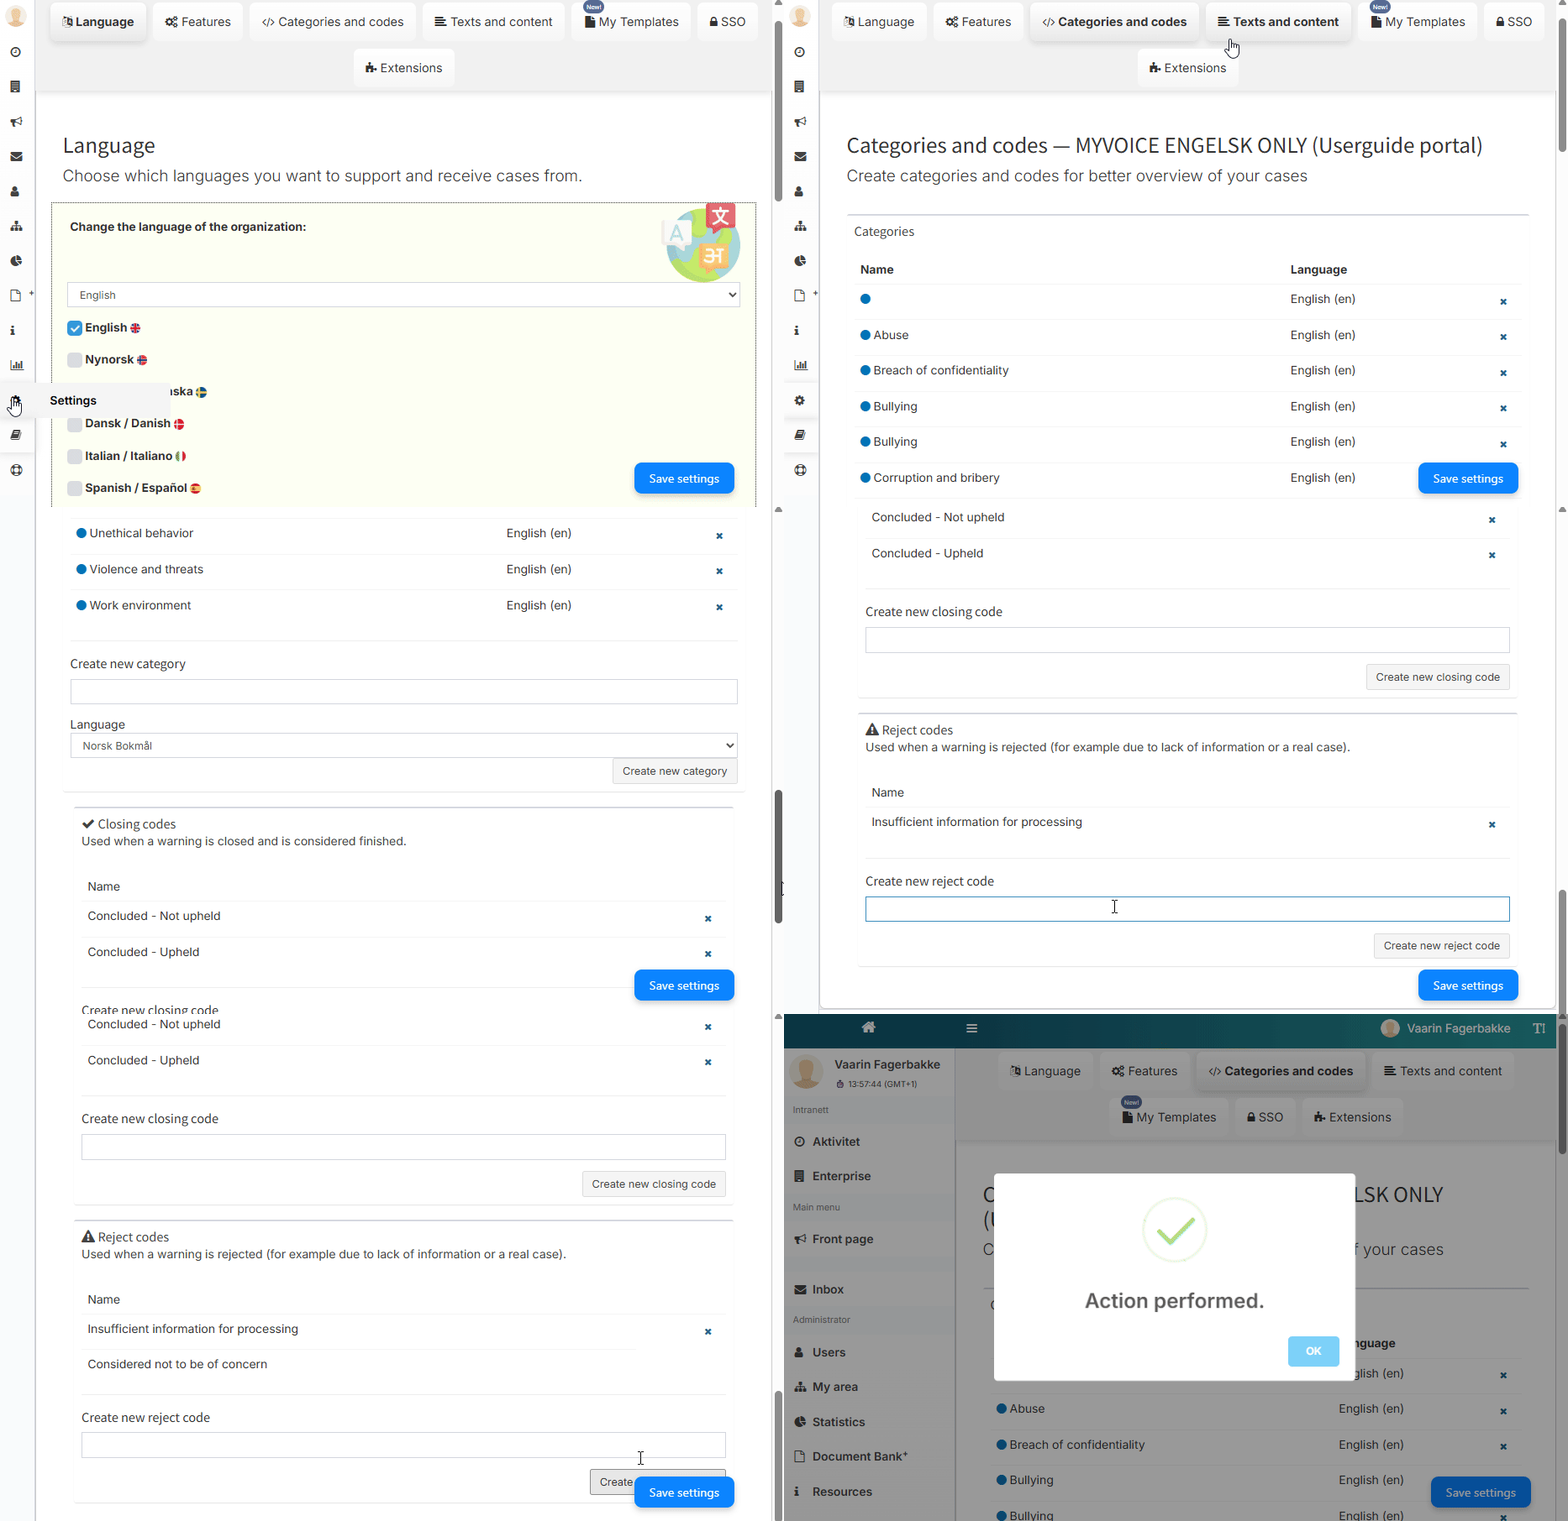
How to add a rejection code:
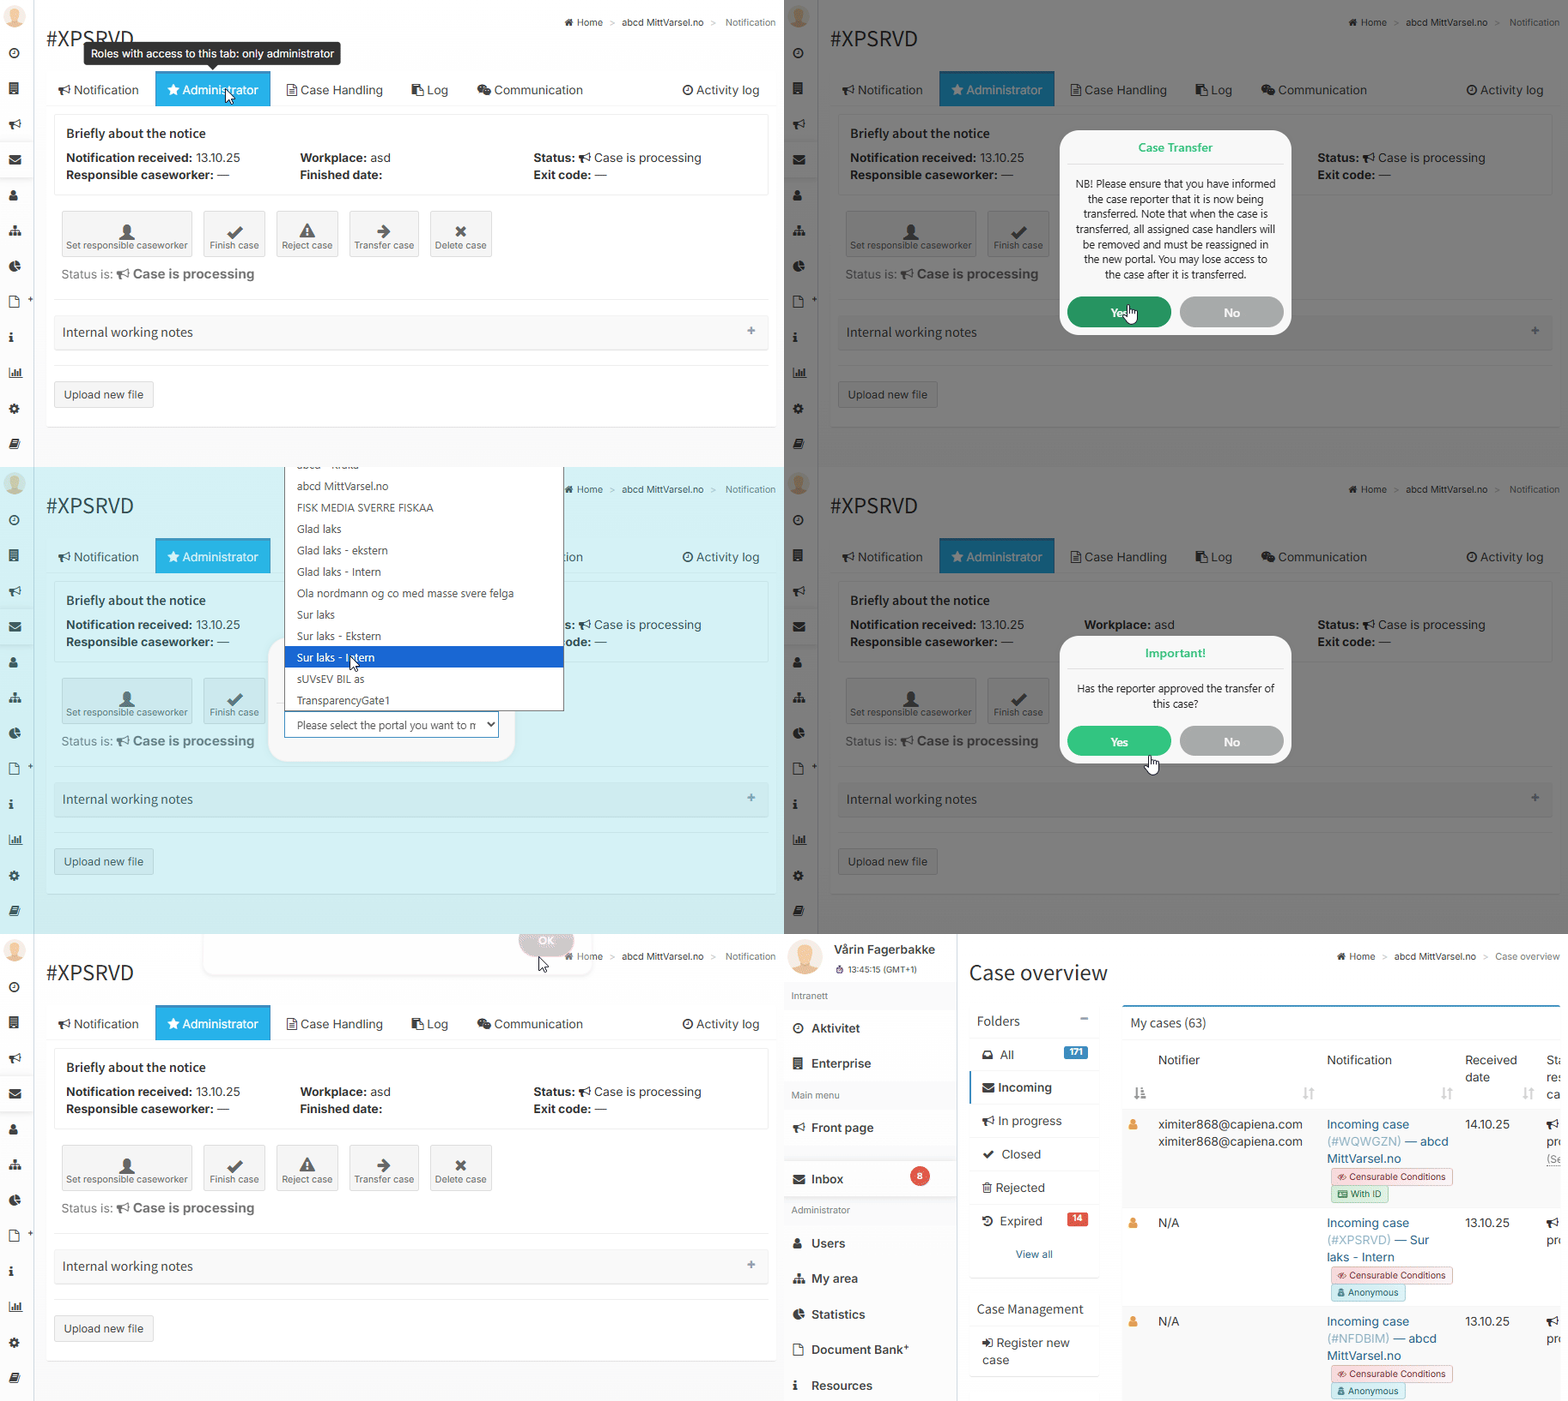
3.2.5 Move case
By clicking “Transfer case,” you can send it to the correct portal or department. Once you select the desired portal and confirm, the case will appear in the chosen portal.
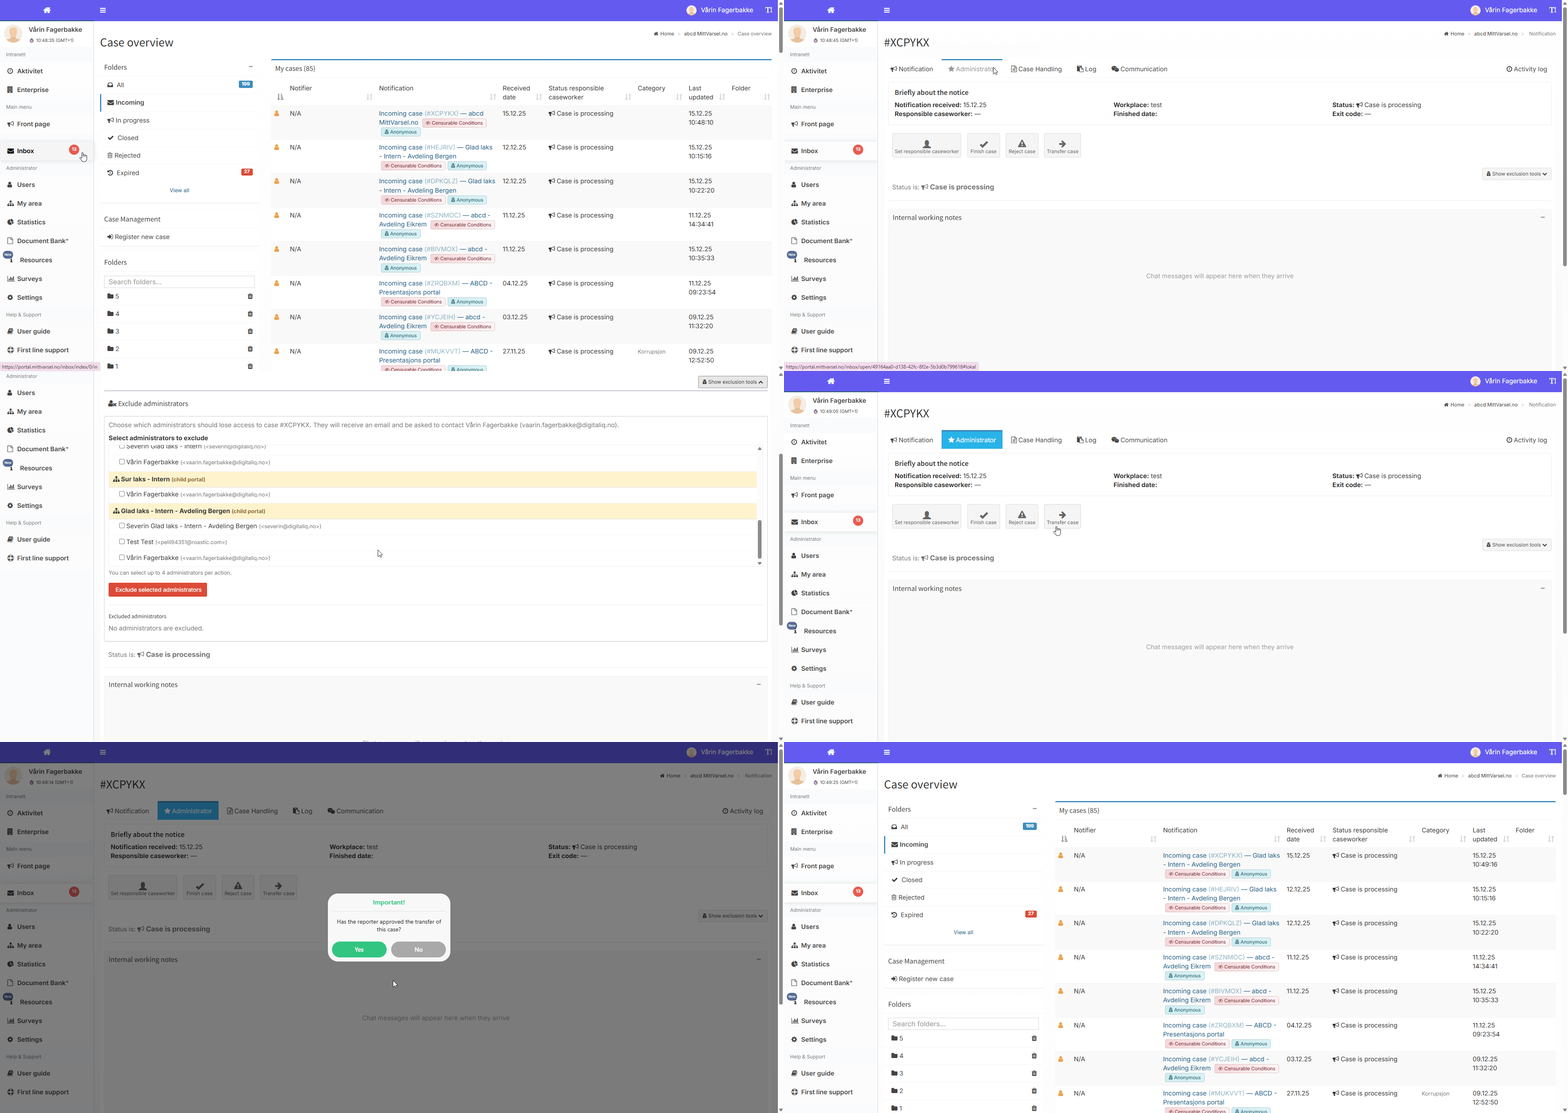
3.2.6 Excluding Administrators Before Transferring Cases
The system allows administrators to be excluded from sub-portals before a case is transferred there. This ensures that sensitive information is not made accessible to conflicted or unauthorized individuals during the process.
3.2.6.1 How to Use the Function
1. Open the case from the inbox.
2. Navigate to the “Administrator” tab.
3. Click “Show exclusion tools” to open the overview.
4. Review the list of administrators, grouped as follows:
- Current portal (grey background) – Administrators who currently have access to the case.
- Sub-portals (yellow background) – Administrators belonging to subsidiaries or other subordinate portals.
5. Select the administrators you want to exclude (up to four at a time).
6. Click “Exclude selected administrators”. The selected administrators will then lose access to the case.
3.2.6.2 How This Appears in the Receiving Portal
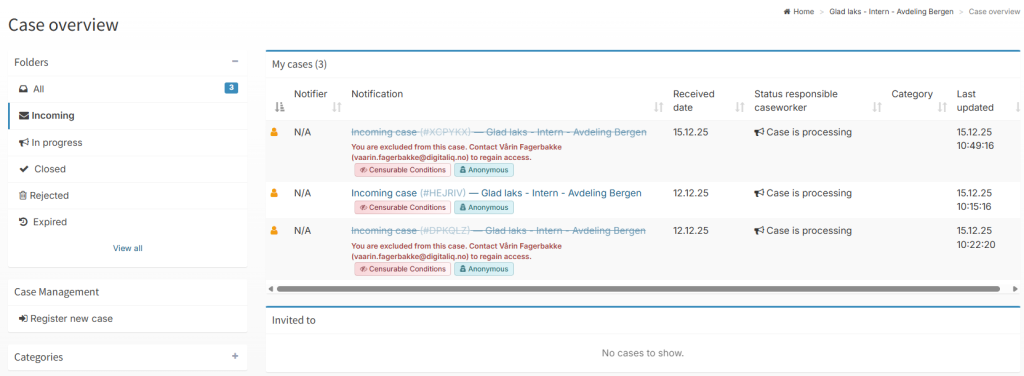
When a case is moved to a portal where one or more administrators are excluded, the case will still be visible in their overviews, but they will not be able to open or view the contents of the case.
3.2.6.3 Re-adding an Excluded Administrator
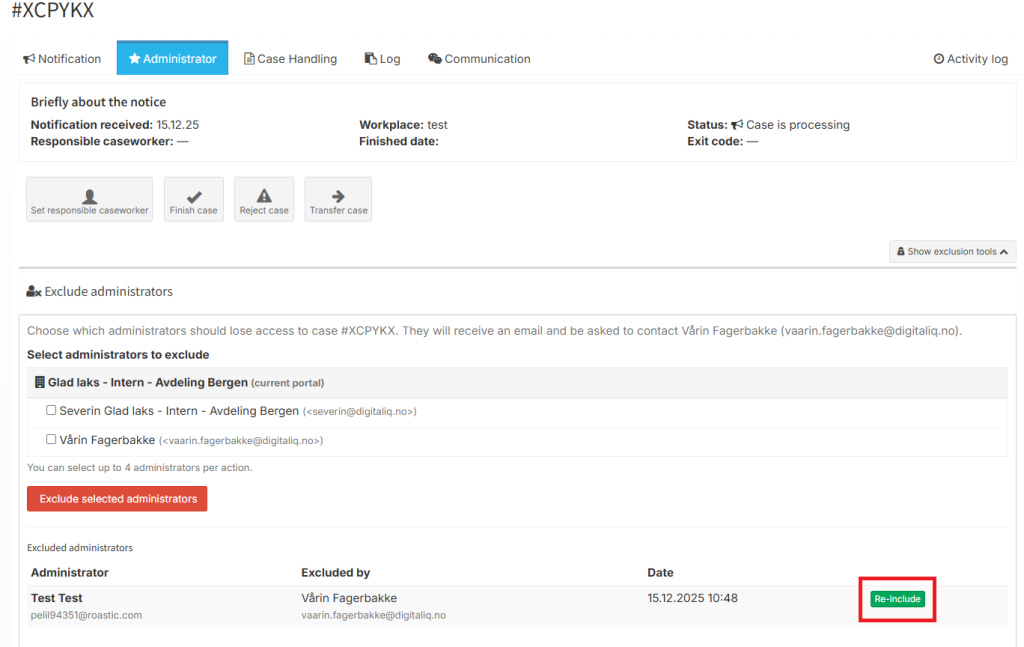
If a person needs to regain access to the case, this can be done in the same location as the exclusion tool.
The “Re-inclide” button is marked in green next to the person who was removed, and allows the administrator to be added back to the case.
3.2.7 Move files between tabs in a case
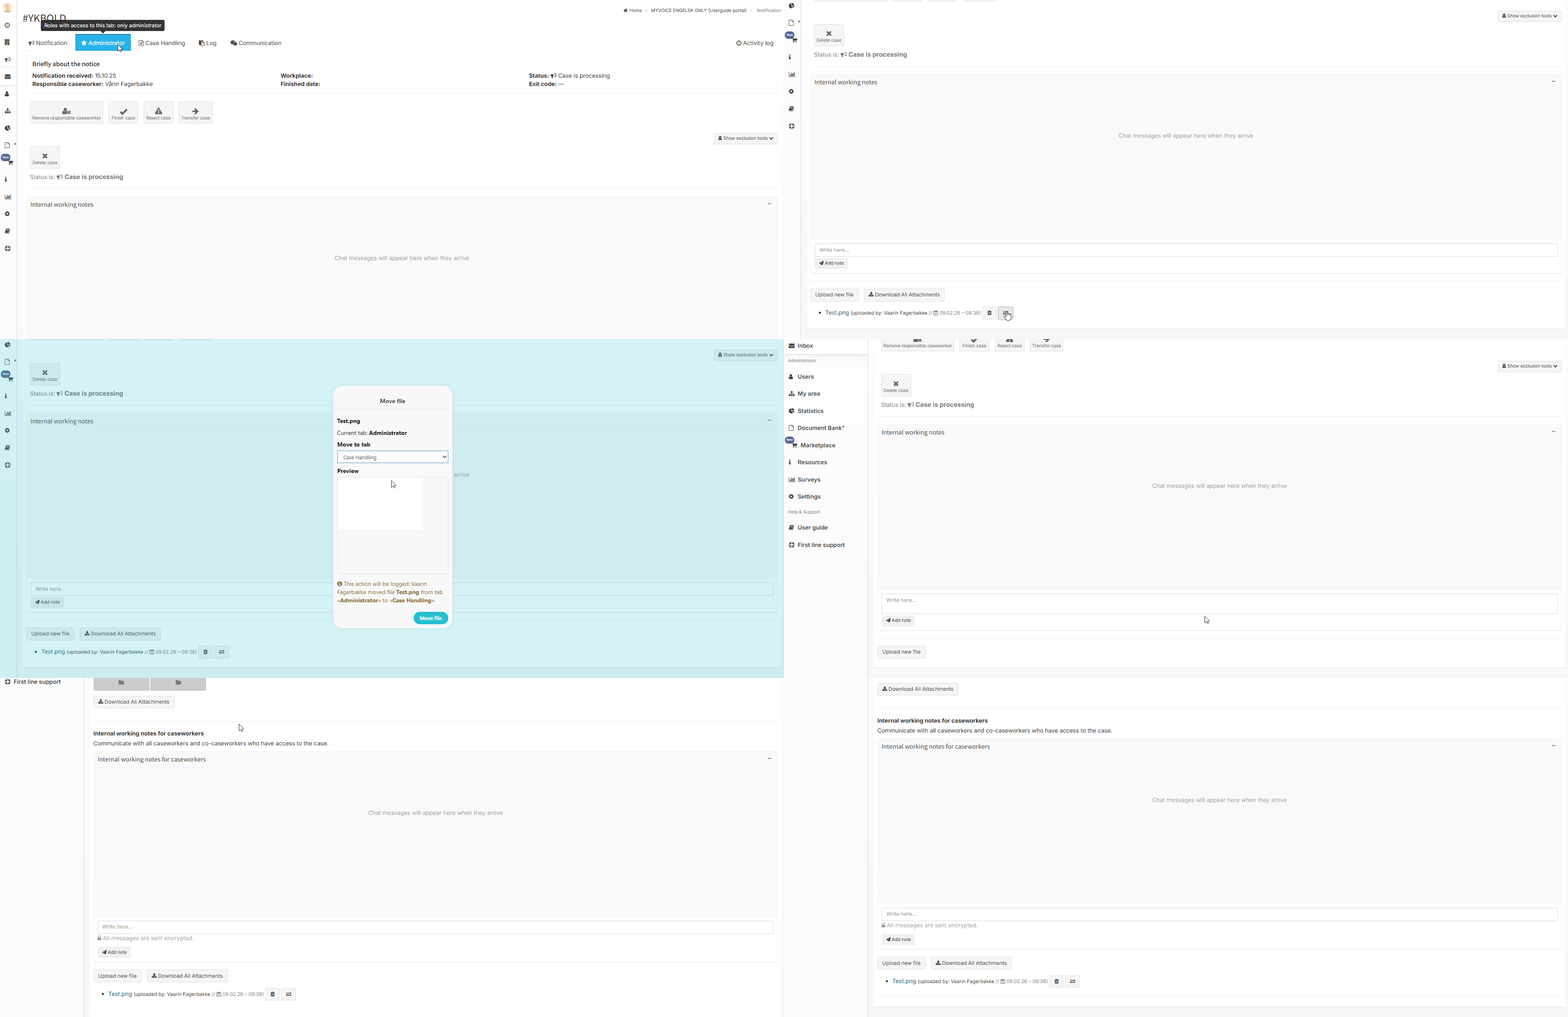
Administrators can move uploaded files between tabs within the same case. This can be used if a file was uploaded to the wrong tab, or if it later belongs in a different part of the case process.
Files can be moved between the following tabs:
- Submission
- Case handling
- Administrator
- Internal communication
- Specific dialogs under Communication
File movement is also supported in dialogs where external parties are invited.
3.2.7.1 How to move a file
- Go to the tab where the file is located.
- Find the relevant file and select Move file.
- Select the desired destination tab in the dialog window.
- Confirm the move.
The file is moved immediately and displayed in the selected tab.
3.2.7.2 Access, logging, and language
- Only administrators (or higher) with access to the case can move files.
- Files can only be moved while you are inside the correct case.
- All file movements are automatically logged in the activity log, including who moved the file, which file was moved, and the source and destination tabs.
- The texts in the move dialog and activity log are available in the following languages: Bokmål, Nynorsk, English, Swedish, Danish, Finnish, German, and Sami.
3.3 Case management
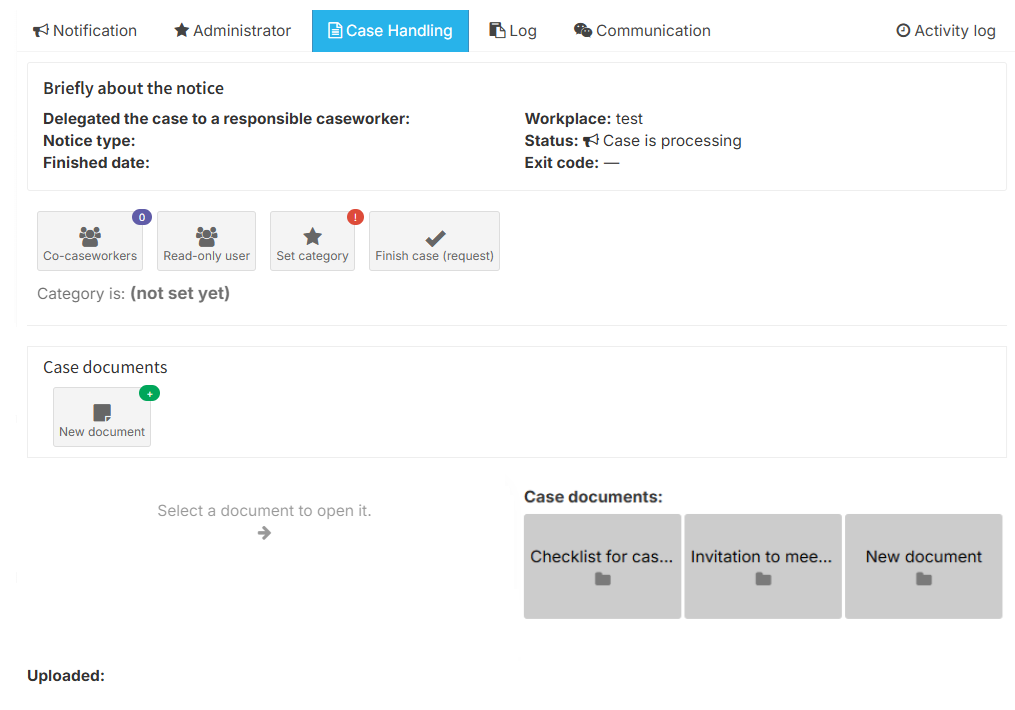
In the case handling tab you can:
- Invite co-case handlers
- Invite read-only users
- Assign a category to the case
- Move the case into a folder
- Add to folder (if activated)
- Close the case
3.3.1 Invite co-case handlers
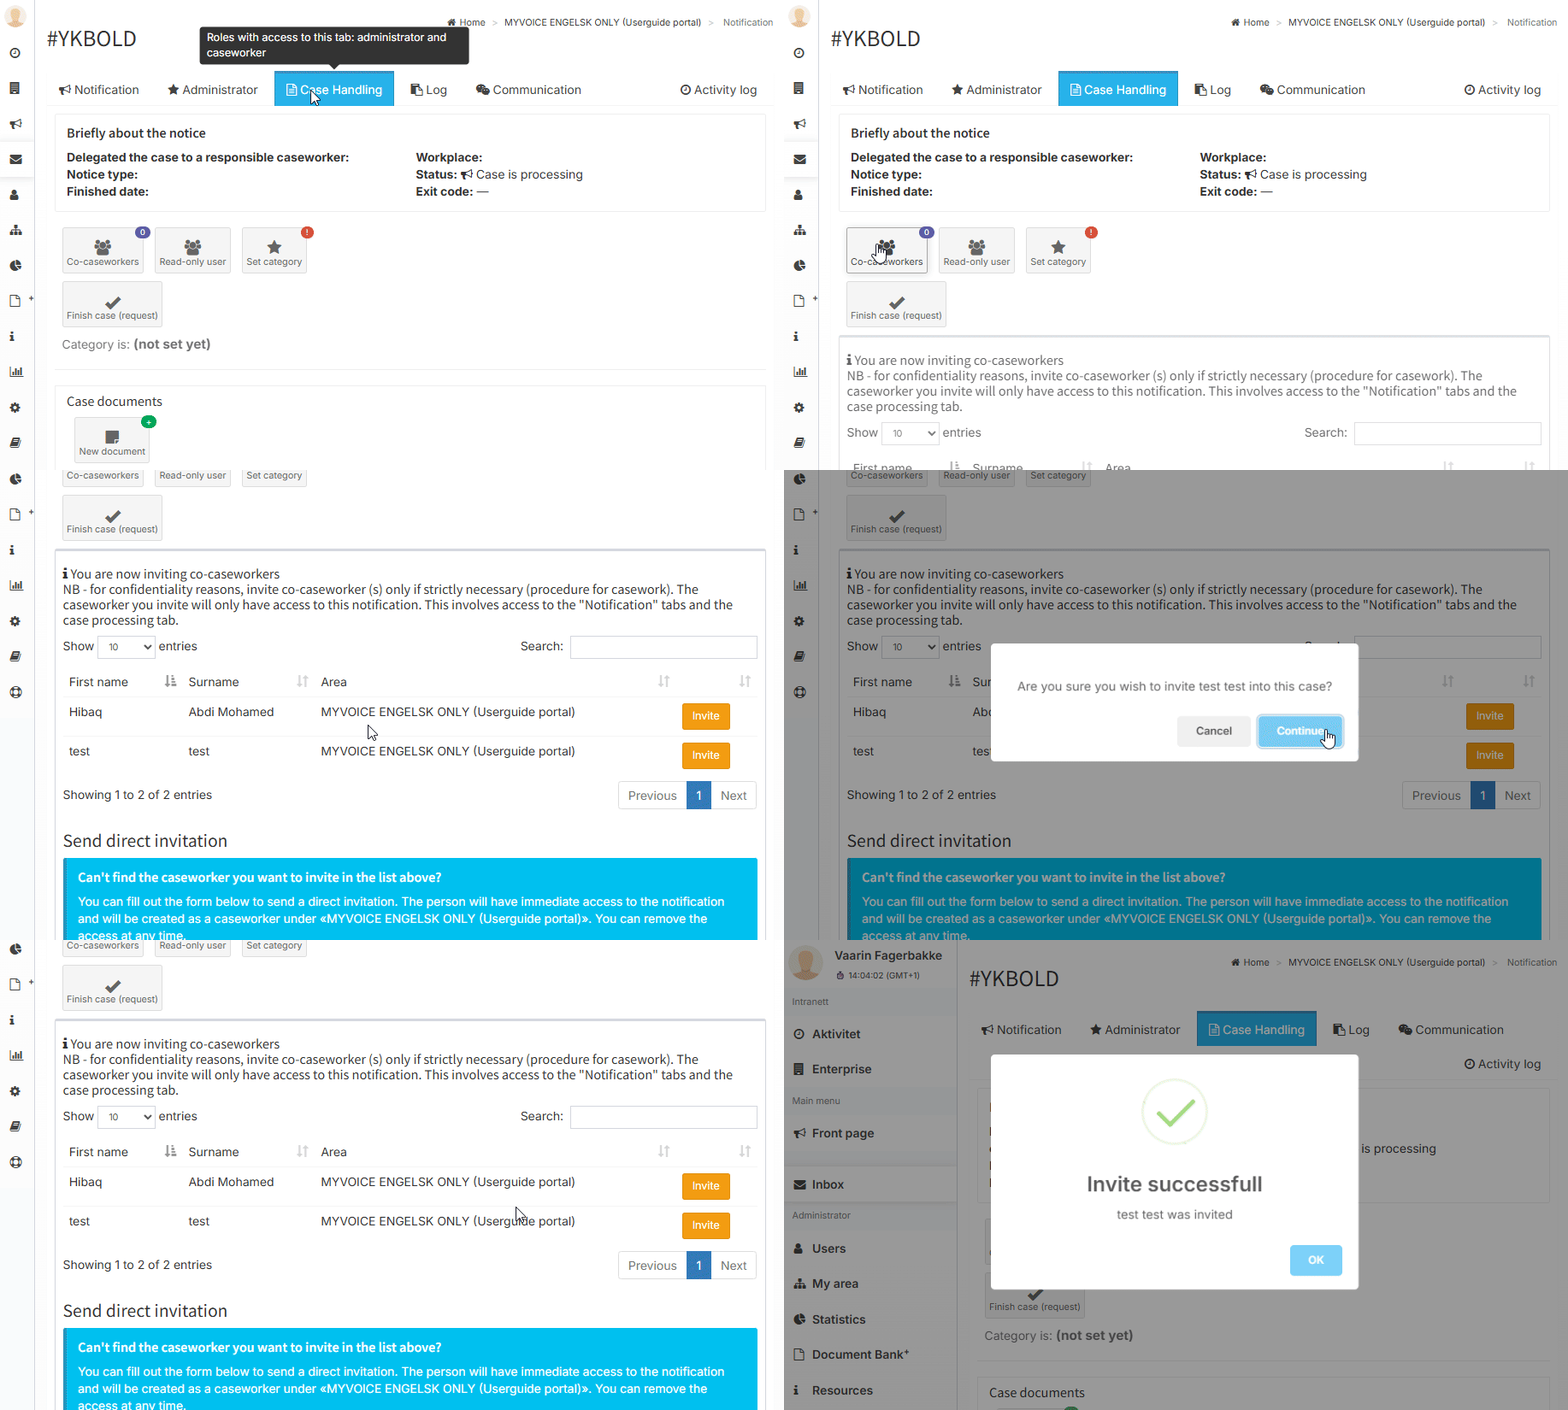
To invite a co-case handler, click “Co-caseworkers” and select the relevant person from the list.
3.3.2 Can’t find the case handler you want to invite?
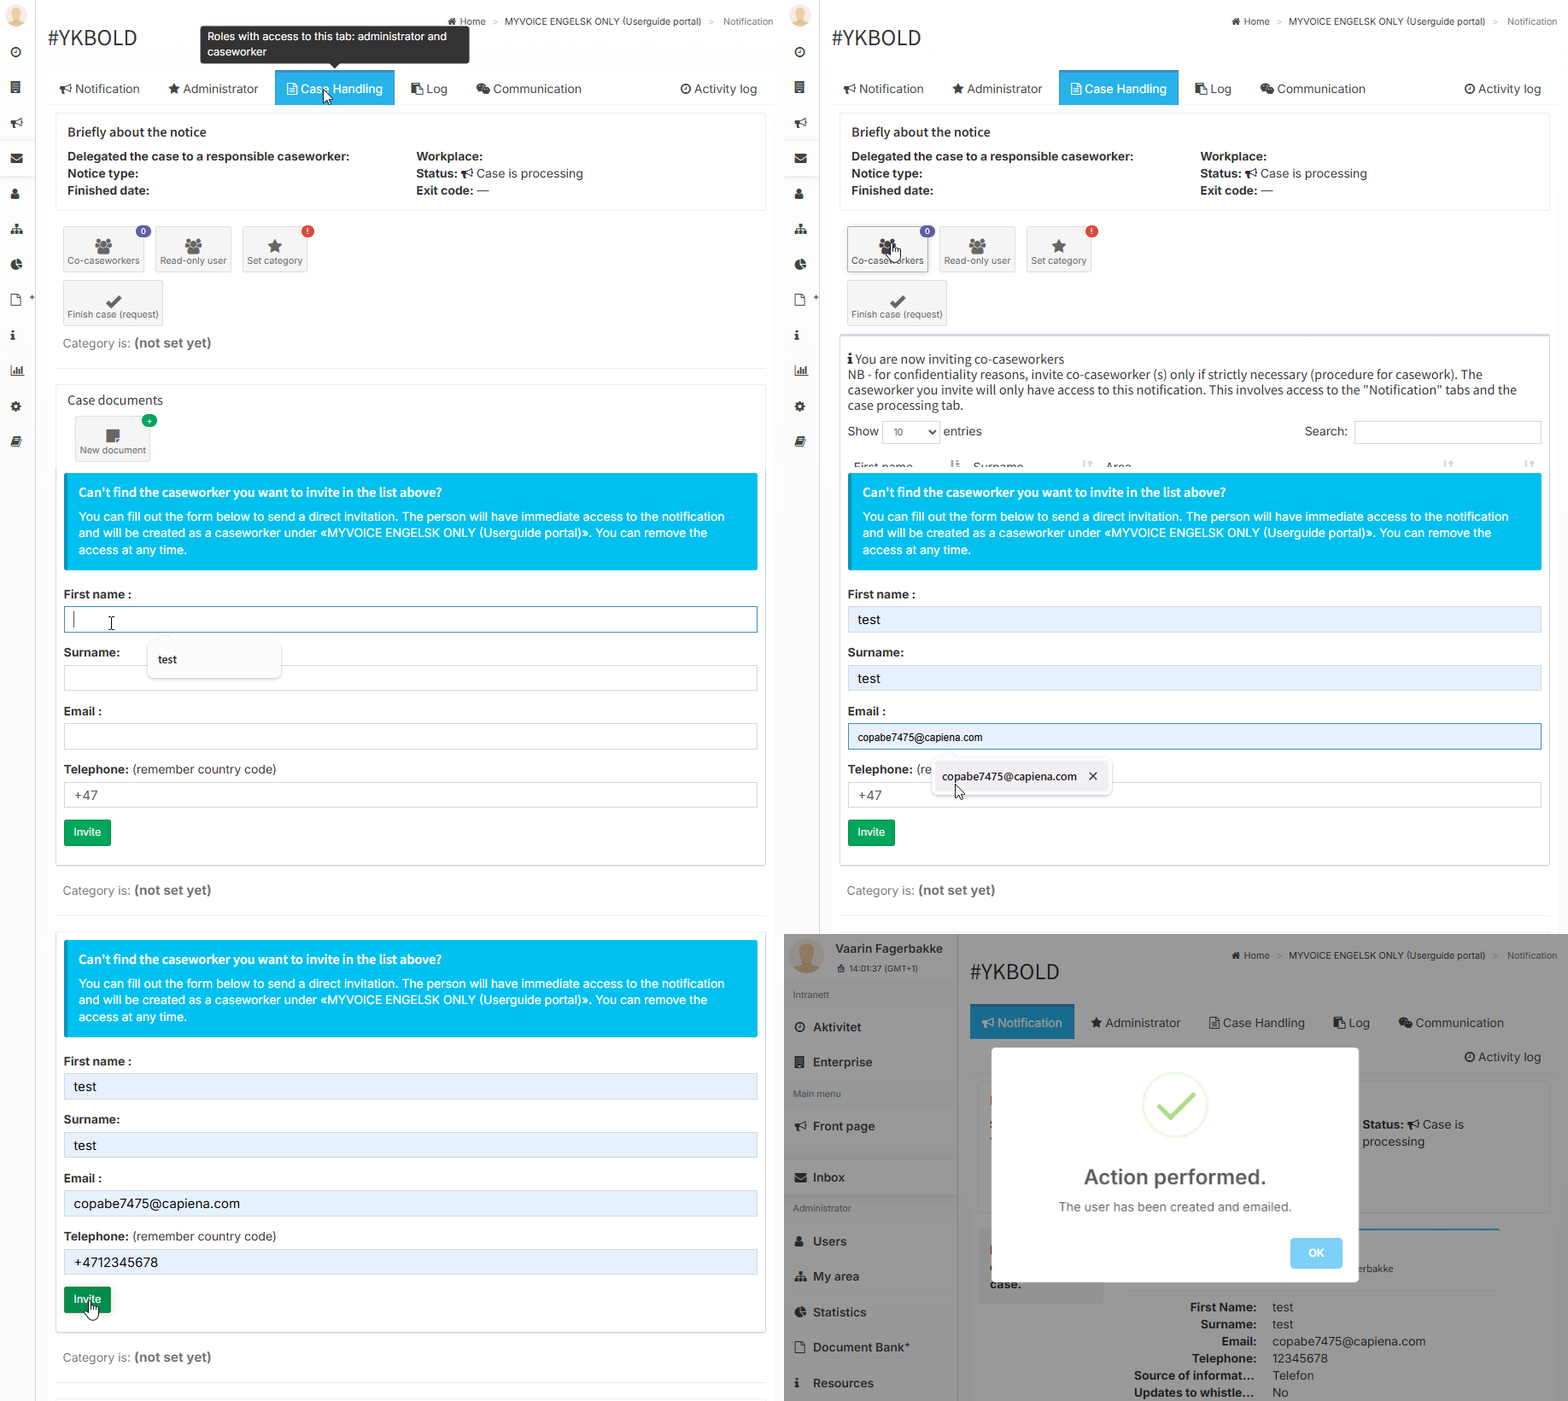
If the desired person is not listed, send a direct invitation. They will gain access to the case and be created as a case handler in the system. You can remove access anytime by clicking “Remove from case.”
3.3.3 Select category for the case
To assign a category, click the “Set category” button.
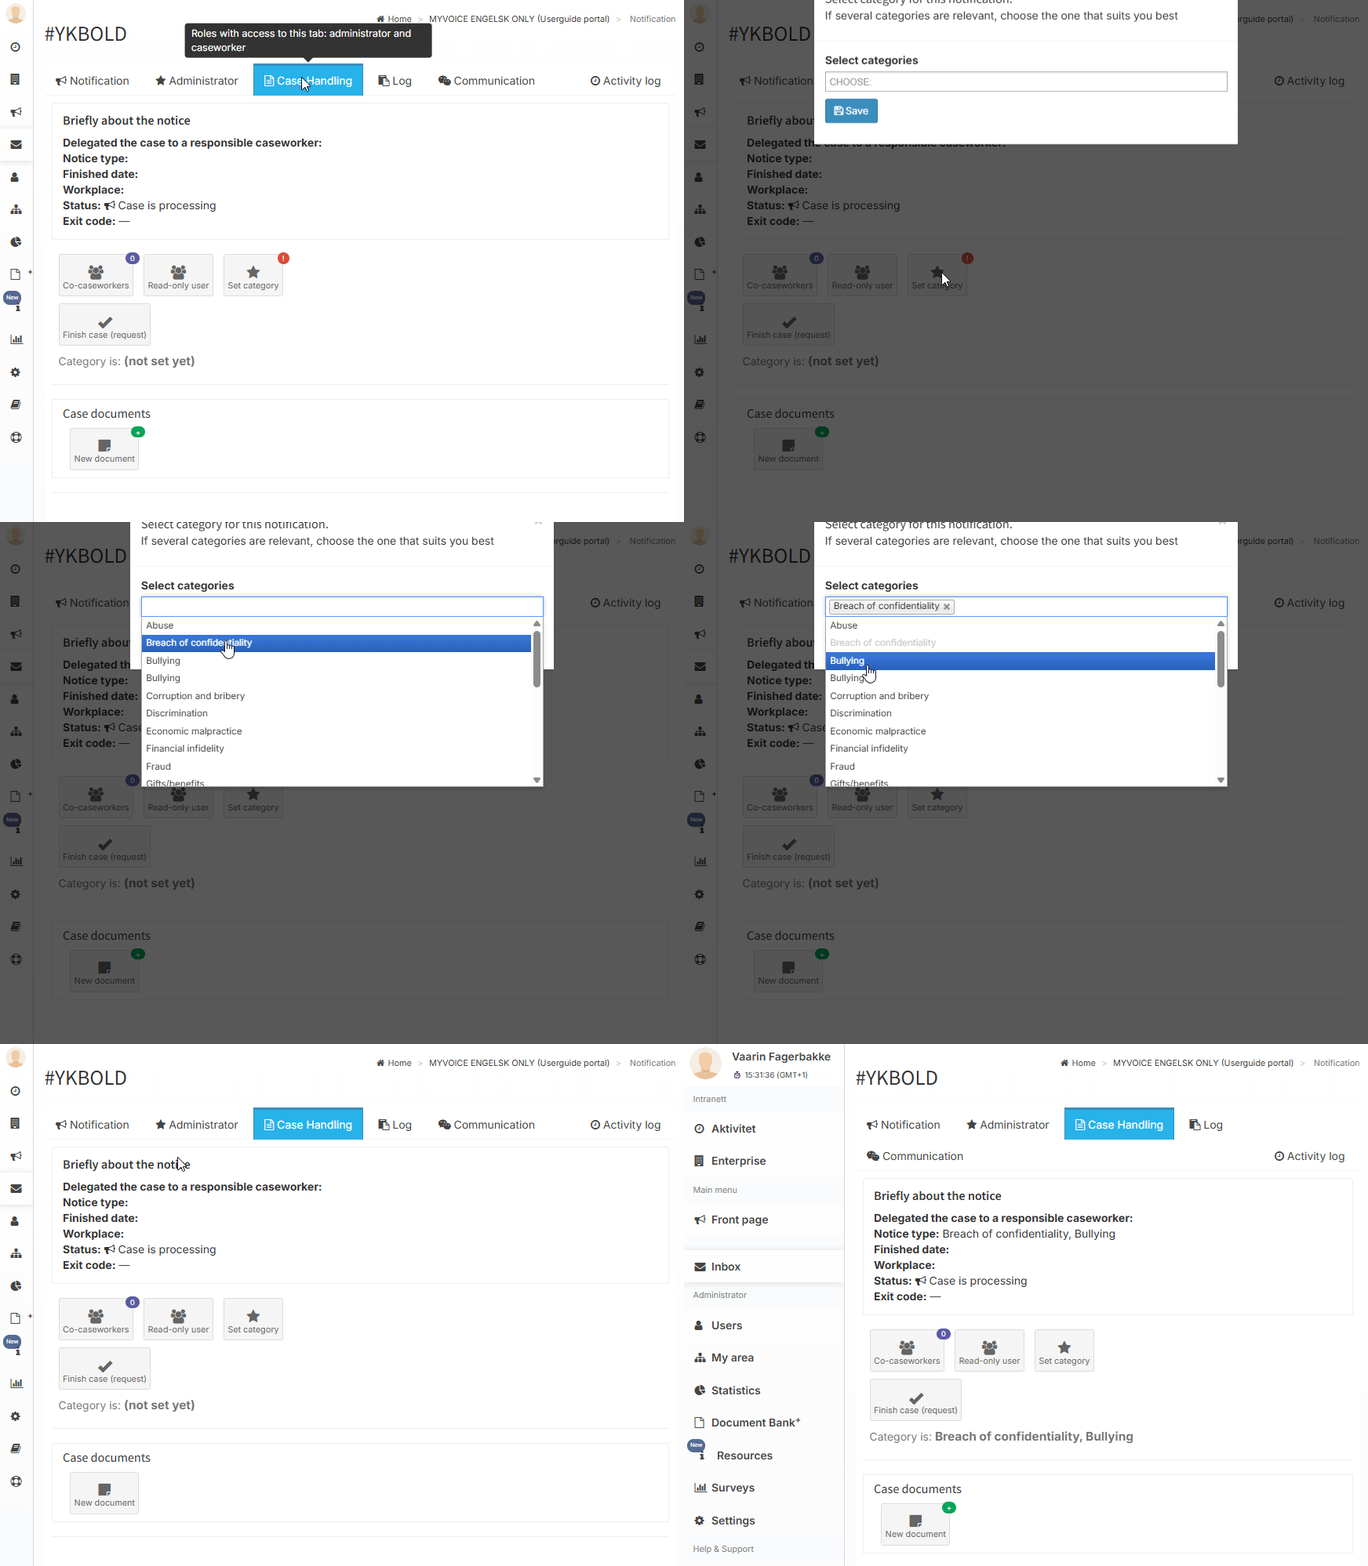
A dropdown menu will appear, allowing you to select one or more relevant categories. If multiple categories apply, you may select all that are relevant to the report.
If none of the categories are suitable, select “Other” and provide a short description of the subject of the report in the comment field.
If you wish to remove selected categories, choose the bottom option in the list, “(None)”.
3.4 Create document (Case document)
You can create documents to use in case handling.
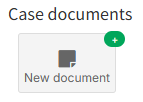
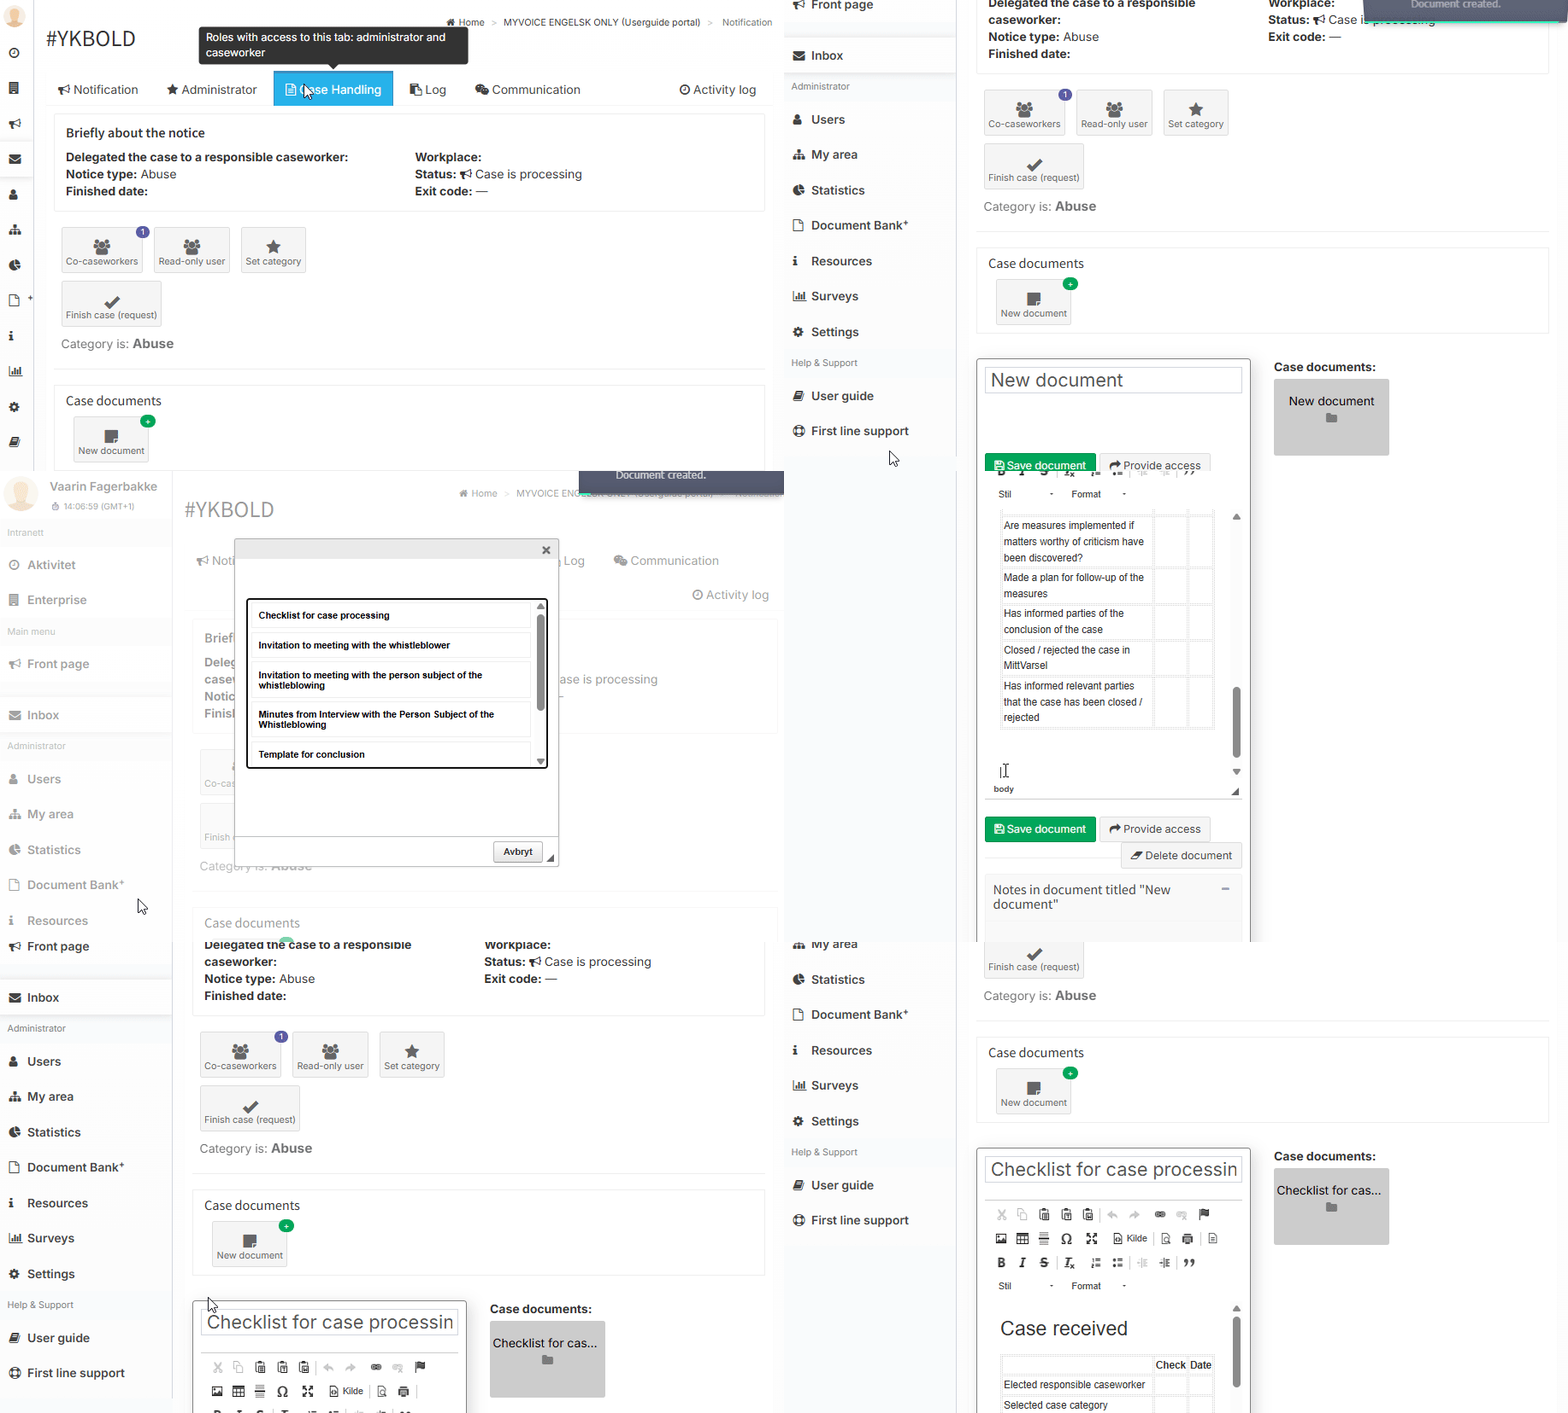
By clicking “New document,” you can choose from pre-filled templates or create a new blank document.
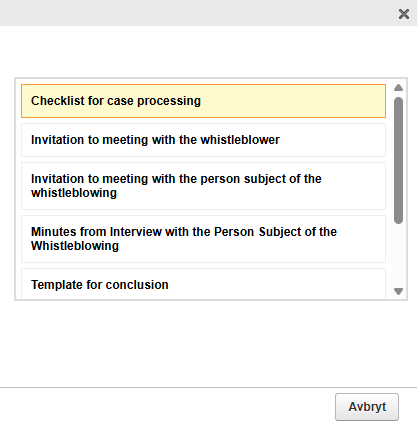
The template “Checklist for case processing” is shown below as an example:
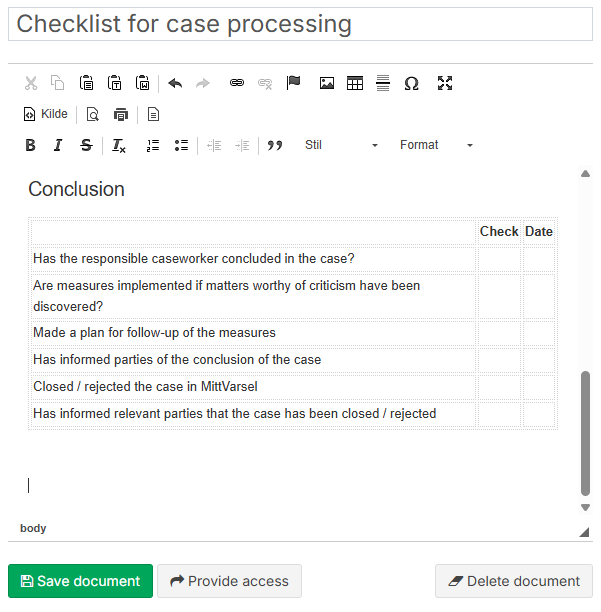
After completing the document, click “Save document”. It becomes visible under “Case documents.” Documents are accessible to co-case handlers, administrators, and any invited read-only users.

You can also upload documents. At the bottom of the page, click “Upload new file.” Uploaded files appear under “Uploaded”.
How to create a new case document:
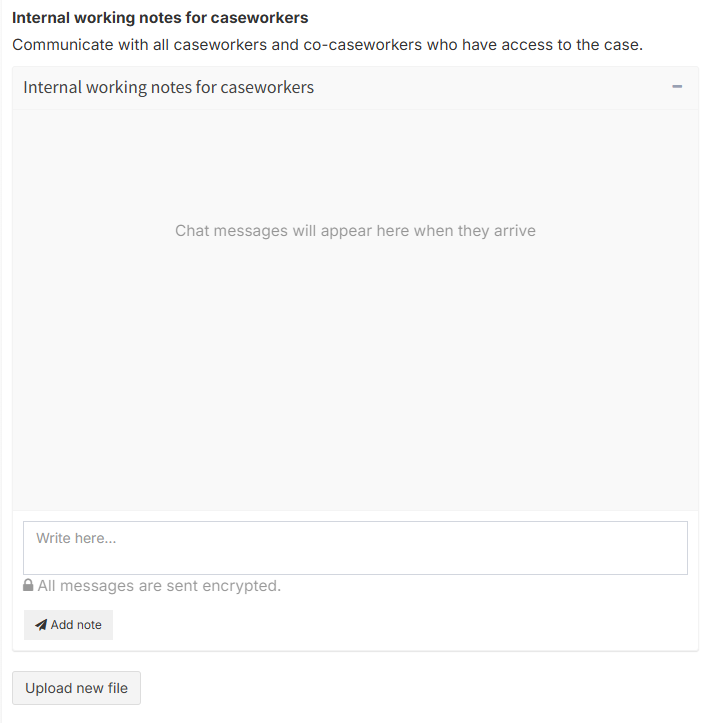
3.5 Communication with co-case handler
In the case handling tab, you can communicate with co-caseworkers and administrators.
3.6 Add to folder
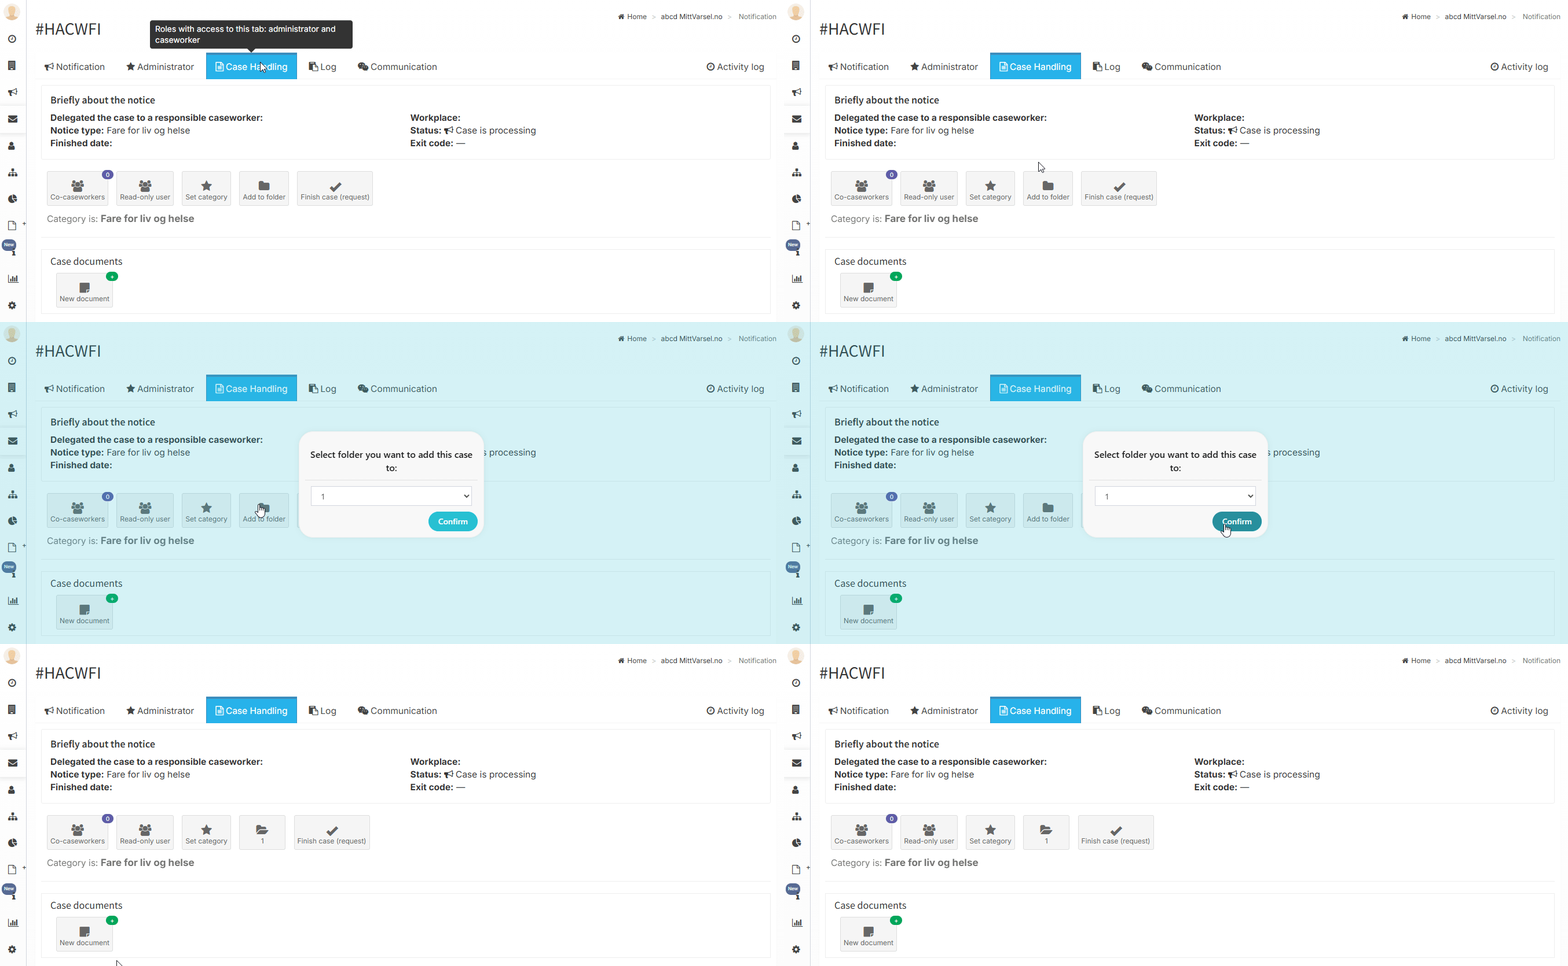
The folder function is a feature that can be added to the portal and helps you organize notifications in a clear and structured way. With the folder function, you can sort notifications into different categories, making it easier to keep track of your cases.
You can create and customize your own categories based on your needs. The folder function helps improve structure in the portal and makes it easier to work efficiently with different cases.
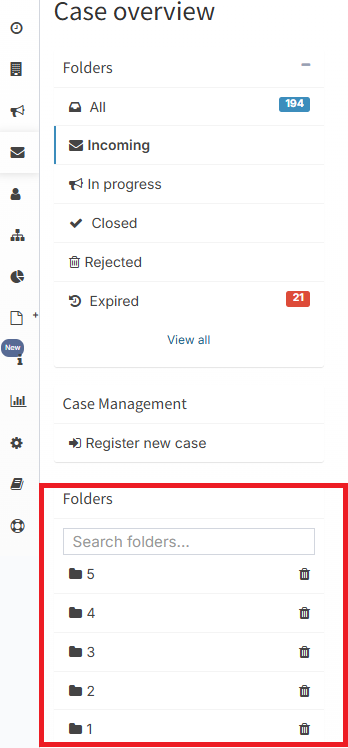
3.6.1 Folder Search Function in the Portal
The portal includes a feature that makes it easier to navigate when you have many folders.
When you have more than five folders in your inbox, a search bar automatically appears above the folder list.
As you type into the search bar, the folders are instantly filtered, without requiring a page reload.
The search is case-insensitive and finds any folder that contains the text you enter.
This makes it faster and more efficient to locate the correct folder when working with a large number of items.
3.7 Finish case (request)
As an administrator, you can close the case yourself without sending a request, since it is the administrator who is responsible for approving it. However, as an administrator, you also have access to close the case under the Case Handeling tab, but in that case, a request to close the case will be sent.
Therefore, if you need to close a case, you should instead go to the Administrator tab and close the case directly there.
3.8 Log
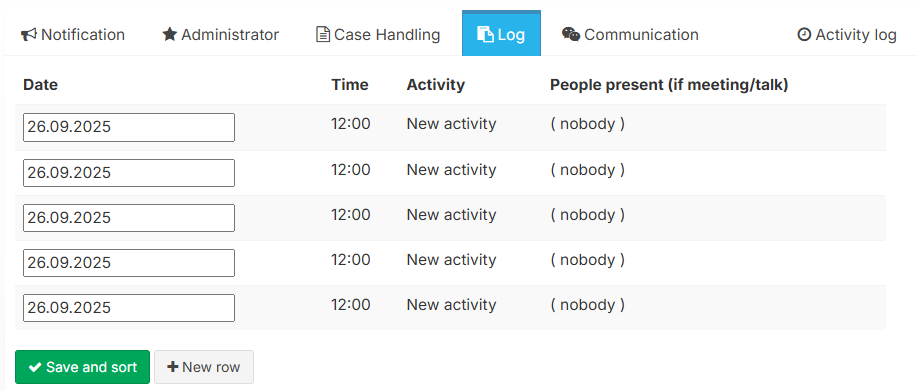
In the log function you can record activities during case handling. Entries are date-ordered to provide an overview of the process. To register a new activity, click “New row,” select the event date, enter the activity details, and click “Save and sort”.
3.9 Communication
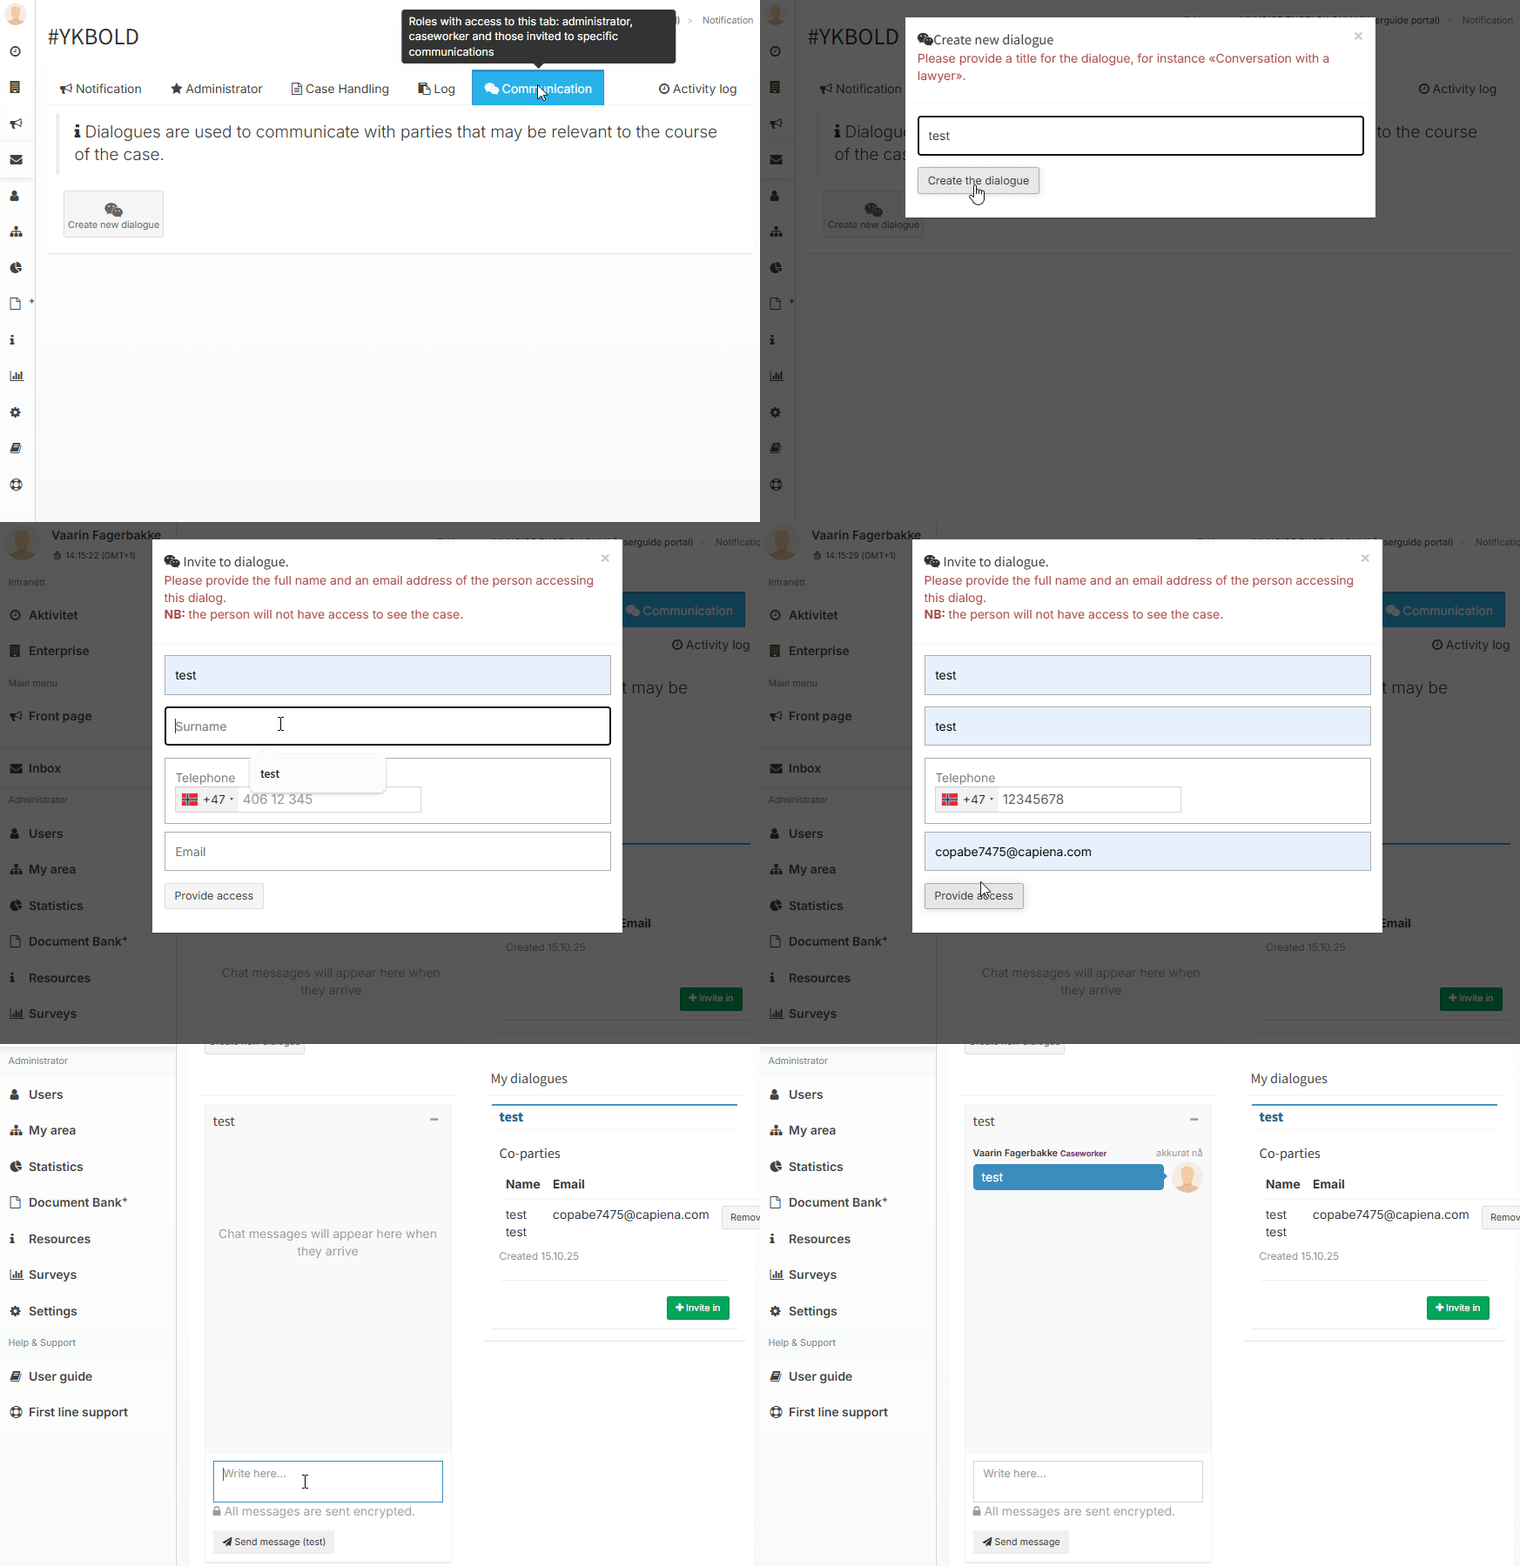
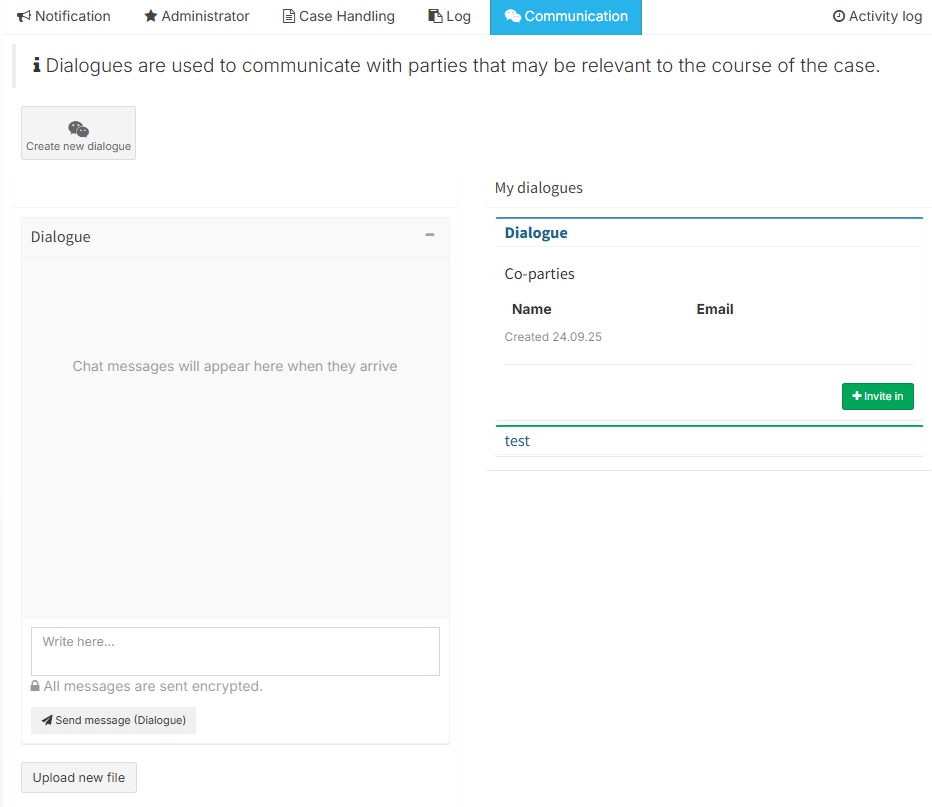
In this tab, you can communicate with relevant parties for the case.
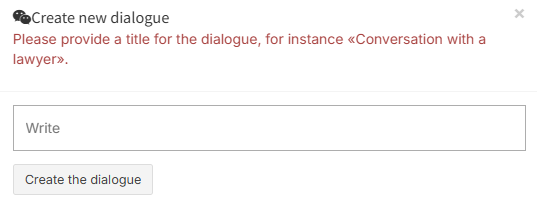
Click “Create new dialogue,” enter a title for the dialogue.
The dialogue is saved on the right under “My dialogues.”
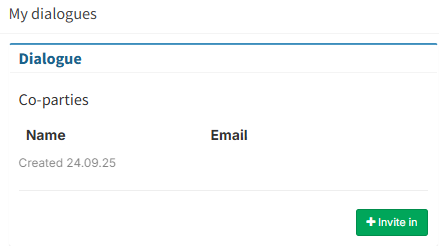
To send an invitation to a new user, click “Invite in”. Fill in the contact info for the person you wish to invite and click “Provide access.”
3.9.1 Renaming Dialogues
When creating a new conversation under the Communication tab, you can assign a name to the conversation. This helps you distinguish between multiple dialogues and maintain a clear overview.
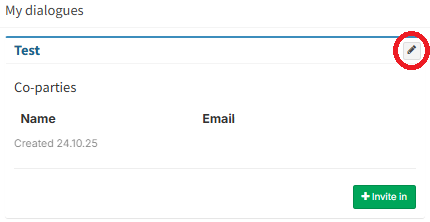
If you wish to change the name of an existing conversation, simply click the pencil icon . This allows you to edit and update the conversation name as needed.
4.0 Activity log
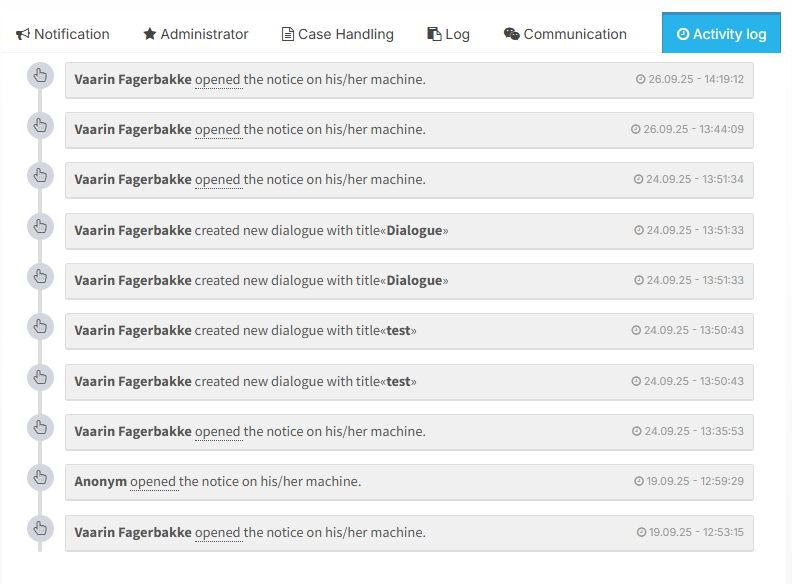
The activity log records all actions within the case. It provides an overview of who accessed the case and what actions were made.
5.0 Register new case
If you become aware of a whistle-blowing case, you can register it in the portal on the whistle-blower’s behalf. This function is located under “Inbox.”
Click “Register new case” under “Case Management”.

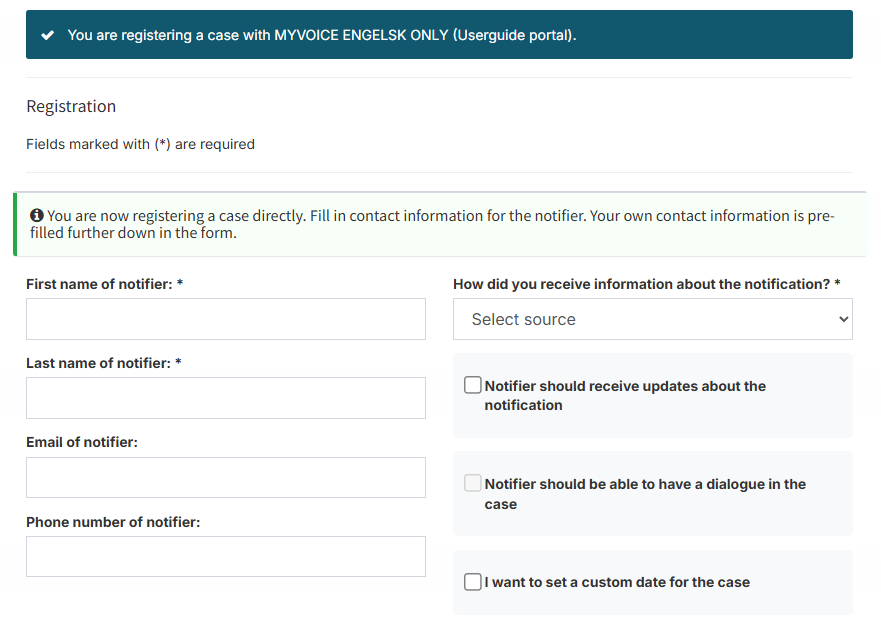
When you click ‘Register new case’, a form opens that you can fill out on behalf of the whistle-blower. You can choose whether the whistle-blower should receive updates and participate in the dialogue. This allows for better communication by using the portal as a shared communication platform.
6.0 Statistics and reports
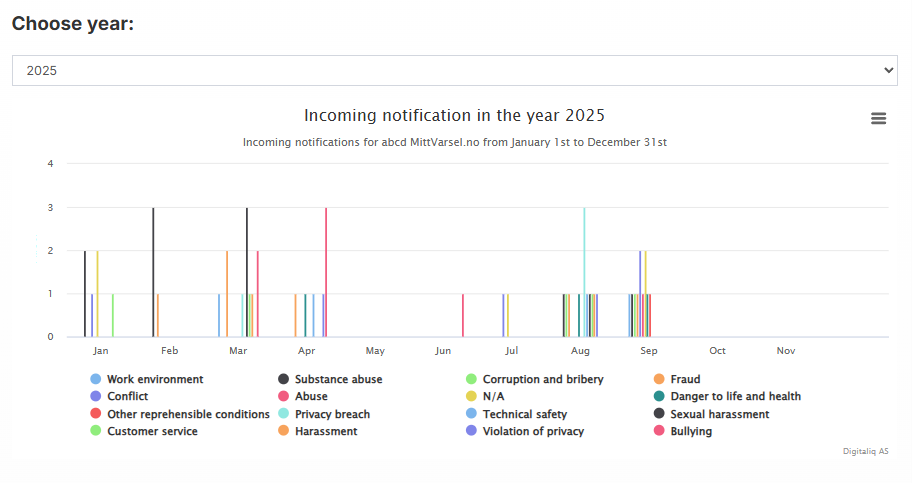
Click “Statistics” in the menu to view statistics on incoming cases in the whistleblowing portal. The current year is selected as the standard, but you can change it by choosing another year from the “Choose year” dropdown.
6.1 Overview
Overview displays a bar graph of incoming cases by category for the selected year.
6.2 Dashboard
The Dashboard provides an overview of incoming reports and their associated categories for a selected period. You can choose the time period you want to view statistics for and then customize the view using Filters.

6.2.1 Filtering statistics
You can refine the statistics by combining the inclusion, matching, and exclusion of categories.
Include categories
Select one or more categories to be included in the statistics.
Match
Choose how the selected categories should be applied:
- All selected (AND) – only reports that contain all selected categories are included
- Any selected (OR) – reports that contain at least one of the selected categories are included
Exclude categories
Select categories to be excluded from the statistics. Reports that contain these categories will be excluded, even if they otherwise meet the criteria above.
This combination gives you full control over which reports are included in the statistics.
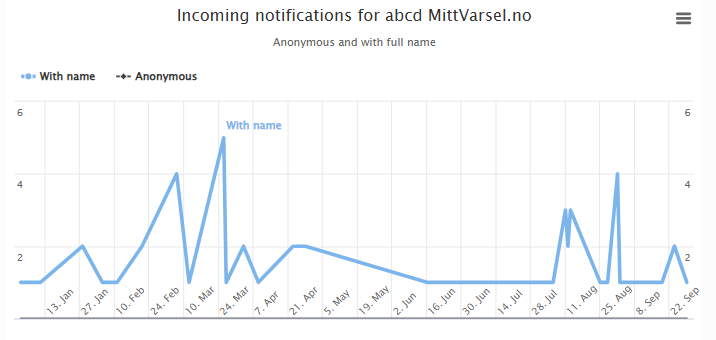
6.3 Incoming cases
The graph shows incoming cases by whether the whistle-blower is anonymous or not.
6.4 Average monthly case
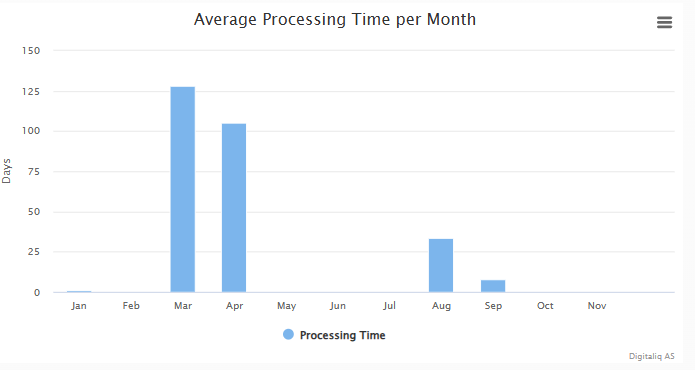
In the section Average case processing time per month, you can see an overview of the case processing time for each month in the selected period.
6.5 Pie chart
The pie chart shows incoming reports distributed by category. The chart displays the distribution for the selected period.
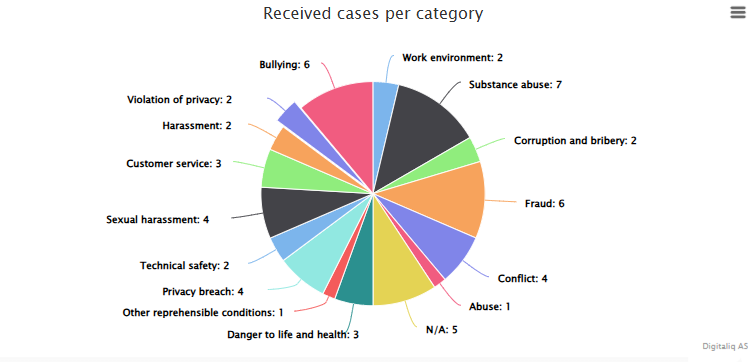
6.6 Notification received per category
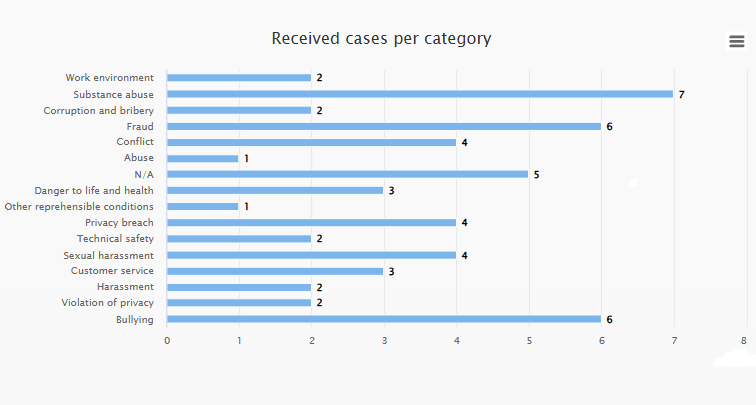
Here you can find statistics on the number of incoming whistleblowing cases belonging to each category.
6.7 Matrix
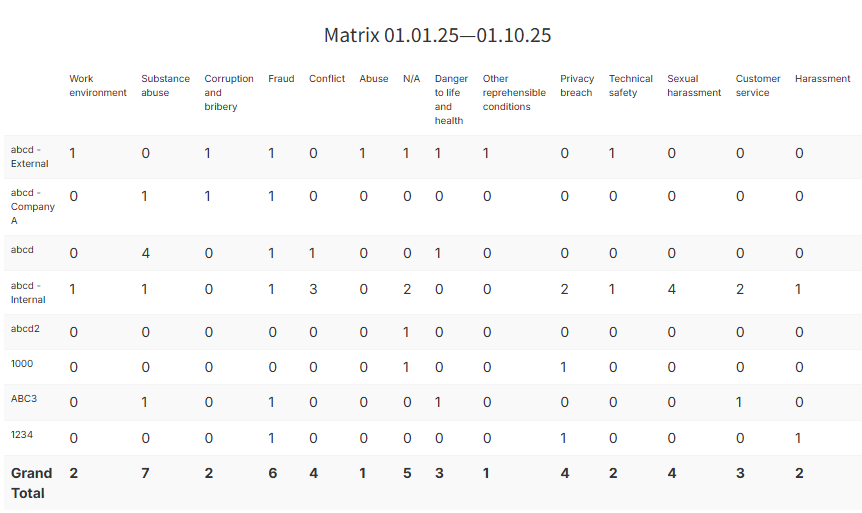
At the bottom of the page, you’ll find a matrix showing an overview of all whistleblowing cases
6.8 Download statistic
You can download the chart as an image, print it, view full-screen, or export via the menu in the upper right.

7.0 Document Bank
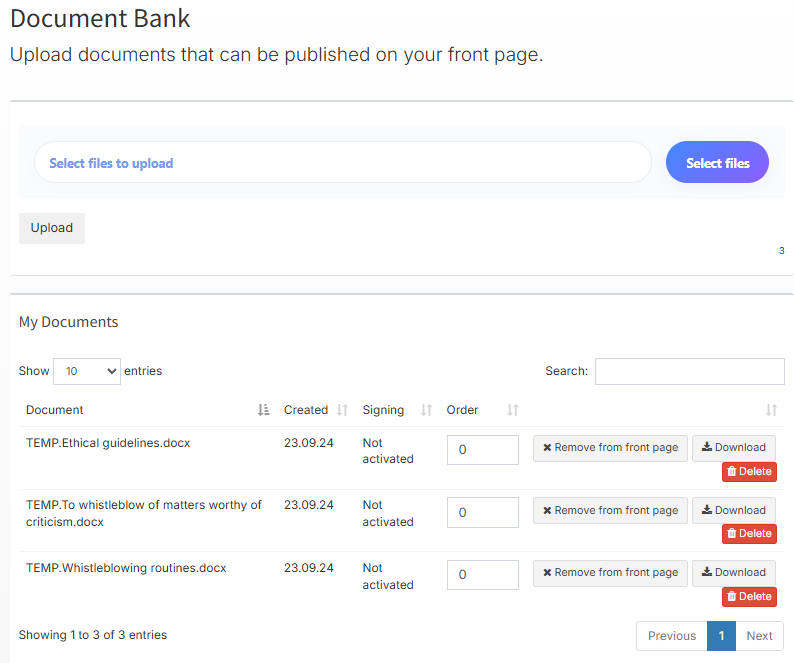
7.1 Upload documents
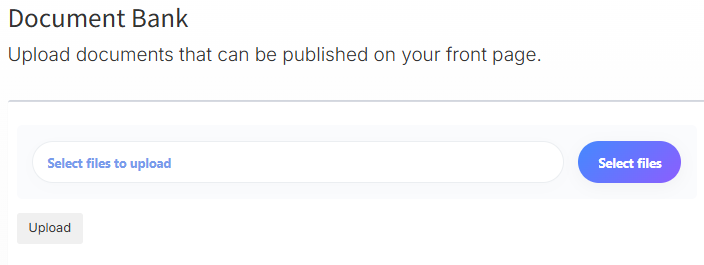
Select a file and click “Upload.”
7.2 My documents

Under “My Documents”, you’ll find a complete overview of your documents. From here, you can also choose to publish them on the front page if you want.
8.0 Resources
Under resources you will find:
- Templates for notification routines and ethical guidelines

9.0 Survey module

9.1 Introduction
The survey module allows administrators and case managers to create and send surveys to gather feedback from users. This can be useful for evaluating the whistleblowing process and ensuring continuous improvement.

9.2 Who can use this feature?
The survey module is available to both administrators and case handlers. Administrators can create and distribute surveys, while case handlers can view results.
9.3 How to create a survey
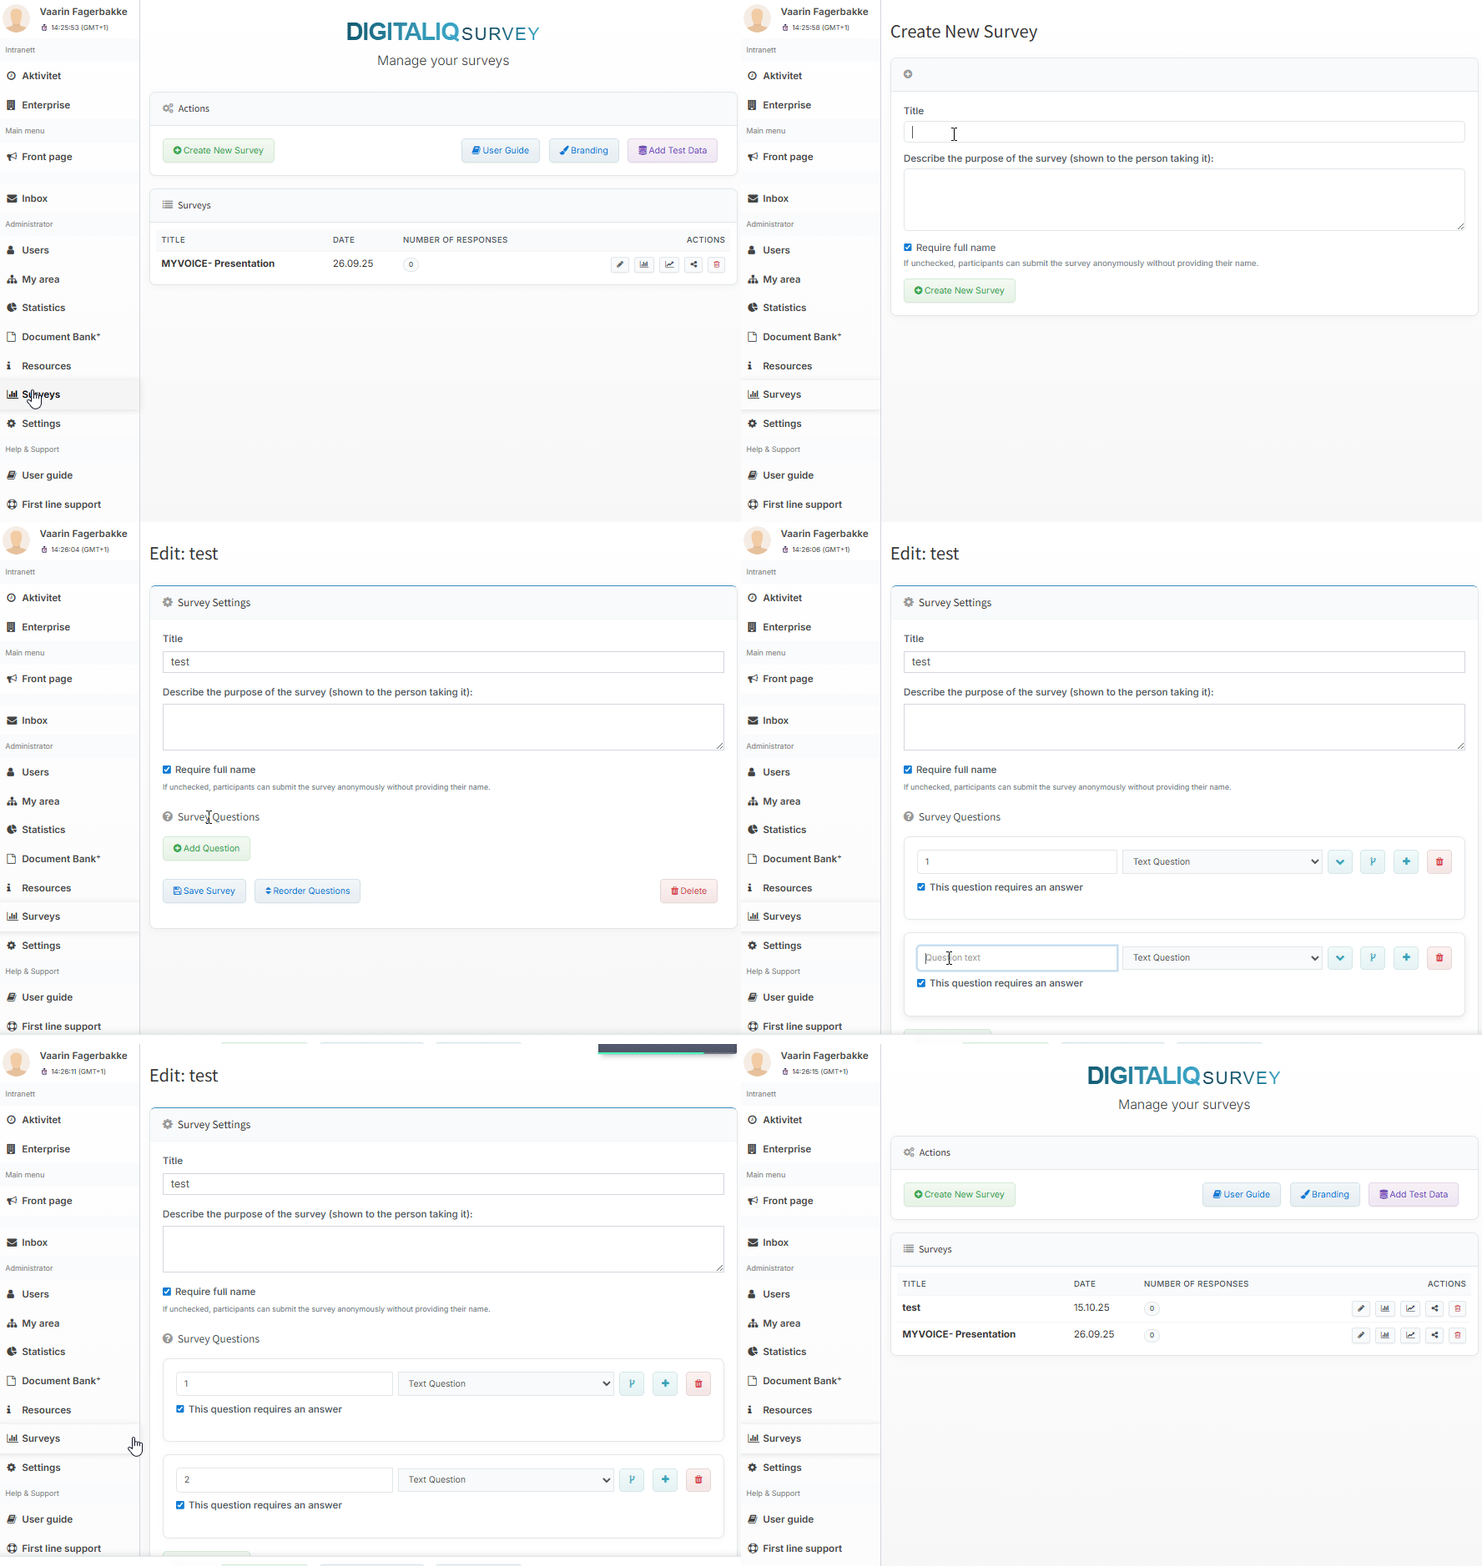
Go to “Surveys” in the menu and click “Create new survey.”

Fil in the …, then click “Create new survey.”
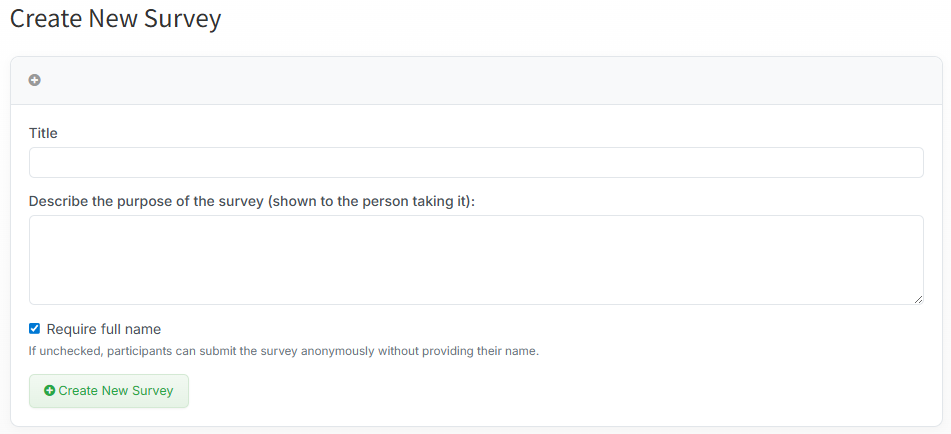
Fill in the questions you want to include in the survey. To insert another question, click ‘Add Question’.

Once you’ve finished creating the survey, click “Save Survey” to save it.
9.4 How to send a survey

After saving the survey, click ‘Share’ to share it.
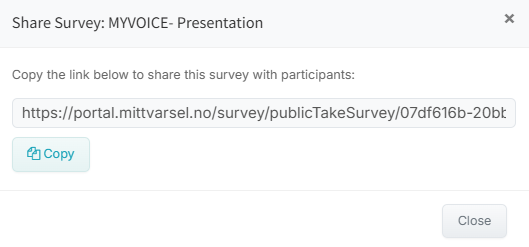
Copy the link and share it with your desired audience.
9.5 How to view survey results

Click “Results” to see the answers.
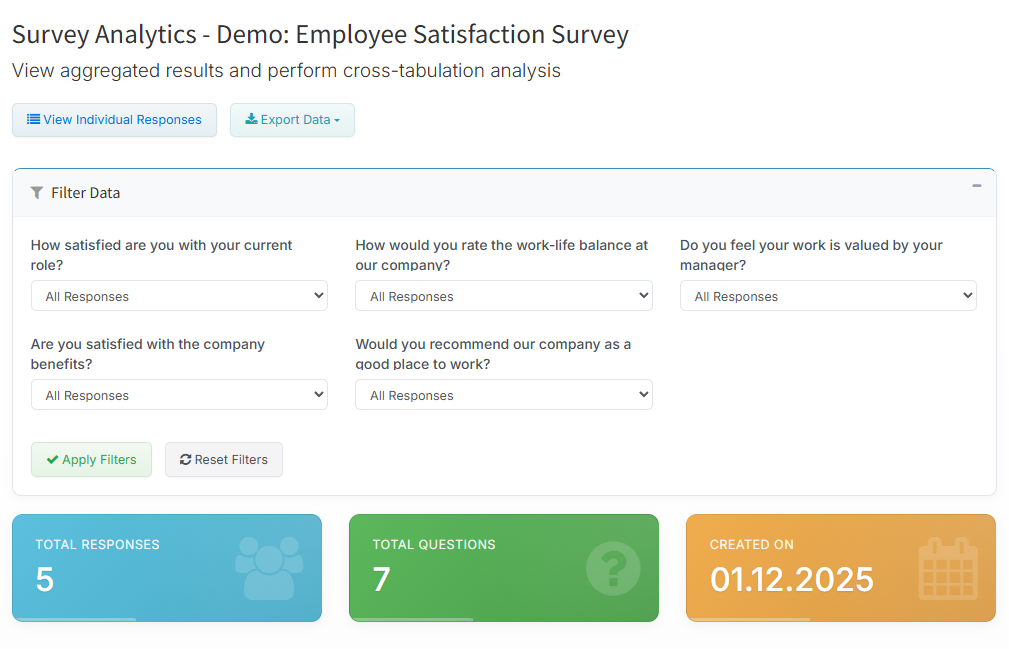
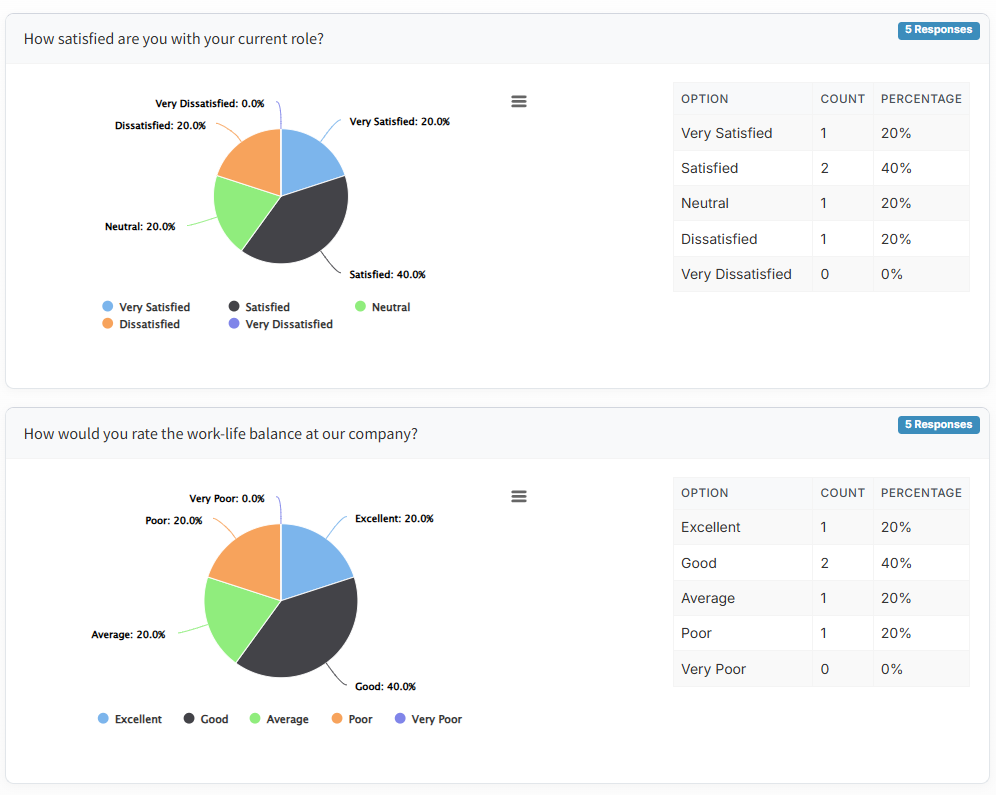
9.6 Analyze Submitted Survey Responses
After participants have completed the survey, you can view an analysis of the responses that have been submitted. This gives you a clearer and more comprehensive understanding of what participants have answered, as well as insights into trends and patterns in the feedback.

9.7 Tips for optimal use of the survey module
- Use the module regularly to gather feedback on the whistle-blowing process
- Ask clear, concise questions to enable useful responses
- Analyze results carefully to identify improvement areas
10.0 Settings
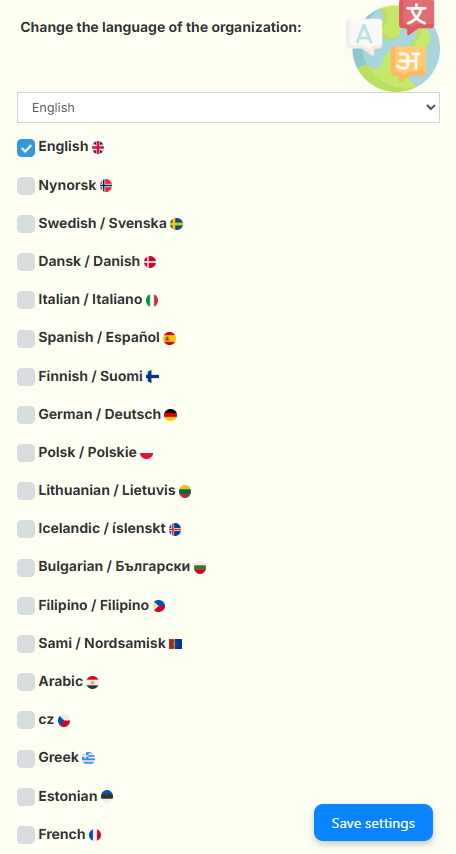
10.1 Language
You can activate the desired language for the portal, allowing you to tailor the whistleblowing portal to users’ needs. This ensures the whistle-blower sees all information in their preferred language.
10.2 Features
Configure your portal here. Upload a logo, select front-page text, create an accordion menu, or change the color layout.
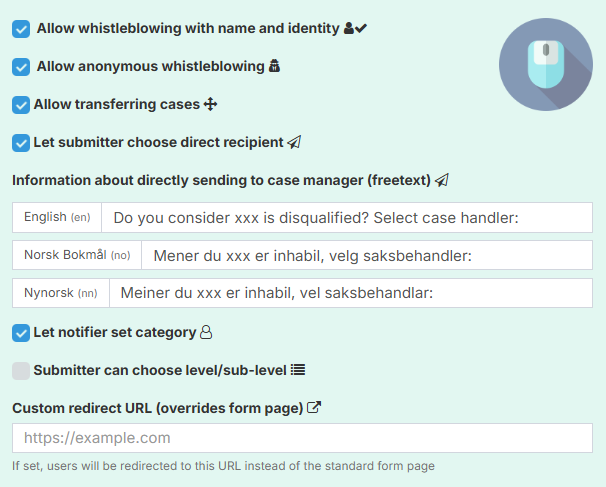
10.2.1 Allow requests with name and identity
Allows the whistle-blower to use the portal to submit a case or information request with their name and identity.
10.2.2 Allow anonymous requests
Allows the whistle-blower to use the portal to submit a case anonymously.
10.2.3 Allow case transfers
If you have multiple sub-portals, the function makes it possible to move cases between the portals.
10.2.4 Allow sender to choose direct recipient
The function allows the whistle-blower to choose to send the report directly to a case handler. This means the case goes straight to the selected case handler without the administrator having access. The whistle-blower can choose from the case handlers registered in the portal.
10.2.4.1 Information about directly sending to case manager
When someone submits a report about questionable conditions in the whistleblowing portal, you can edit the text displayed in the field where the reporter selects the direct recipient.
This feature allows you to adapt the portal to different languages. The text you enter for a specific language will appear in the portal for that language version.

Example:
In the Norwegian version, the field may display:
“Mener du at xxx er inhabil? Velg saksbehandler.”
In the English version, it may display:
“Do you consider xxx disqualified? Select case handler.”
You can customize this text to fit your organization and each language version.
Note that this field only appears in the whistleblowing submission document when the function “Allow sender to choose direct recipient” is enabled.
This is how the notification form would appear if it were submitted via the English version of the form:

10.2.4.2 When the Administrator is the Recipient of a Direct Notification
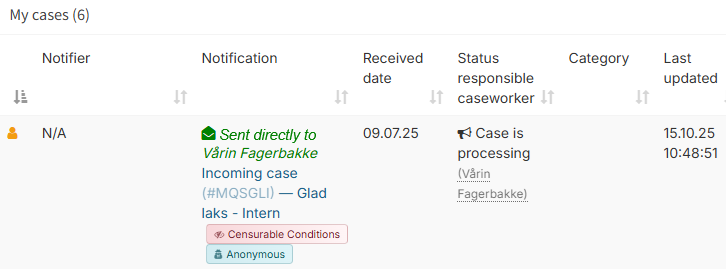
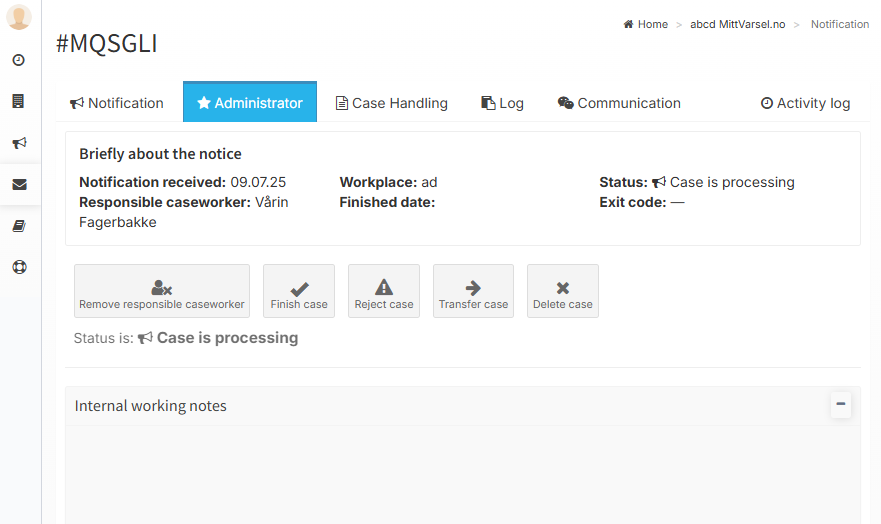
When the feature to send a notification directly to a selected case handler is enabled, the notification will only be sent to the chosen case handler.
If you, as an administrator, are the only case handler assigned to that particular notification case, even if there are multiple case handlers in the portal, you will see the Administrator tab within the notification, even when logged in as a case handler.
This occurs because the notification has been sent directly to you, making you the only user associated with that specific case.
10.2.5 Allow sender to set category
This setting allows the whistle-blower to choose the category of the report. Even when the function is turned on, the case handler can change the category if another is deemed more suitable.
10.2.6 Sender may choose level/sub-level
Allows the whistle-blower to select the level (portal) where the report will be sent. This is useful for organizations with multiple levels (sub-portals), such as by region or country. The top-level portal (your portal) must have this function activated.
10.2.7 QR code

The QR code links directly to the portal. It can be printed on a whistle-blowing poster or shared on the intranet.
10.2.8 Features

10.2.8.1 Activate folder module
Activates a folder structure for incoming reports. This function allows whistleblowing cases to be organized into folders for easier management and overview.
10.2.8.2 Activate communication module
The communication module makes it possible for the case handler to engage in dialogue with external parties.
10.2.8.3 Activate document module
Activates the document module for creating case documents.
10.2.8.4 Turn this portal’s homepage into a portal selector
Transforms the portal’s homepage into a visual selector for sub-portals. Use only if there are multiple sub-portals. Recommendation: Use images of identical format for best appearance.
10.2.9 Parameters
Under Parameters, you can:
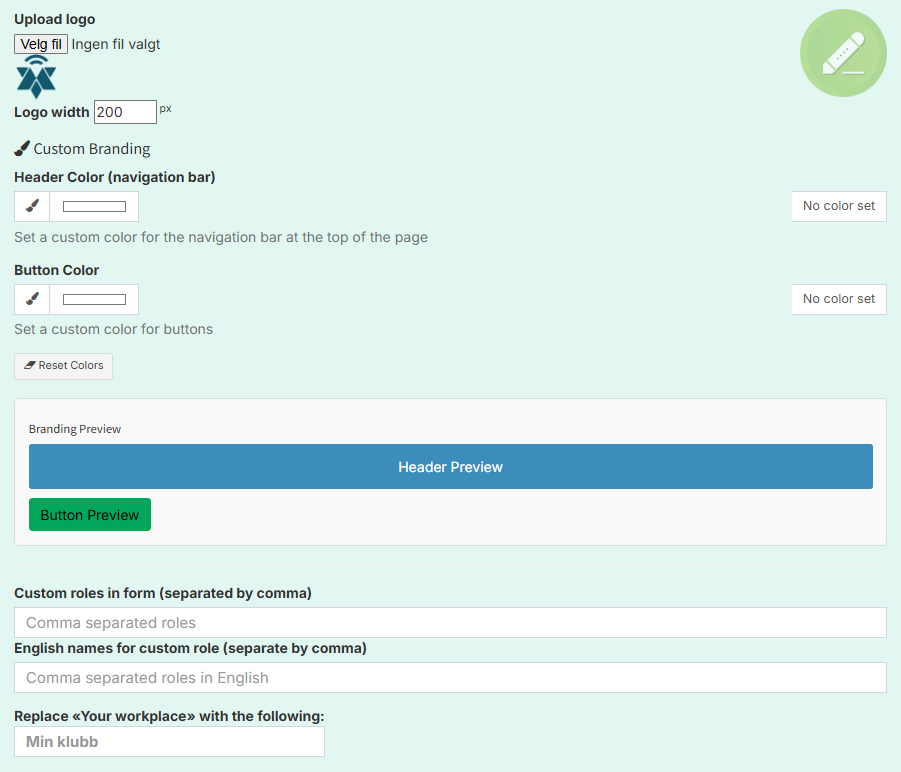
- Upload a logo for your portal.
- Adjust the logo width (default is 300 px).
- Add custom roles that users can select in the form.
- Replace the “Your workplace” text with your own wording.
- Turn the front page into a portal selector to make navigation easier if you have multiple sub-portals.
10.2.9.1 Upload logo
By clicking on “Choose File,” you can upload the desired logo for the portal.
10.2.9.2 Logo width
If you want to adjust the pixel size of your logo for the front page, you can do it here. The default size is set to 300 px.
10.2.9.3 Customized profiling
This section allows you to modify the color of the top bar, navigation bar, or buttons to better suit your portal’s design.
10.2.9.4 Custom roles in form
The administrator can add custom roles that users can choose from when submitting a notification.
10.2.9.5 Replace “Your workplace” with:
This feature allows you to change the name from ‘Workplace’ to a custom name, such as ‘My Club’. This customization appears when a notifier submits a report, displayed as a title above the field where they specify the type of workplace they are from.
10.3 Categories and codes
Create categories and codes to better manage your cases.

10.3.1 Categories
Create categories to give case handlers better oversight and the ability to categorize cases, filter the inbox, and generate statistics.
To add a new category, enter the category name, click “Create new category”, and the case handlers can then select this category during case processing.
This is also something that those submitting a notification can do if the feature is turned on, allowing them to choose a category when sending in the report. The case handler can still review and adjust the category later if needed.
10.3.2 Closing codes

Used when a case is closed and considered fully processed.
Enter the name of the code and click “Create new closing code”. The closing code can now be selected when closing a case.
10.3.3 Reject codes

Used when a case is rejected (e.g., due to insufficient information or not being a valid inquiry).
Enter the code name and click “Create new reject code.” You can select this when rejecting a case.
10.3.4 Top level and sub-portals
If you have multiple sub-portals, categories and codes can be created at the top level. These will then automatically be available across all sub-portals. This allows you to avoid creating the same categories and codes in each individual sub-portal, saving time and ensuring a consistent structure.
If a sub-portal requires its own categories or codes, or if names or wording need to differ from the top level, this can be configured directly within the relevant sub-portal. Changes made in a sub-portal will apply only to that sub-portal and will not affect the top level or other sub-portals.
10.4 Texts and content
Under Text and Content, you can create and edit the content displayed on your portal’s front page. You can also add texts for the languages you have activated.

10.4.1 Information on submission (dropdown menu)
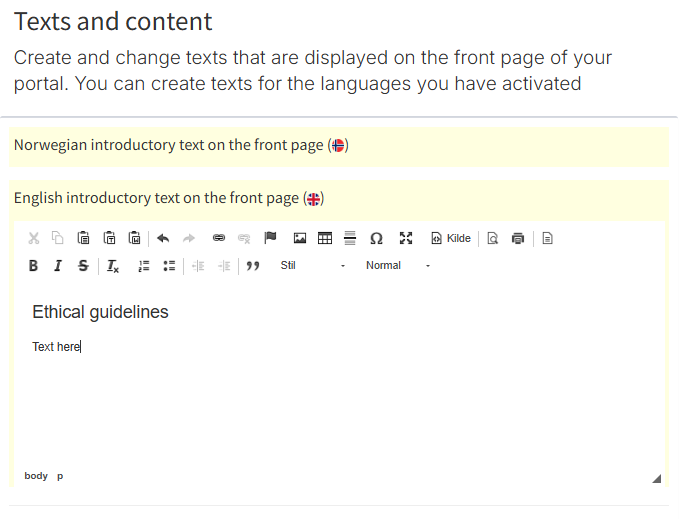
Make sure there are no unnecessary spaces or blank lines in the text below. The text will automatically be built into a dropdown menu displayed on the front page. Use “Heading 1” for main headings.
10.4.2 Custom templates (temporary user guide)
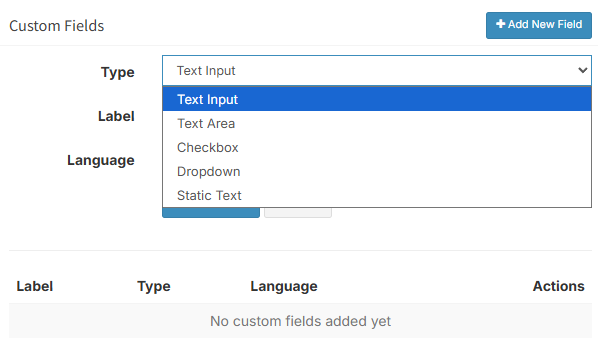
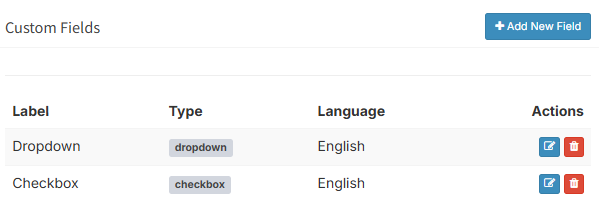
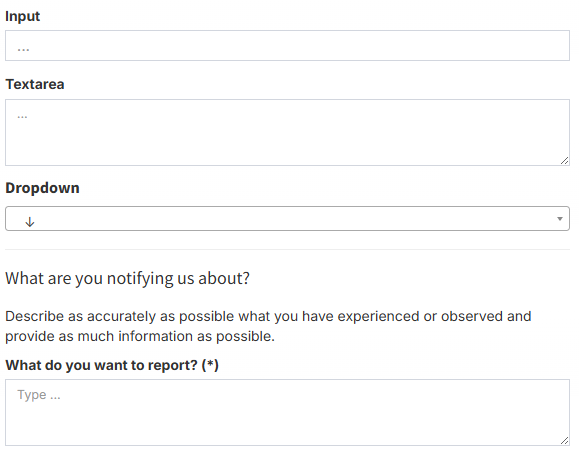
You can also add custom fields by clicking “Add New Field”. This allows you to choose the type from a dropdown menu, enter a label, and then select the language. To display the field on your portal’s front page, click “’Save Field”. All the fields you create will be collected under the section for custom fields.

Add new fields:

Whistle-blower function:
Whistleblower function:
10.5 My templates
Manage your custom templates.
10.5.1 Standard templates
Inside the portal, there are standard templates that can be used.

10.5.2 Create “New template”
Click “New template,” then fill in Template Name, Language, and Content.

Click “Save”.

Your template will now be available to all administrators and case handlers under “Case documents” in all cases.

10.6 SSO
Configure Single Sign-On (SSO) settings for your portal.

10.6.1 Enable global SSO for Azure / Entra ID
Enable SSO from Azure / Entra ID for all users in the given portal.
10.6.2 Enable global SSO for LinkedIn
Enable SSO from LinkedIn for all users in the given portal.
10.6.3 Enable global SSO for Google
Enable SSO from Google for all portal users.
10.6.4 Require SSO for users
Require SSO for all users in the portal (Contact Digitaliq AS to have this activated) ([email protected]).
10.6.5 Require two-factor authentication for users
Require two-factor authentication for all users (Contact Digitaliq AS to have this activated) ([email protected]).
11.0 Digitaliq AI
11.1 AI-Generated Summaries of Whistleblowing Cases
Feature Overview:
The summary function is a support tool that enables the generation of AI-based summaries directly within the case, without any information leaving secure and compliance-approved systems. The solution adheres to established requirements for privacy, access control, and data management.
The AI-generated summary is intended solely as an assistance tool. The caseworker always retains full and final responsibility for all professional assessments and decisions.
AI Credits:
- Available AI credits: 50
- Credits are used each time an AI summary is generated.
- Additional AI credits can be purchased if needed.
Activation and Deactivation:
The feature can be enabled or disabled under:
Settings → Extensions
The AI summary feature currently supports Norwegian language only.
