Meny
Admin
2.0 TransparencyGate
4.0 Help and Support
Admin
The user guide is organized according to the order of the menu on the left in the Transparency Portal and describes the functions that are relevant to know when using the TG platform. Functions not mentioned in the guide are considered not relevant for use in this portal. If any questions or doubts arise, you can contact support. Support is available Monday to Friday from 08:30 to 16:00.
1.0 Main Menu
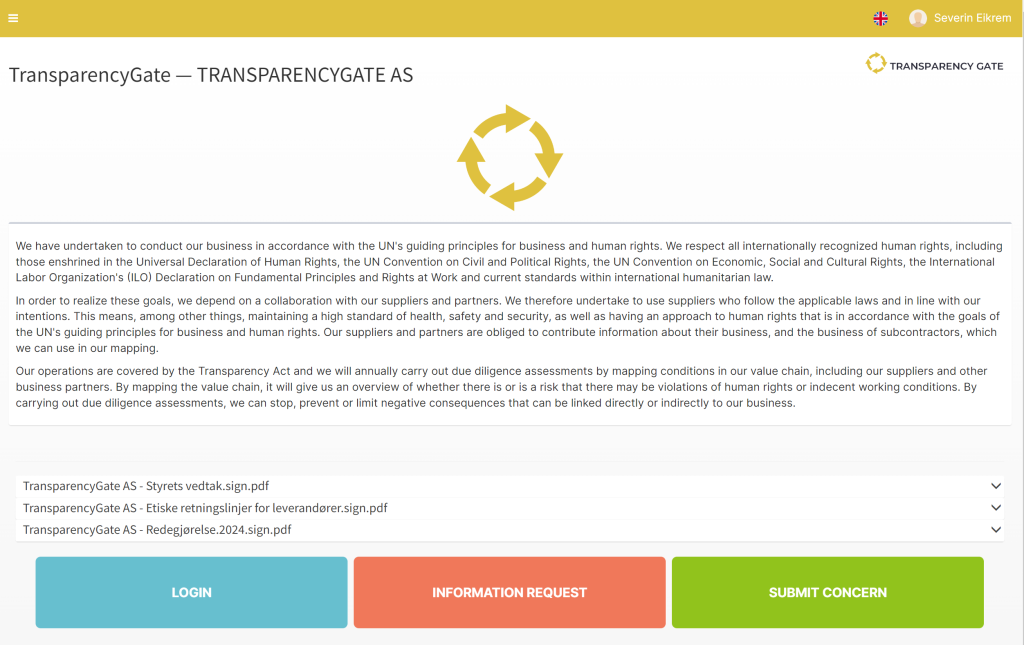
1.1 Frontpage
On the home page, you have the option to log in, submit an information request, or report an issue related to the relevant company.
At the top right of the page, you will find a flag icon. By clicking on this, a dropdown menu opens where you can choose your preferred language.
1.1.1 Login
By clicking “Login,” you can sign in to the portal with the username and password that you have been assigned.
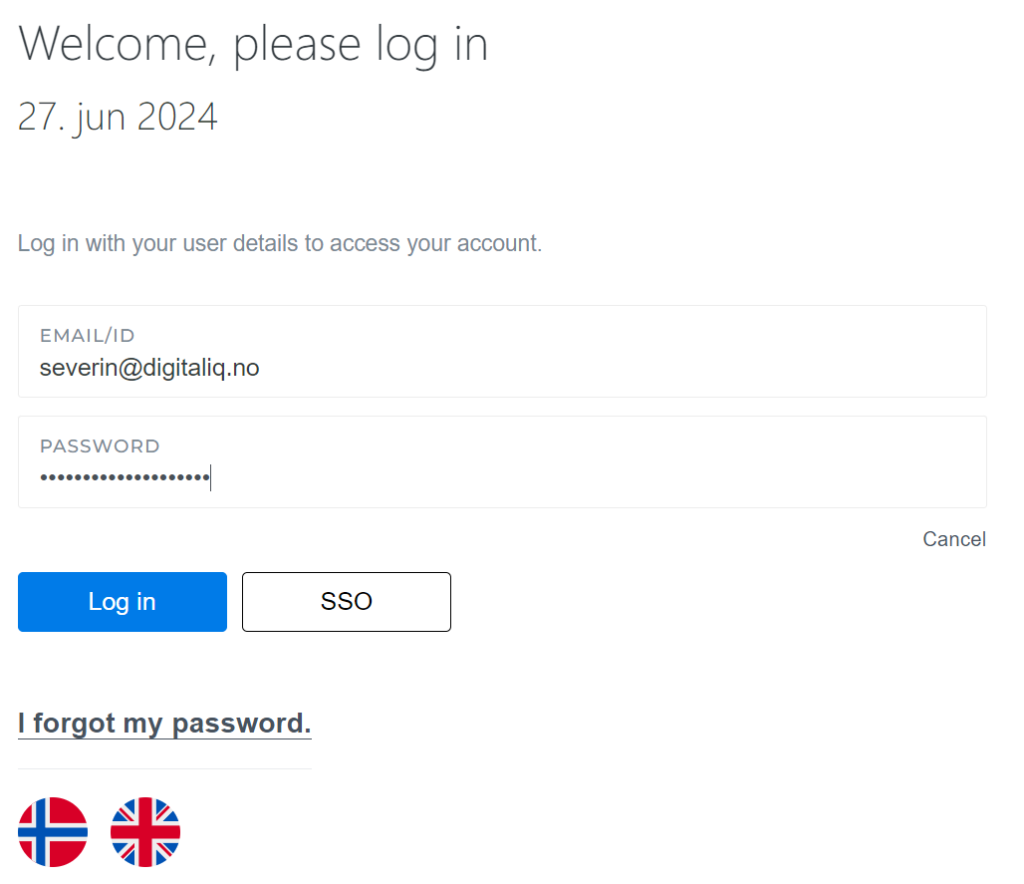
1.1.1.1 Forgot password?
If you have forgotten your password, you can easily reset it by clicking “Forgot password?” on the login page. You will then be able to restore your password by following the instructions sent to your registered email address.
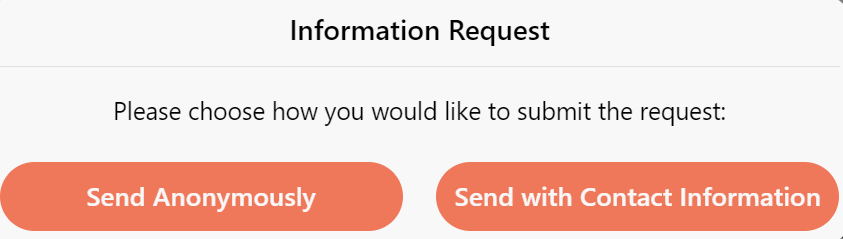
1.1.2 Information Request
Here you can request information on how a company handles actual or potential negative impacts.
You can choose to submit the information request with your name or anonymously.
After submission, you will be assigned a username and password used to log in to the portal to follow up your inquiry and see any responses.
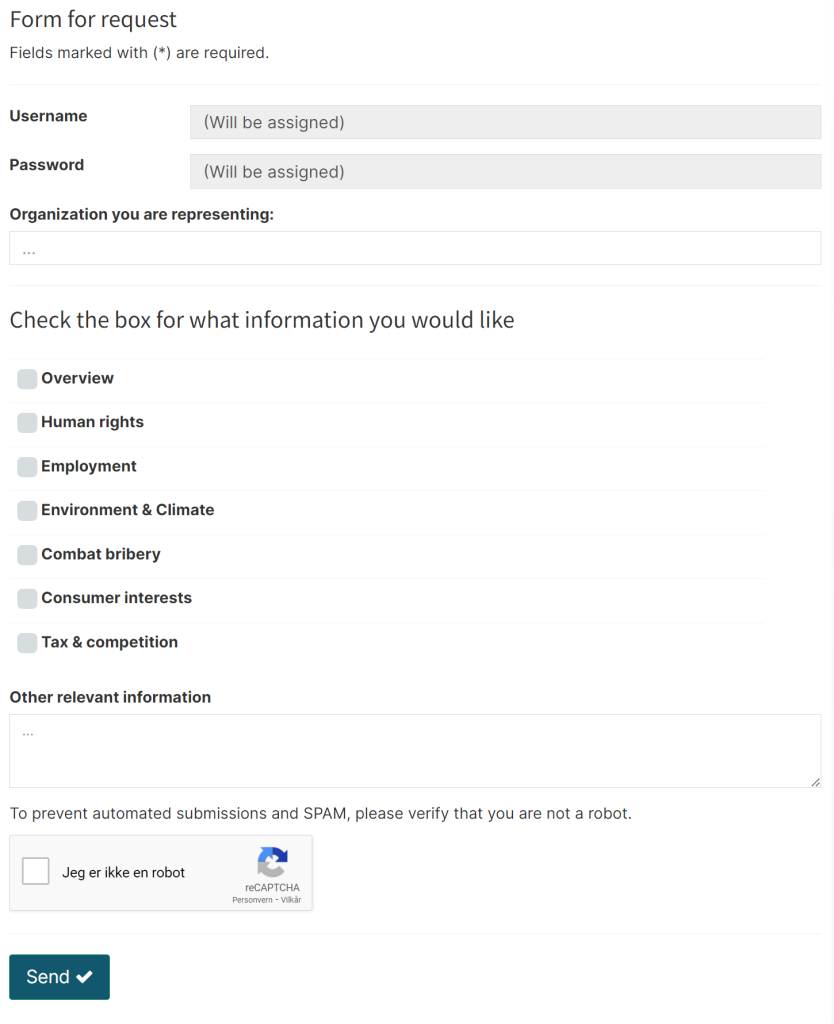
1.1.2.1 Submitting the information request form
You can submit an information request anonymously or with contact information.
Fill in:
- The organization you represent
- Category(ies) you want information about
- Any other relevant information
When submitting with contact information, additionally enter:
- First name and last name
- Email address
- Phone number (optional)
When all fields are completed, click “Send” to submit the form.
Note: For anonymous notifications, username and password are not filled out; these are assigned automatically after submission.
1.1.2.2 Receipt for submitted request
After you have submitted the information request, you will receive a receipt. How this is handled depends on whether the submission is anonymous or with contact information.
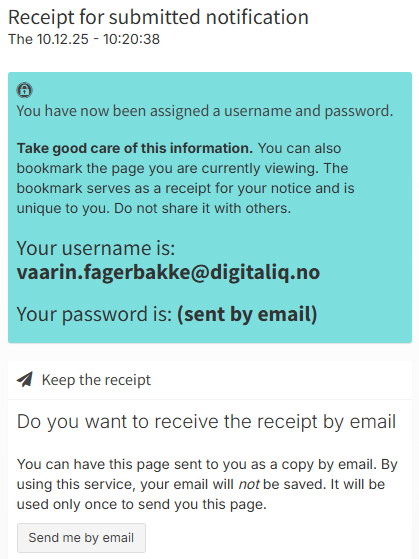
Anonymous:
As an anonymous user, you receive a username and password directly in the browser after submission. If you wish, you can have this information sent by email by clicking “Send me by email.” The email is not stored in the database and is deleted immediately after sending, so you remain completely anonymous.
With contact information:
The receipt is automatically sent to the email address you provided in the form.
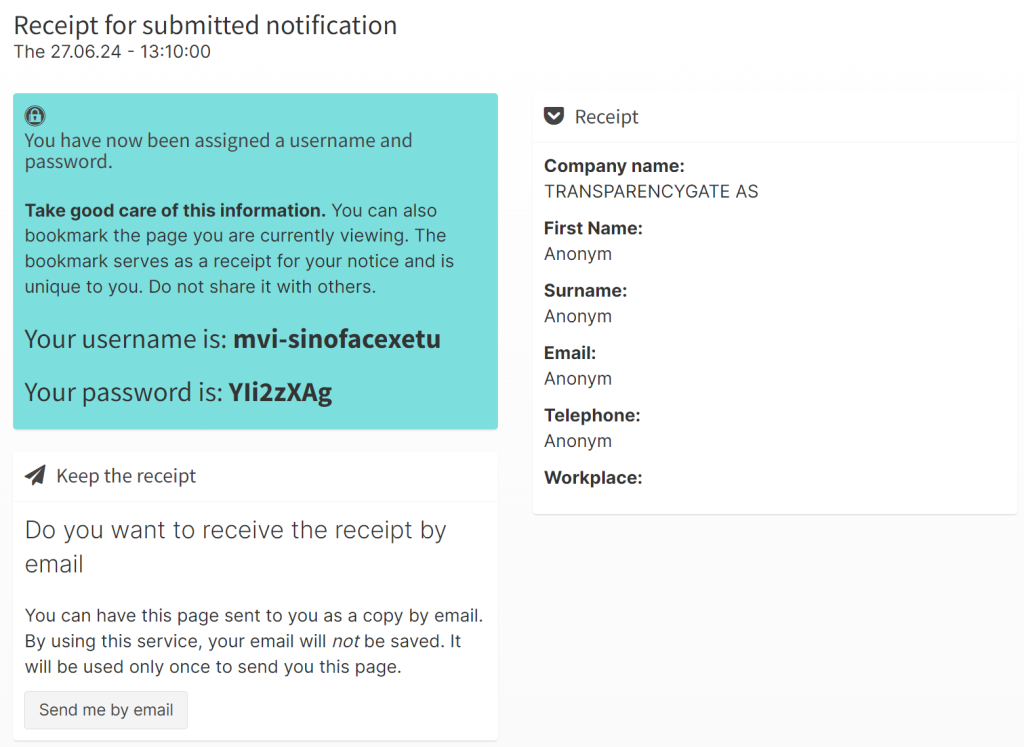
This is an example of what the receipt looks like for an anonymous submission.
1.1.2.3 Further follow-up
All further follow-up takes place in the Transparency Portal, where you can:
- See the status of the inquiry
- Read responses from the case handler
- Write messages in the dialogue field
1.1.3 Submit Concern
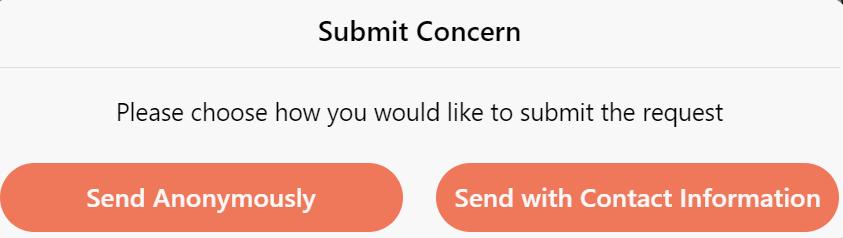
Here, individuals can report issues they are aware of. The person can report with a name or anonymously.
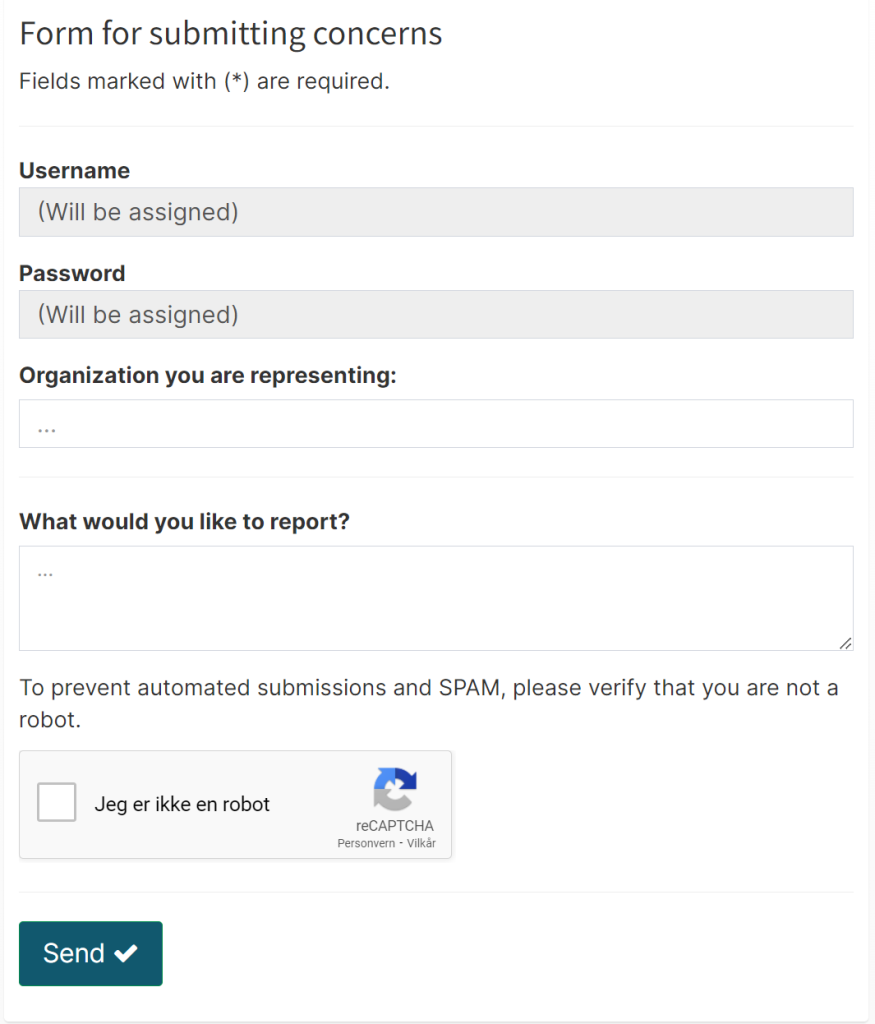
1.1.3.1 Form for submitting concerns
You can report an issue anonymously or with contact information.
Fill in:
- The organization you represent
- What you want to report
When submitting with contact information, additionally enter:
- First name and last name
- Email address
- Phone number (optional)
When you have filled in the fields, click “Send” to submit the form.
Note: For anonymous notifications, username and password are not filled out; these are assigned automatically after submission.
1.1.3.2 Receipt and follow-up of submitted report
After you have submitted the form to report an issue, you will receive a receipt.
How this is handled depends on whether the submission is anonymous or with contact information.
As an anonymous notifier:
After submission, you receive a username and password directly in the browser. If you wish, you can have this information sent by email by clicking “Send me by email.” The email is not stored in the database and is deleted immediately after sending, so you remain completely anonymous.
With contact information:
The receipt is automatically sent to the email address you provided in the form.
This is an example of what the receipt looks like when submitted with contact information.
1.1.3.3 Further follow-up
All further follow-up takes place in the Transparency Portal, where you can:
- See the status of the inquiry
- Read responses from the case handler
- Write messages in the dialogue field
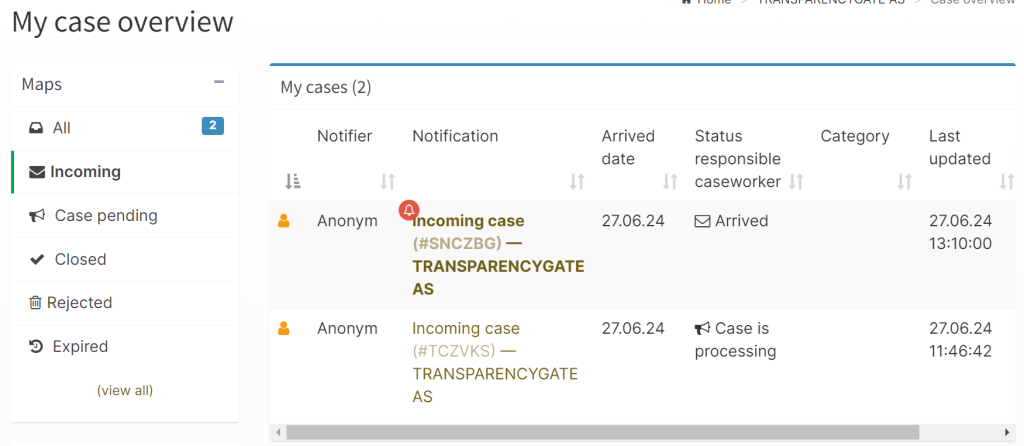
1.2 Inbox
Under Inbox in the menu, you will see an overview of all incoming inquiries.
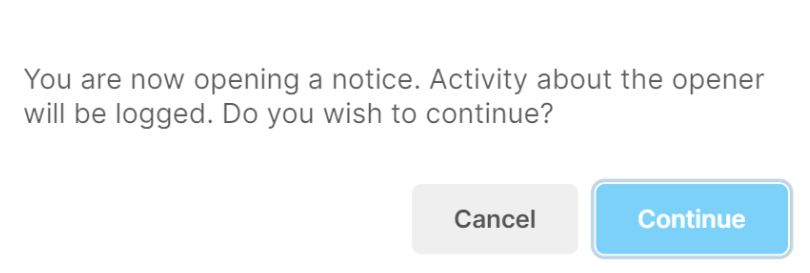
When you open an inquiry, you will be notified that all activity will be logged.
1.2.1 Inquiries
Here you can see the inquiry the person has submitted. On the right, you can see which categories the person wants information about.
If the person has submitted the request with a name, the contact information will be visible on the right.
In the dialogue field, you can communicate with the person who submitted the inquiry. The person must log in to be able to respond in the dialogue.
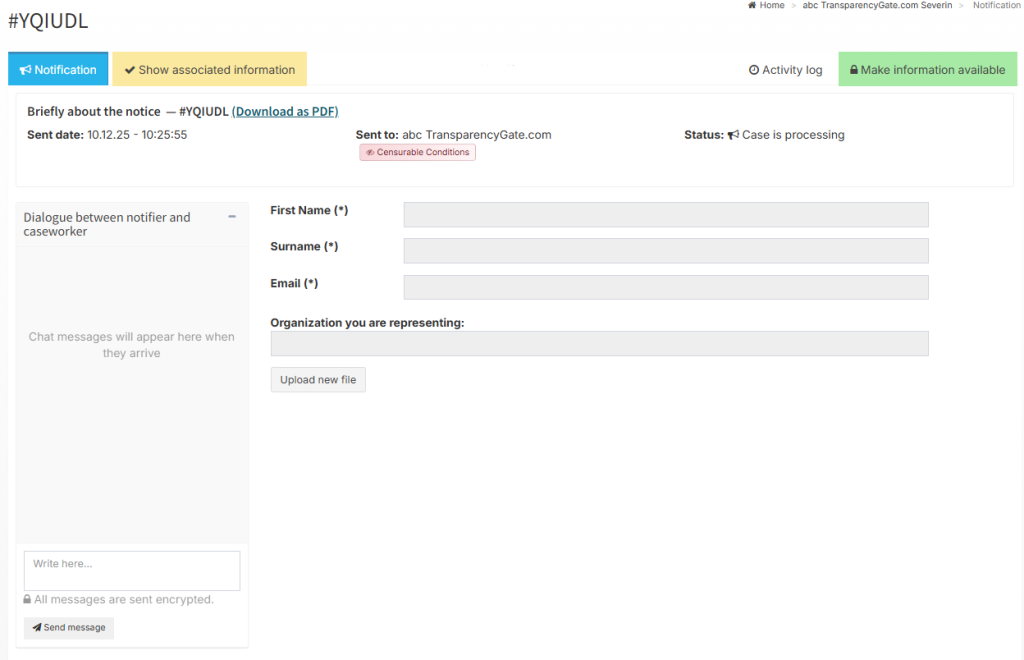
1.2.2 Show associated information
When you click on the “Show associated information” tab, you can see what the sender of the case can see so far.
Here you can publish information as new details are recorded in the case in question.

1.2.3 Make information available
To respond to the inquiry, you can make information available.
Click “Make information available” on the right.

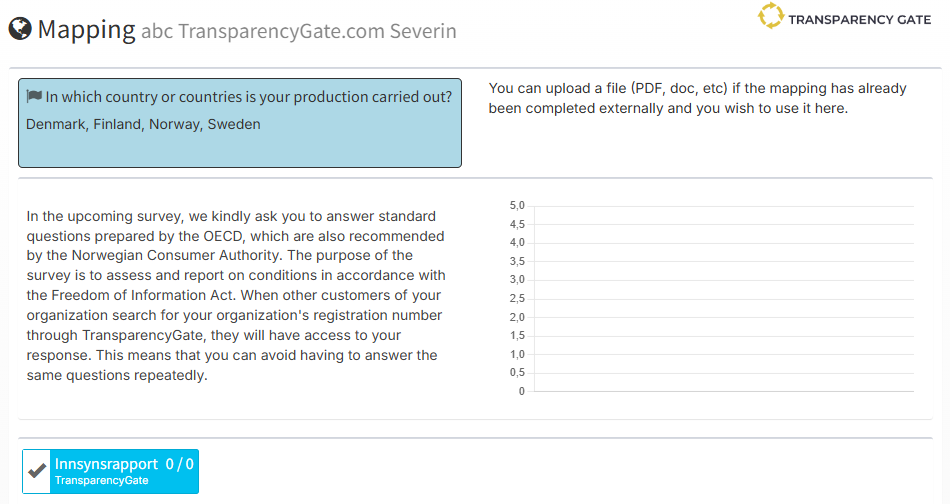
You will then come to the page called “Mapping.”
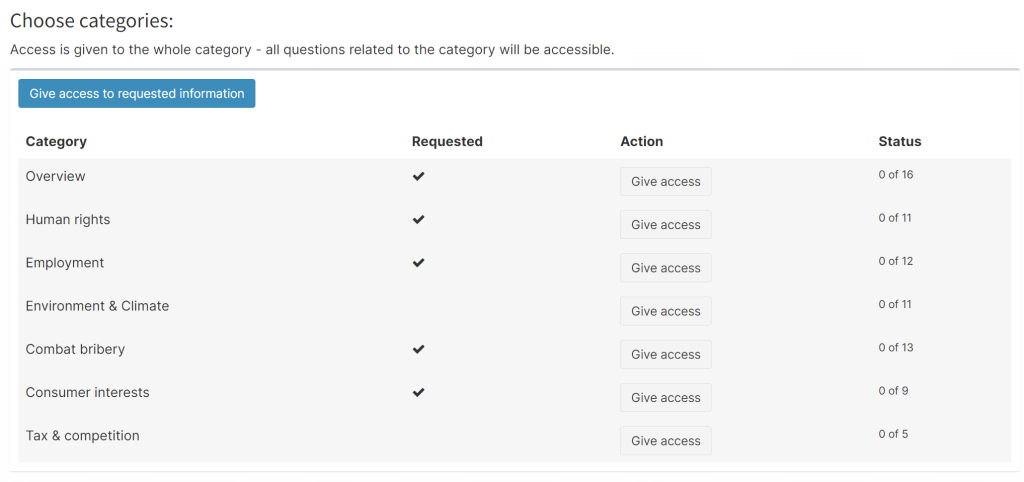
The image shows an overview of the categories in the company’s due diligence assessment.
You can click “grant access” to make the information available for the desired category.
To remove access, click on the desired category and select “remove access.” Then click save at the bottom right corner.
For the action to be carried out, it is important to remember to click “Save access.”
To go back to the case, click “Go back to the case” in the upper right corner.
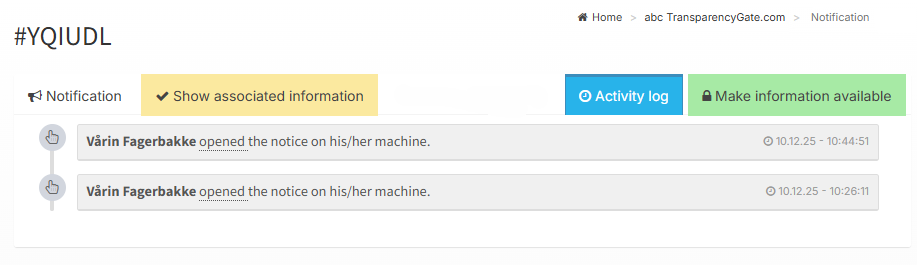
1.2.4 Activity log
The activity log provides an overview of the sequence of events in the case and shows when it was opened and by whom. All entries are automatically recorded with date and time.
2.0 Transparencygate
2.1 Mapping
At the top of the page, you can enter which country you trade with:

Click “Change”
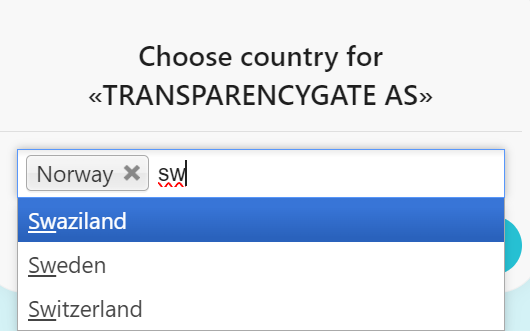
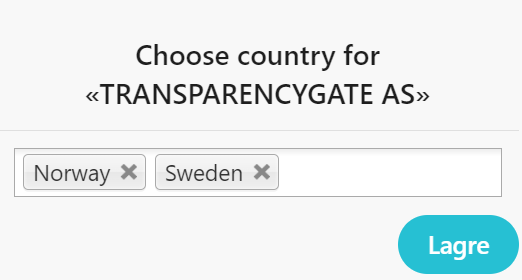
Click “Save.”
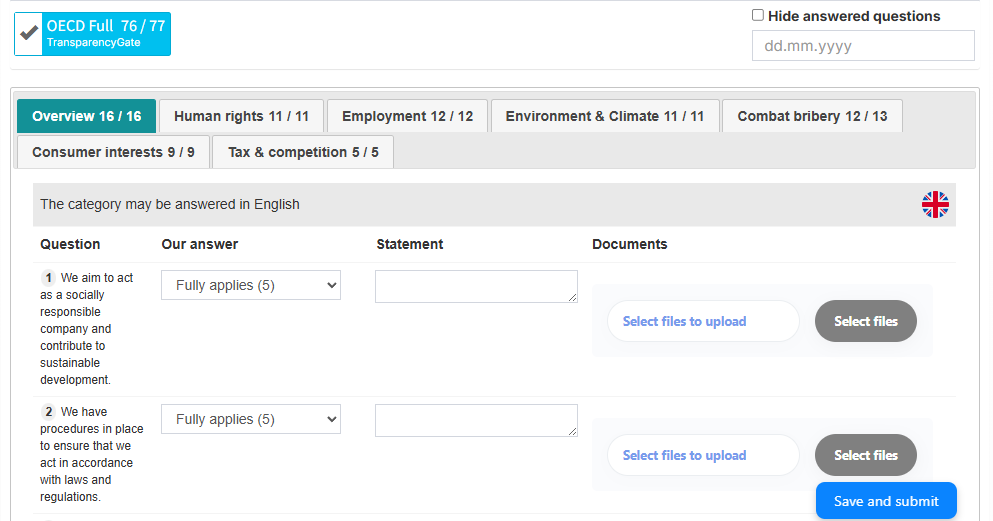
Example packages:
- The OECD Full package is activated here for self-reporting.
- Package 1: Safety is activated for self-reporting. (A separate package for suppliers in the test portal; you will not find this in your own portal).
- Package 2: Environment and Climate is activated for self-reporting. (A separate package for suppliers in the test portal; you will not find this in your own portal).
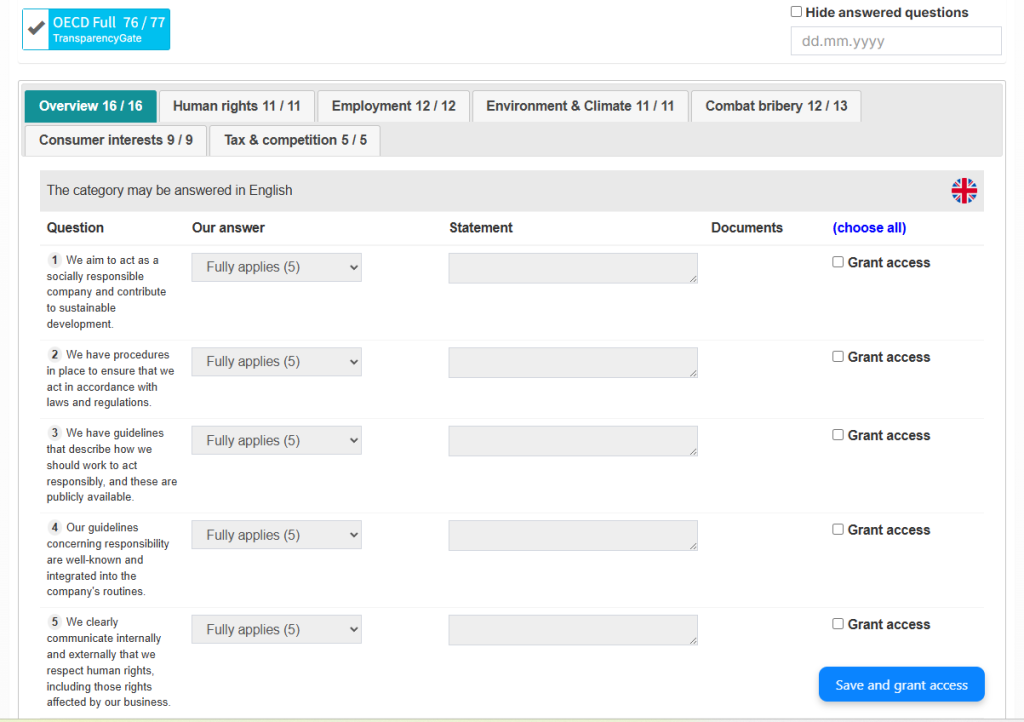
2.1.1 Choose which package you want to see the categories for
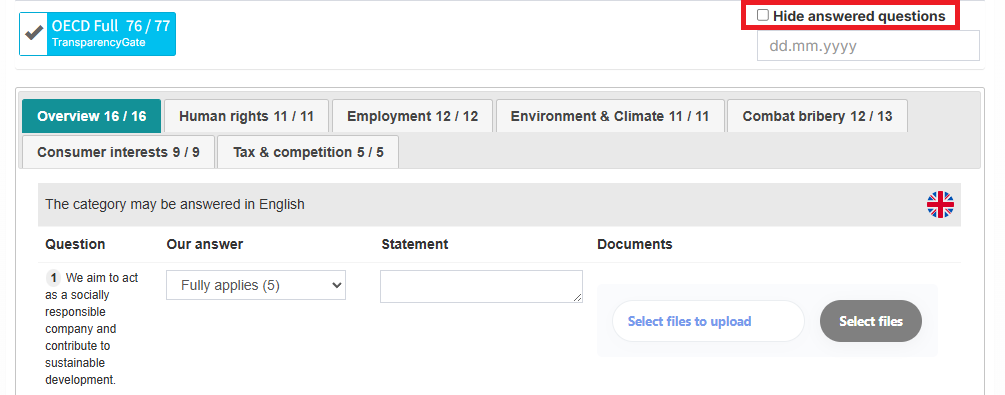
To get a better overview of what you have not answered, click “Hide answered questions” Only questions and categories that lack answers are then displayed.
2.1.2 Answer history
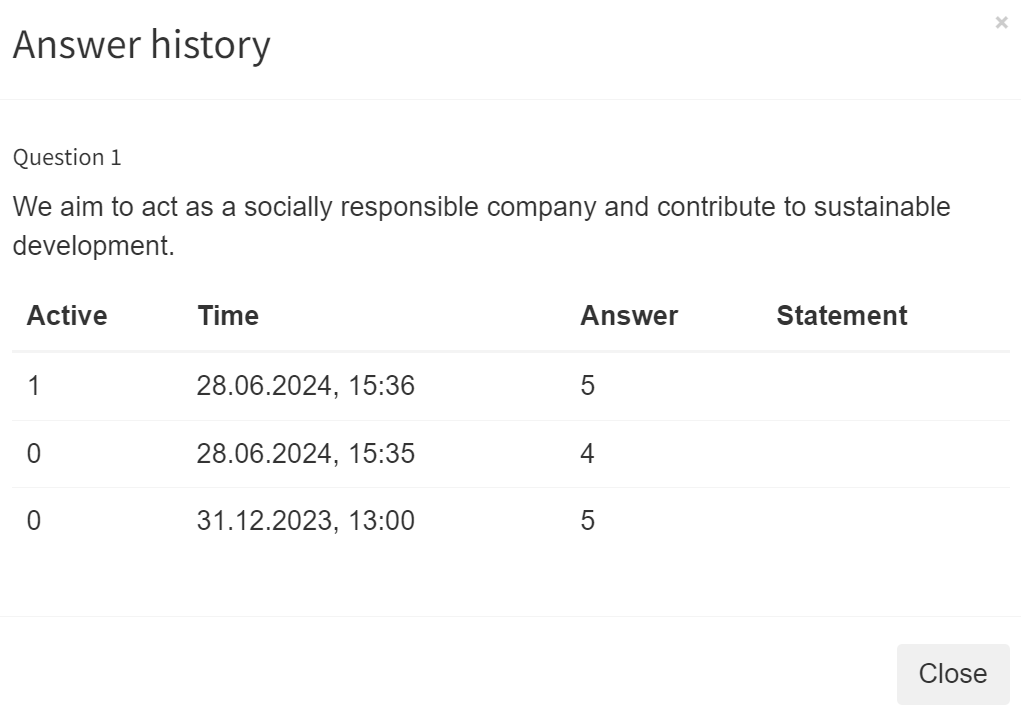
You can easily see when a question was answered or updated.
- Find the list of questions in the system.
- Click the number in front of the question (the question number).
- You will then have the option to see the answer history.
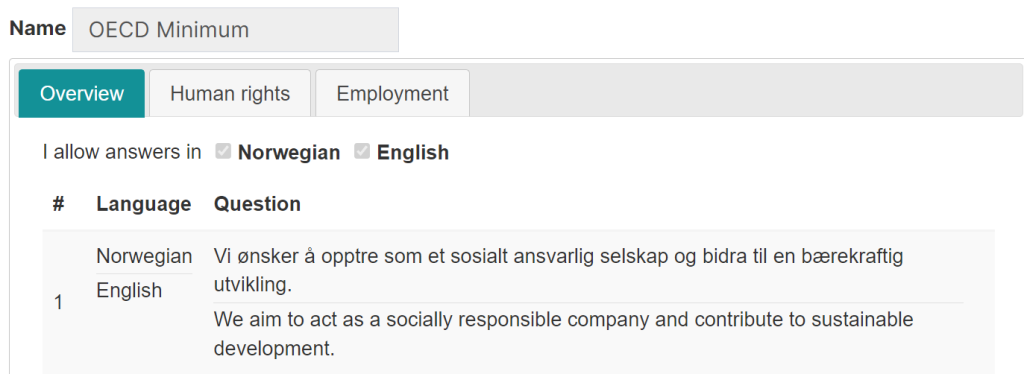
2.2 Mapping Setup
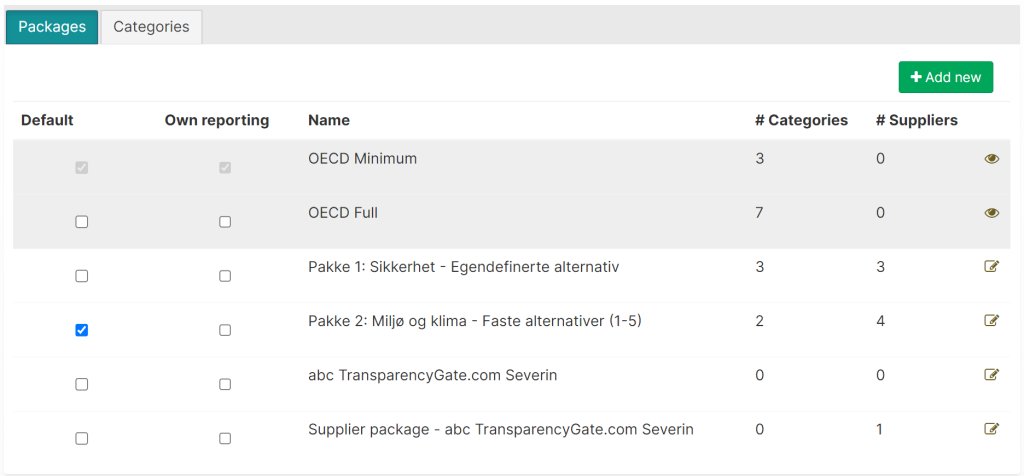
Under Mapping setup there are two tabs: Packages and Categories.
2.2.1 Packages
Overview of Standard Packages, as well as which packages with questions you want to use for self-reporting.
In the Packages tab, an overview of all available packages in the solution is displayed.
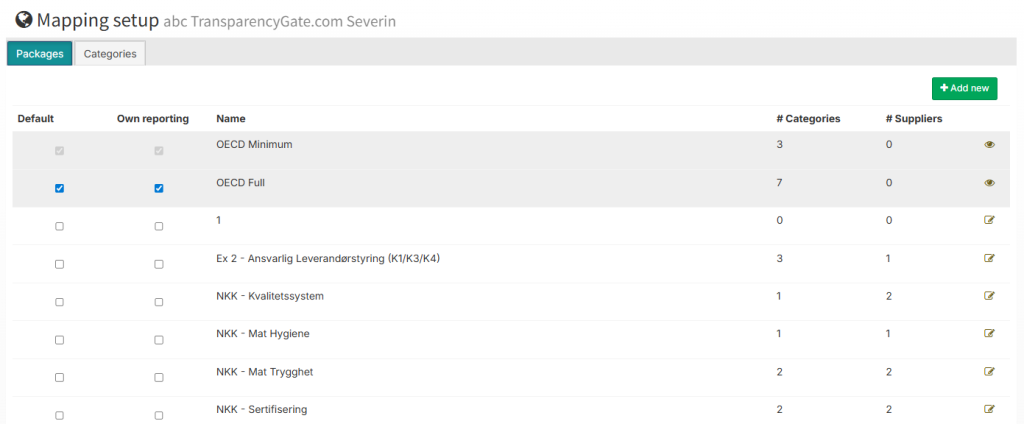
The bullet list below explains what the different columns and icons in the table mean:
- Default: Package that is automatically added to new suppliers when they are created.
- Own-reporting: Indicates which packages the portal owner wants to answer themselves. Consumers, customers, and partners can also request information from these packages.
- Name: Shows the name of the package.
- #Categories: Shows the number of categories included in the package.
- #Suppliers: Shows the number of suppliers assigned the package with questions.
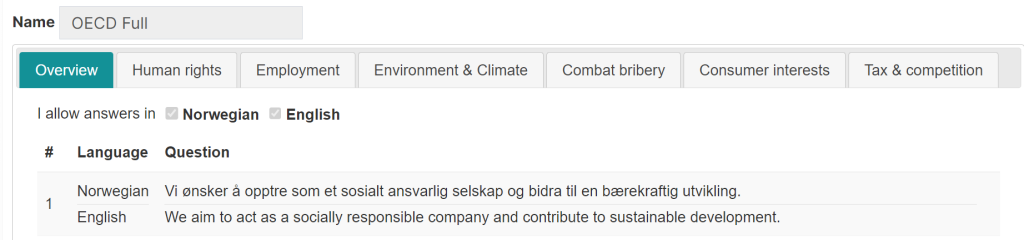
- Eye: Provides the ability to see which categories and questions are included in the package, for example in OECD Minimum or OECD Full.

- Edit: Used to add your own defined categories to the package.

2.2.1.1 Overview of existing packages and creation of new ones
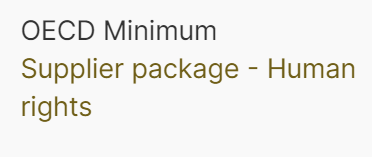
- OECD Minimum: Contains the overarching topics of Human Rights and Labor.
- OECD Full: Overarching, Human Rights, Labor, Environment and Climate, Anti-Corruption, Consumer Interests, and Competition & Tax.
- Supplier Package – Name of the portal: This is a package that is attached to all registered suppliers, so that there is the possibility to add categories easily to all suppliers by adding categories to this package.
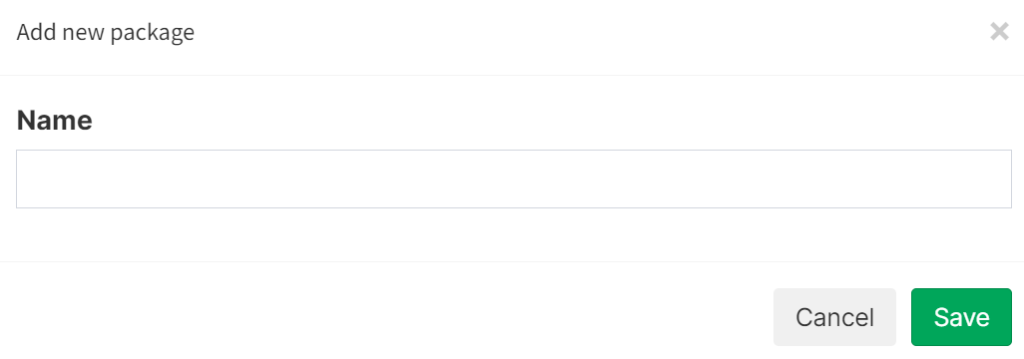
- Add new: Create your own package with custom categories and questions for your supplier(s)
2.2.2 Categories
This page provides an overview of all the categories that are available in your portal.
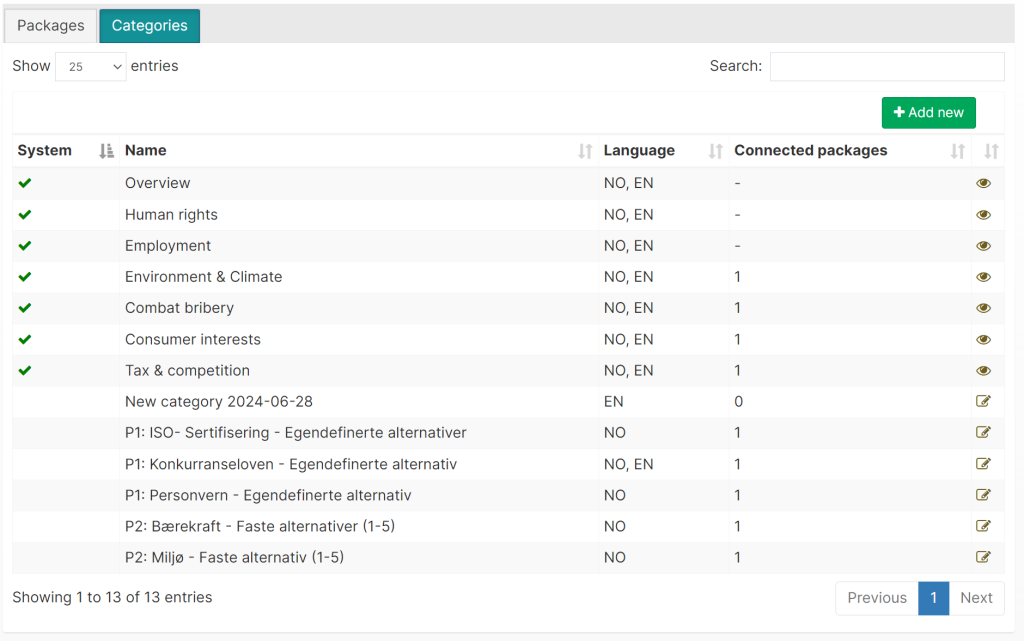
The bullet list below explains the meaning of the various elements on the page:
- Add new: Used to create a new category.
- System: Categories that are under the OECD Full / Minimum packages.
- Name: Shows the name of the category.
- Language: Indicates which language the category and its content are registered in.
- Connected packages: Shows how many times the category has been added to different packages.
- Eye: See the questions in the category
- Edit: Edit the questions in the category
2.2.2.1 Add new category:
Click “Add new” to create a new category in the portal.

Below is an explanation of the fields and options you need to fill out:
- Name: Enter the name of the category.
- Language: Choose which language the category should be created in. You can create categories in both Norwegian and English.
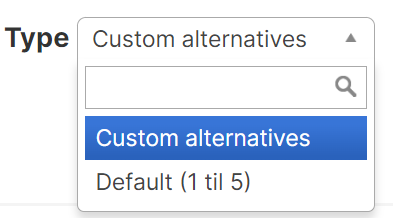
- Type: Choose between custom options or fixed options. When choosing fixed options, you will not have access to add your own response options.
- Add questions: Used to add questions to the category.
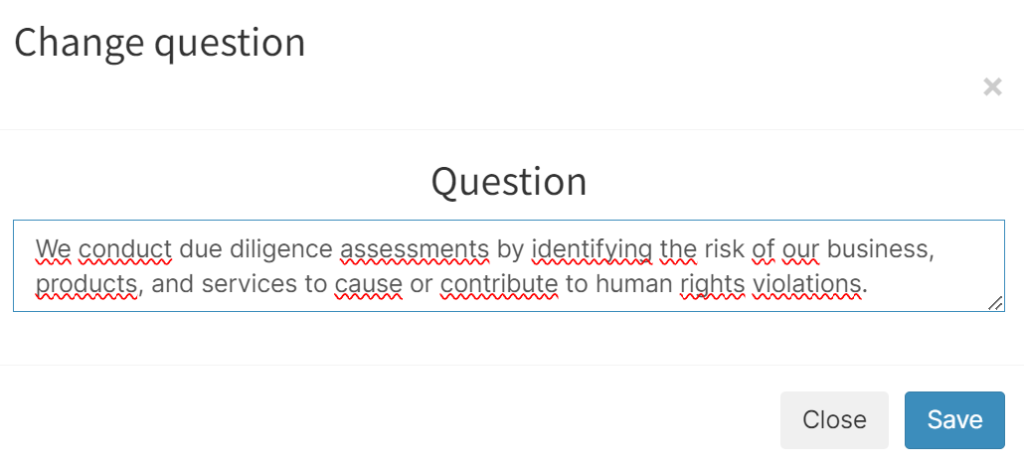
2.2.2.2 Add questions to the category/categories (custom options)
You can add questions either for a single language or for both Norwegian and English at the same time. The procedure is slightly different for the two options, and this is explained in more detail below.
Single language:
Click “Add question.”
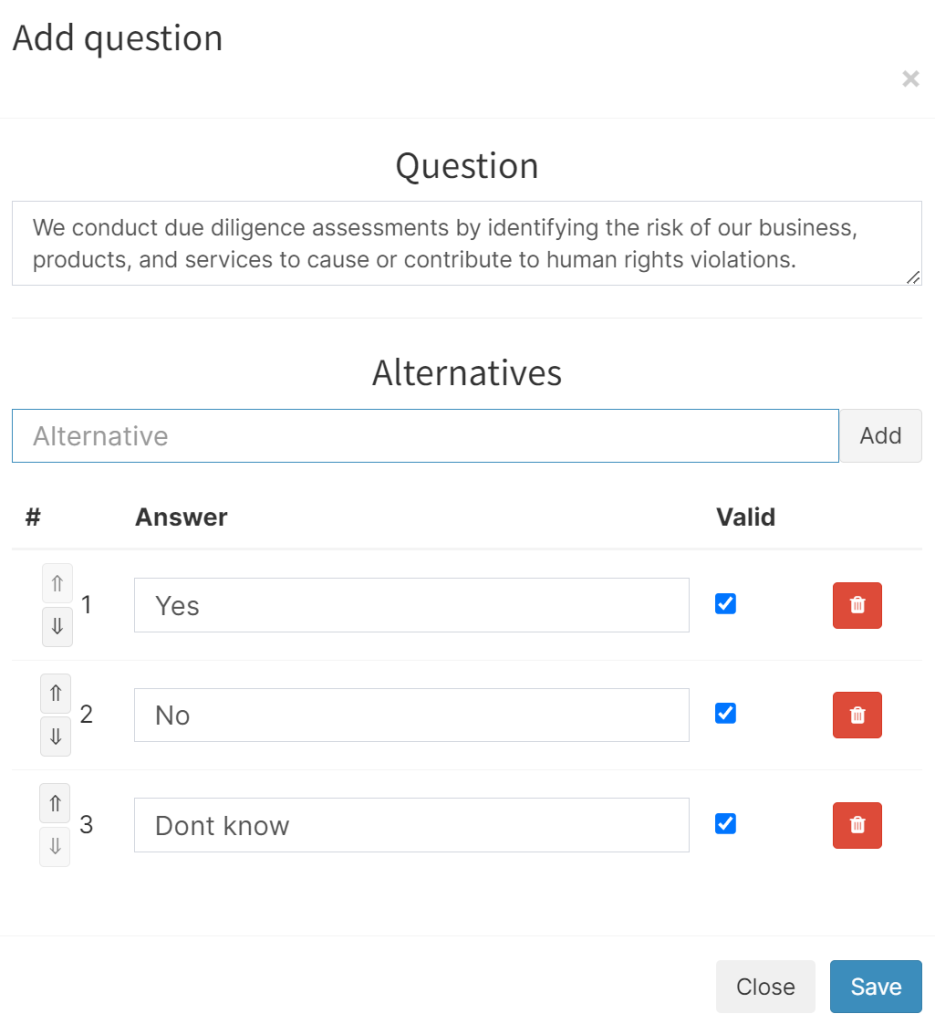
Enter the question text and add the response options. When you are finished, click “Save.”
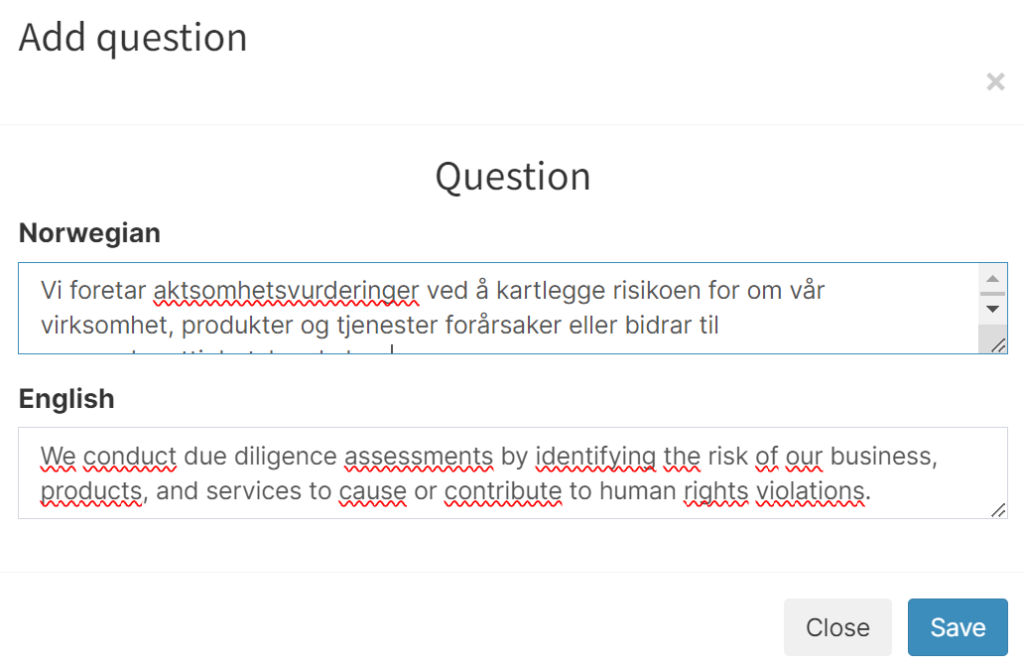
Multiple languages:
Activate Norwegian and English by clicking “Language.”

Then click “Add question.”
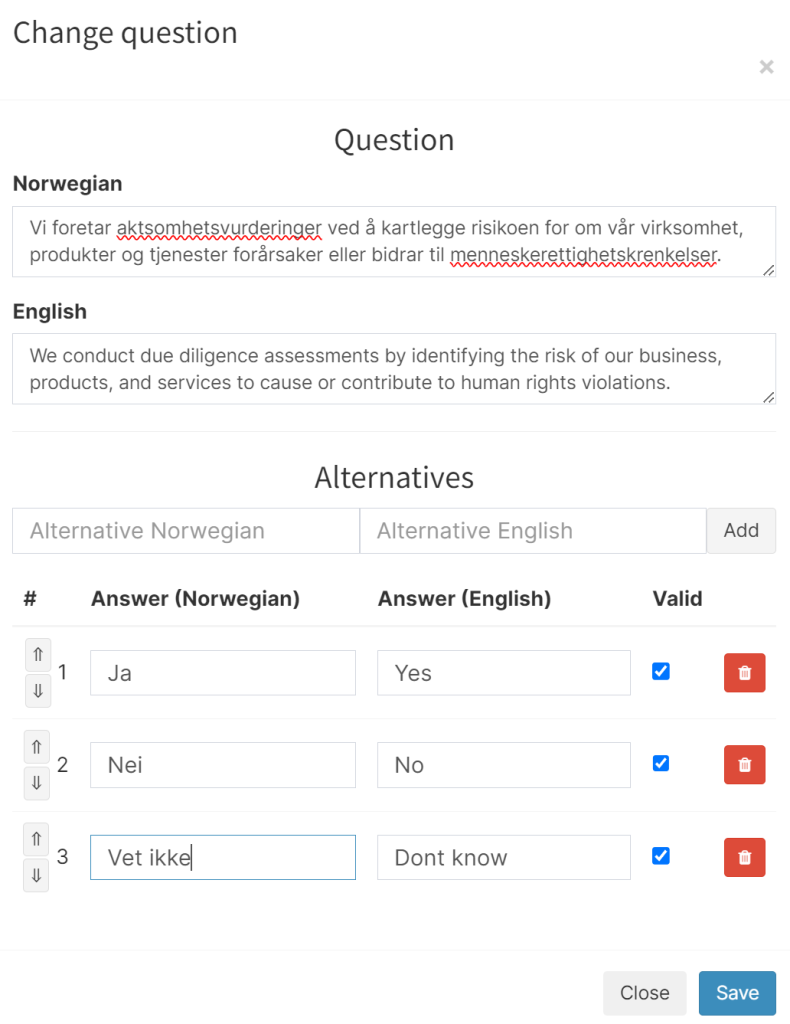
You will then see two separate fields where you can enter the question in each language. Fill out the form with the questions and response options that are relevant, before clicking “Save.”
2.2.2.3 Add questions to the category/categories (Fixed options 1 to 5)
Select Fixed options (1 to 5)
Add question:
2.2.2.4 Add questions to the category/categories (Fixed options 1 to 5 – multilingual)
Activate English and Norwegian:
Add questions, or edit questions:
Click “Save.”
2.2.2.5 Add Categories to a Package:
Open the relevant package:
Here you get an overview of which categories are in the package, as well as access to add categories.
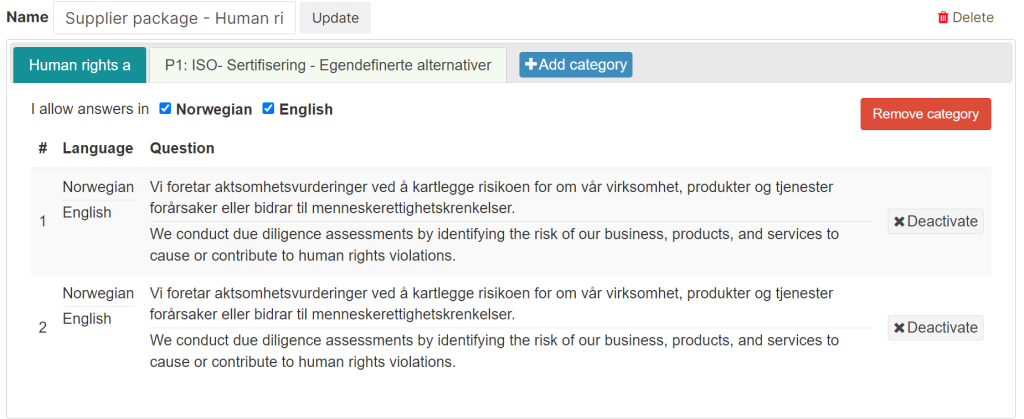
Press «Add category»:
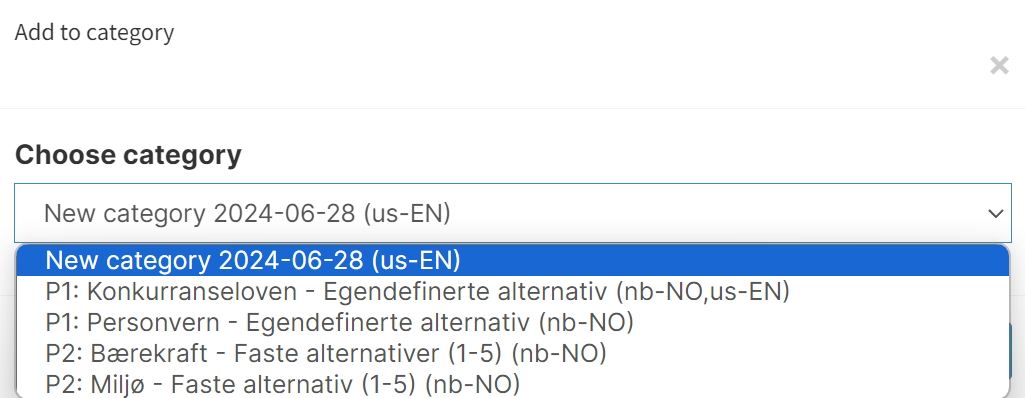
Select the relevant category and click save.
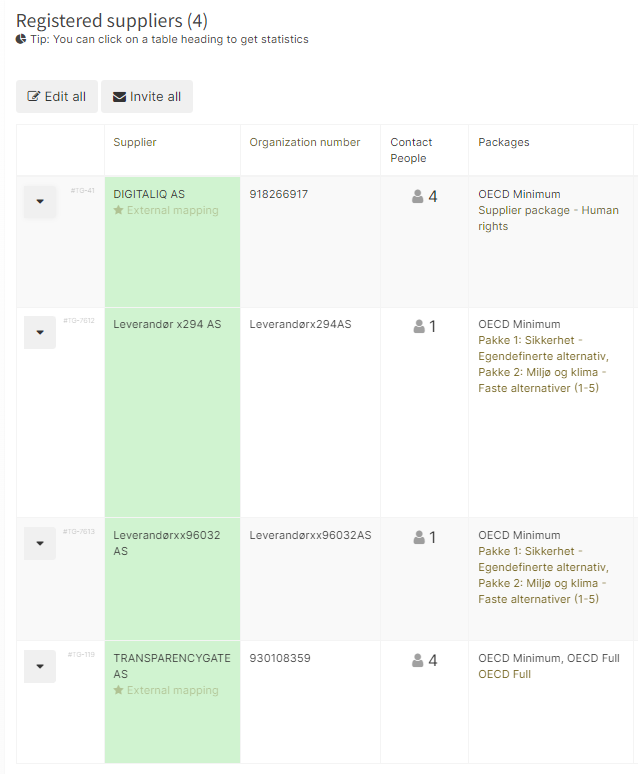
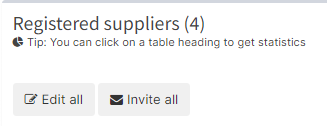
2.3 Suppliers
In this section, you will find an overview of all suppliers registered in your portal.
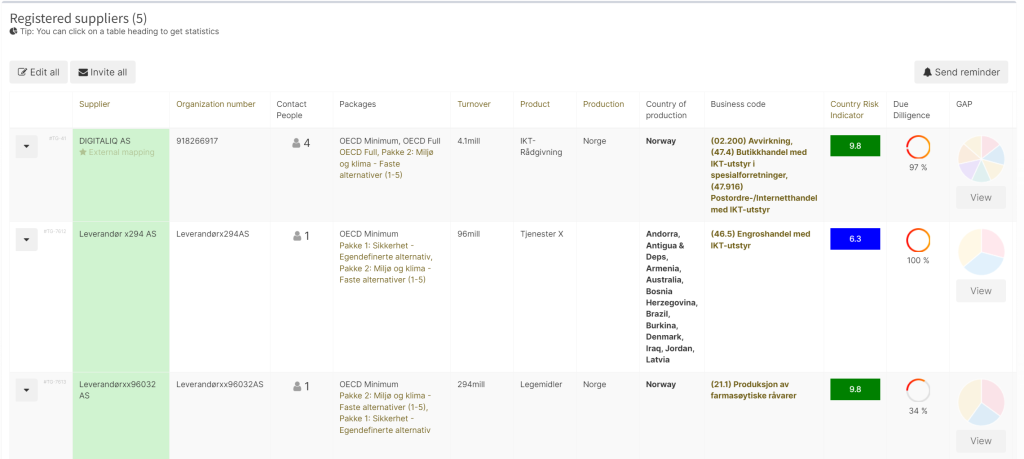
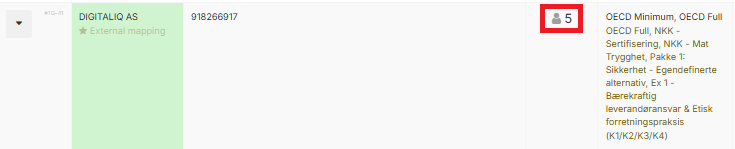
The overview shows key information about each supplier, including:
- Supplier name
- Contact person
- Packages
- Turnover
- Product
- Production
- Country of production
- Industry code
- Risk assessment
- Due Diligence Score
- GAP
- Measures
- Responsible
- Deadline
- Follow-up
- Status
By clicking “Edit all,” you can edit these categories.
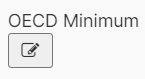
2.3.1 Assigning packages to suppliers:
Overview of packages at the supplier:
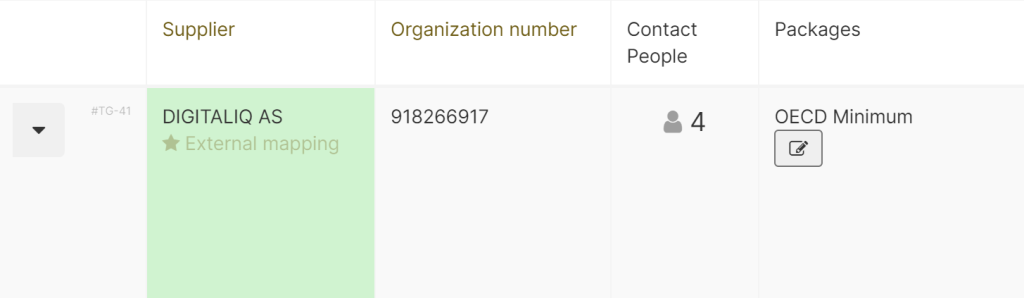
Then click the edit button, or the existing packages that are attached.
Select packages for a given supplier:
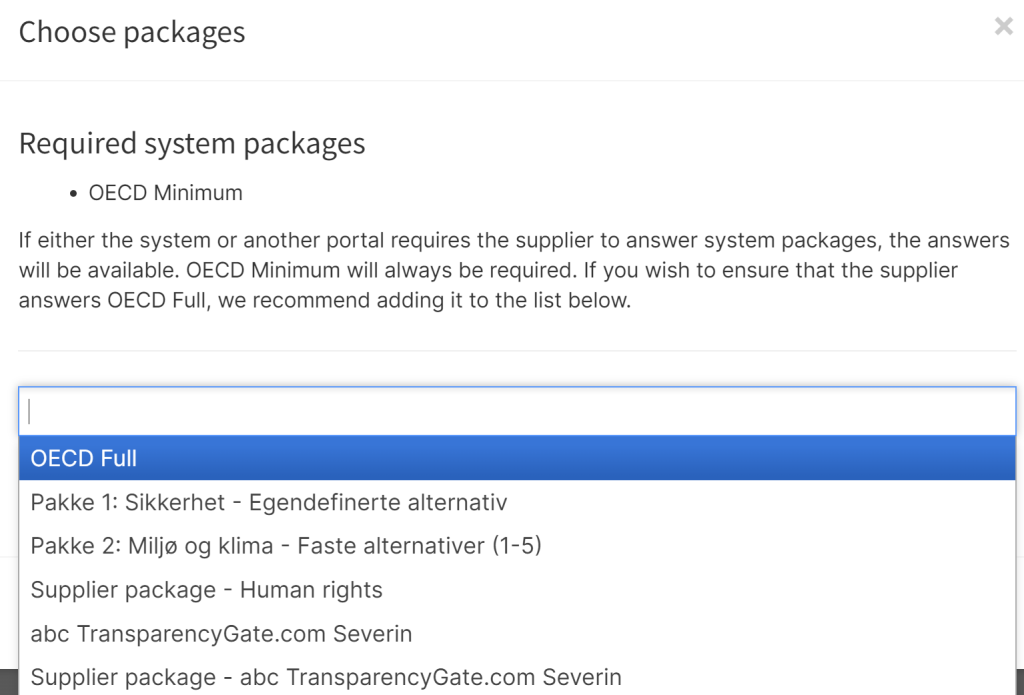
Add standard packages (2.2.1 Packages):
Then click save; the package is now attached to the given supplier.
2.3.2 Add a new supplier via the Brønnøysundregistrene
You can add a supplier either via Excel, the Brønnøysund Register, or manually.
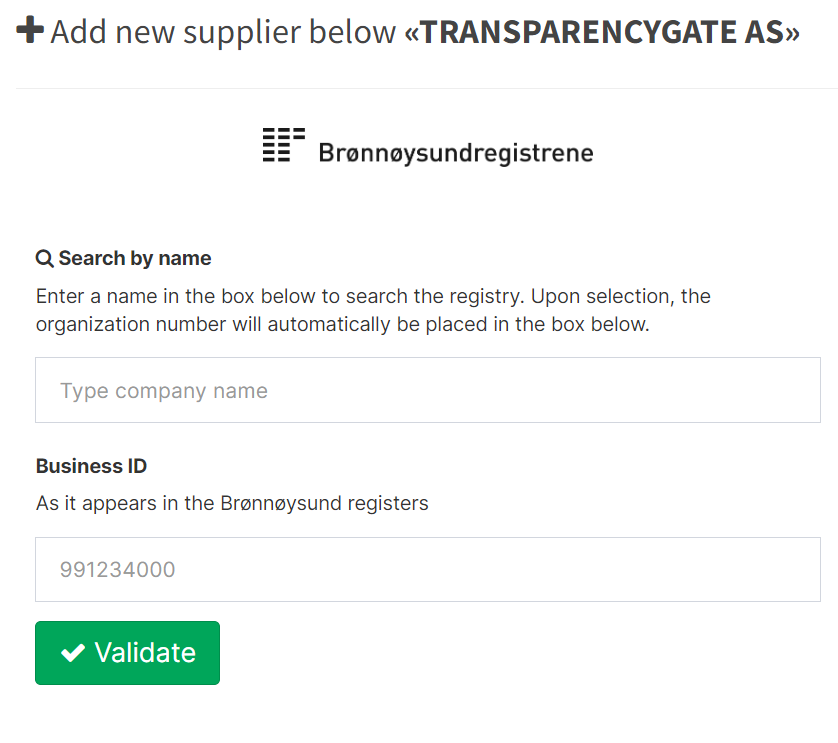
Here it is possible to add suppliers from the Brønnøysund Register. The function is located further down the page, below the overview of registered suppliers.
2.3.3 Add a new supplier manually
Under the registered suppliers, you will find the function for manual registration.
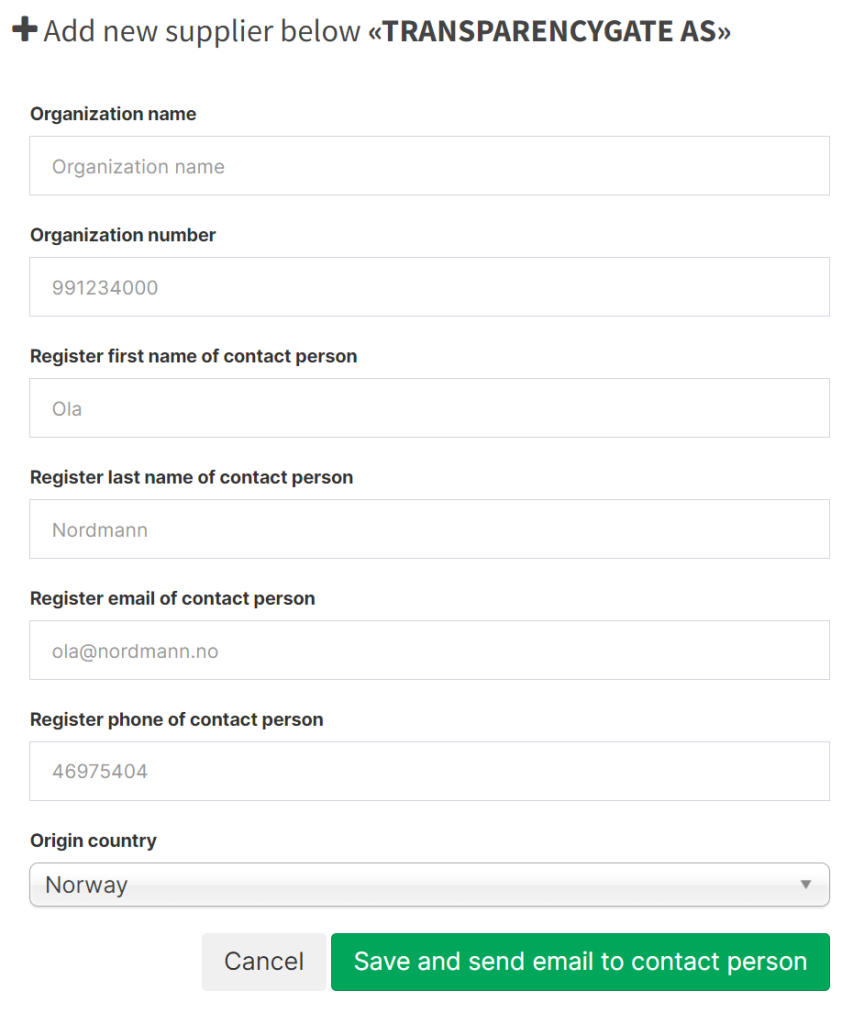
Here you can add suppliers manually if you wish.
2.3.4 Add supplier through Excel
See section 2.6.2 for uploading suppliers via Excel.
2.3.5 Add contact person to an existing supplier
1. Find the supplier
- Go to the “Registered suppliers” table.
- Search for the relevant supplier.
- Click “Contact person” in the row of the supplier whose detail page you want to open.
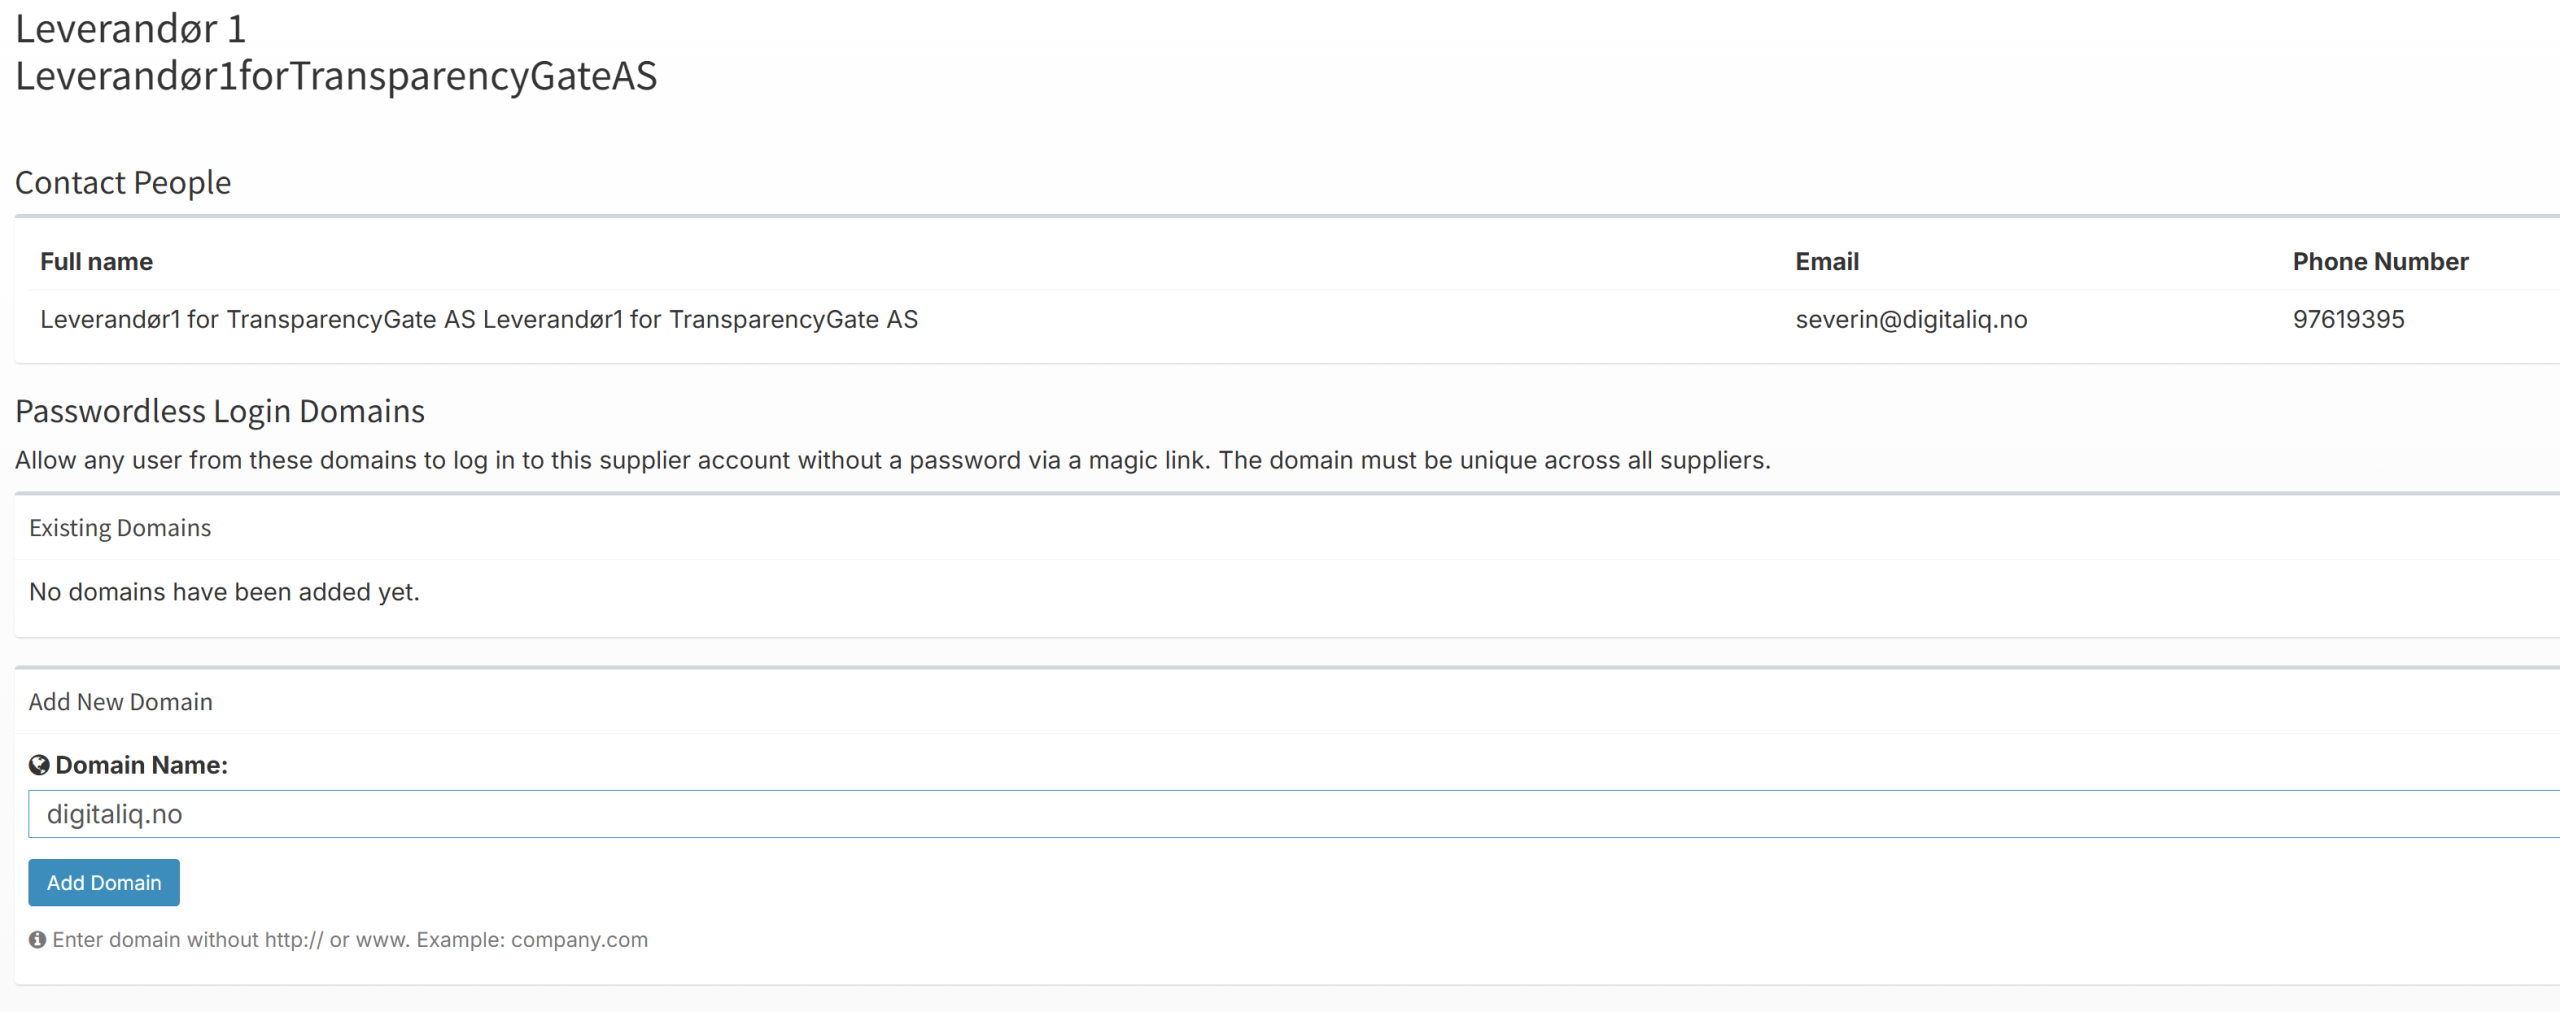
2. Add a new domain
- In the Domains section, find the field “Add new domain – Domain name.”
- Enter the domain (e.g., abcd.no, without “@”).
- Click “Add Domain”.
3. How it works for users
- Anyone with an email address ending in @abcd.no can now log in via this link: https://portal.transparencygate.com/login/passwordless/tg
- At first login, they receive an email with a one-time link for secure access.
- When the user logs in, they are automatically added as a contact person for the supplier. You do not need to register name, email, or phone number manually.
Tips:
If the supplier has multiple domains (e.g., abcd.no and abcdgroup.com), you can add all of these in the same list under Domains.
2.3.6 Invite suppliers
To invite all registered suppliers into the portal, click “Invite all.”
- All suppliers who have not previously been invited will automatically receive an email with username and password.
- Suppliers who have already been invited will not receive the email again.
NB!:
- If you are using the English portal, the email is sent in English.
- If you are using the Norwegian portal, the email is sent in Norwegian.
2.3.6.1 Invite a single supplier
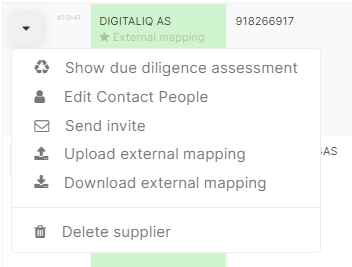
Click the arrow on the given supplier, and then “Send invite.”
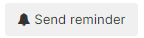
2.3.7 Send reminder
To send a reminder to suppliers who have not logged into the portal to answer the due diligence assessment / mapping, click “Send reminder.”
NB! Suppliers who have logged into the portal and answered the due diligence assessment / mapping will not receive a reminder email.
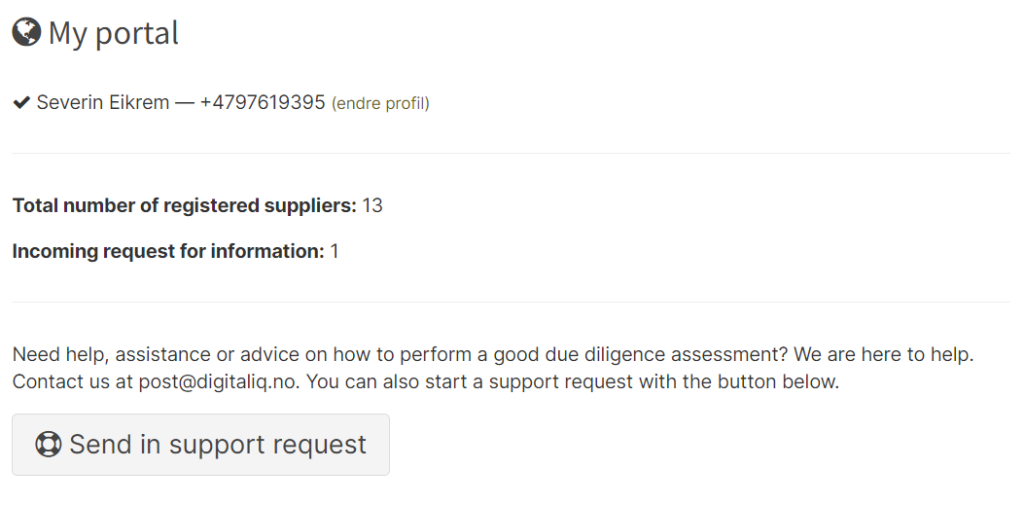
2.3.8 My portal
Scroll to the bottom of the page. Here you will find My portal, which shows:
- Total number of registered suppliers
- Incoming requests for information
In this section, you also have the opportunity to send support requests if you need help or have questions.
2.3.9 Risk assessment
To build a risk assessment, you can click on risk assessment under the suppliers.
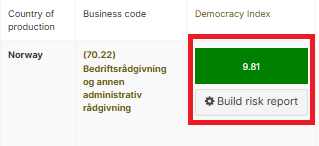
Click “Build report.” You will then enter the risk report.
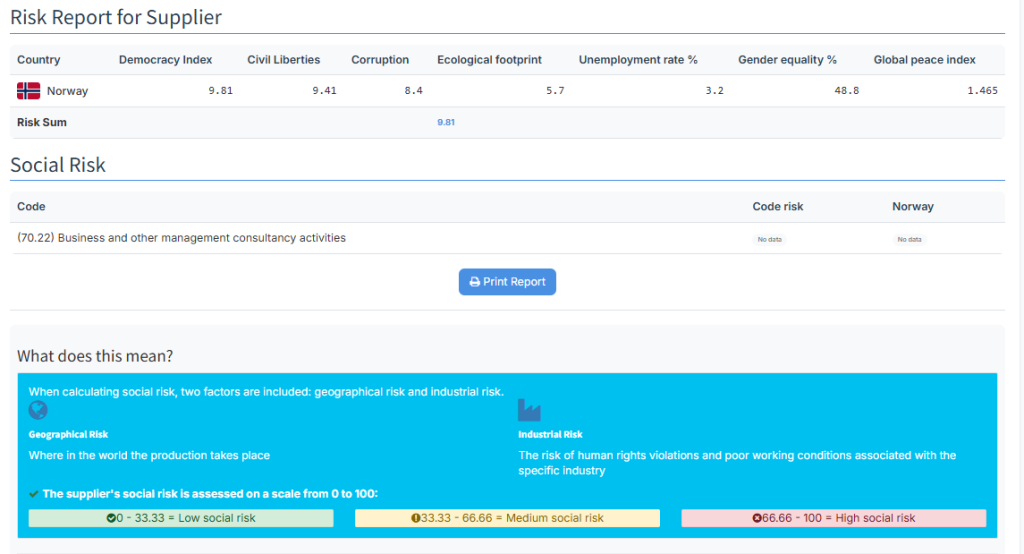
Risk report:
If there are parts of the report that are difficult to understand, you will find explanations of the various segments just below, in the section called “What does this mean?”.
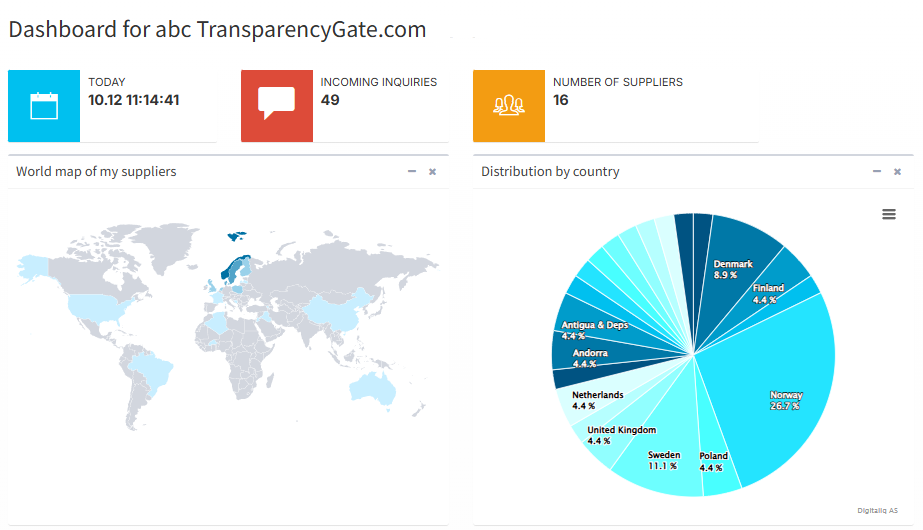
2.4 Dashboard
The dashboard shows an overview of your portal. Here you can see the number of inquiries, the number of suppliers, and based on this, a score is given that says something about the risk associated with your business.
Explanation of the elements in the dashboard
In the top section of the dashboard, you will find several functions that can be useful. Below you will find an explanation of the various elements:
- Incoming inquiries: shows how many inquiries have come into the portal
- Number of suppliers: number of registered suppliers in your portal
- World map of my suppliers: countries where suppliers are located are marked in blue
- Distribution by country: shows the distribution of suppliers by country
2.4.1 Due Diligence Scores
Overview of the average responses of the registered suppliers.
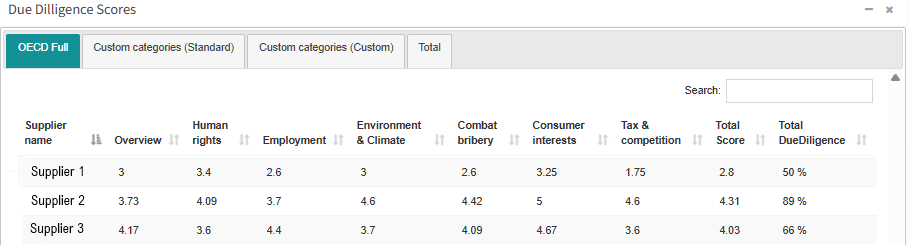
- Total Score = Total average of the different categories in the tab
- Total Due Diligence = Percentage of how much of the due diligence assessment has been answered
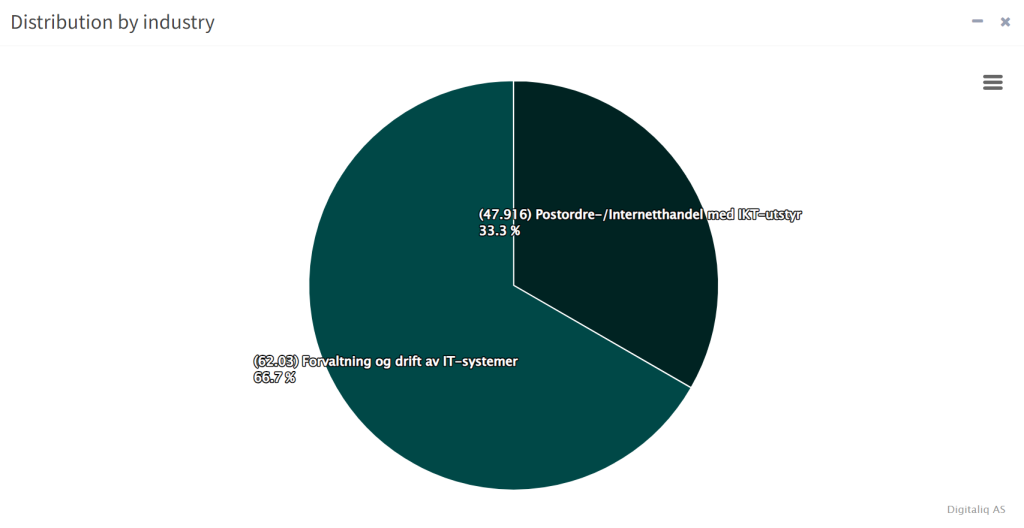
2.4.1 Industry distribution
Shows how your suppliers are distributed by industry or sector.
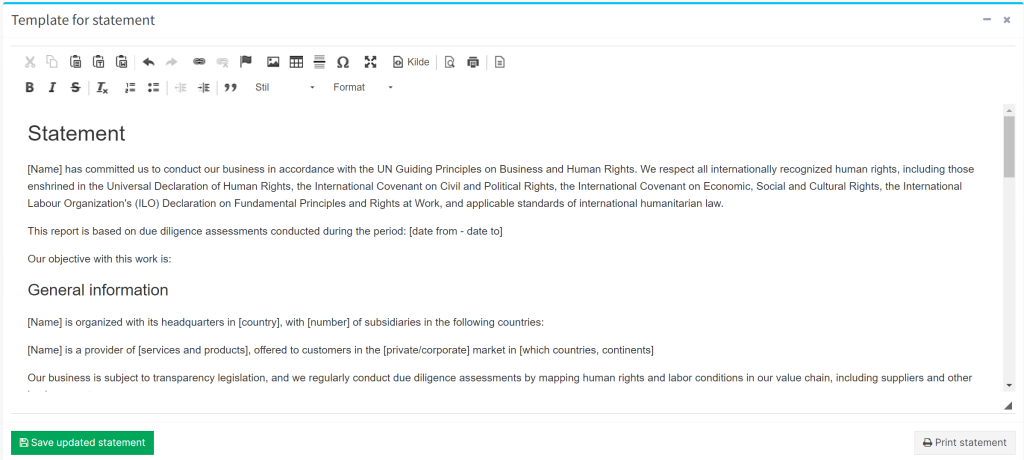
2.4.2 Templet for statement
If you scroll to the very bottom of this page, you will find the section “Template for statement.”
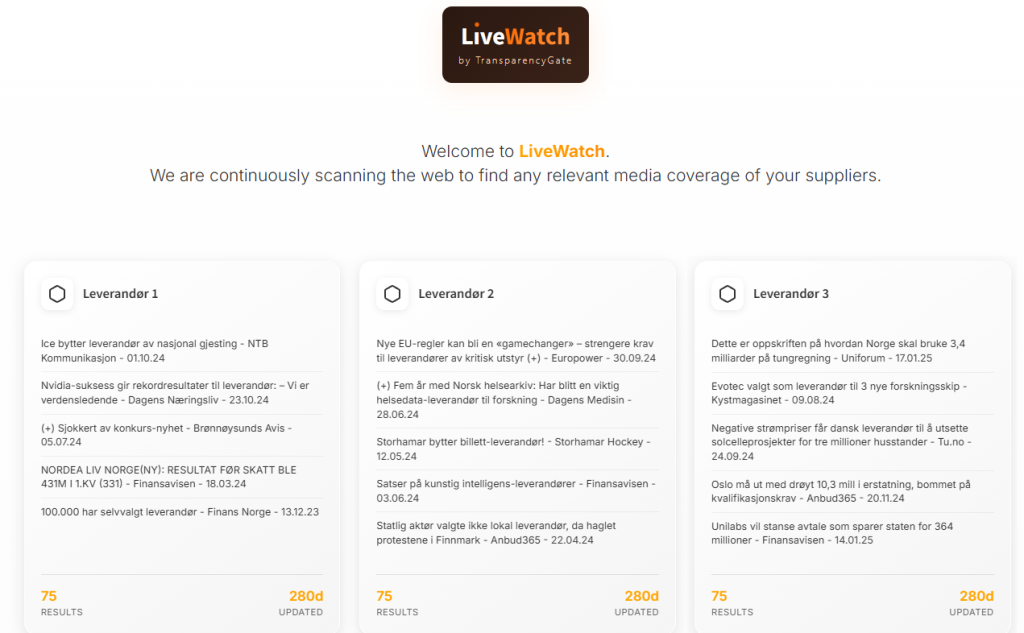
2.5 TGLiveWatch
An advanced monitoring feature that gives you ongoing insight into what is happening with your registered suppliers.
LiveWatch retrieves news articles that mention your suppliers, so that you can quickly identify and respond to critical events. This is an essential tool for ensuring compliance with the Transparency Act and for maintaining a responsible supply chain.
2.6 Settings for TG
By clicking “Settings TG” in the menu on the left side, you will see settings for the portal.
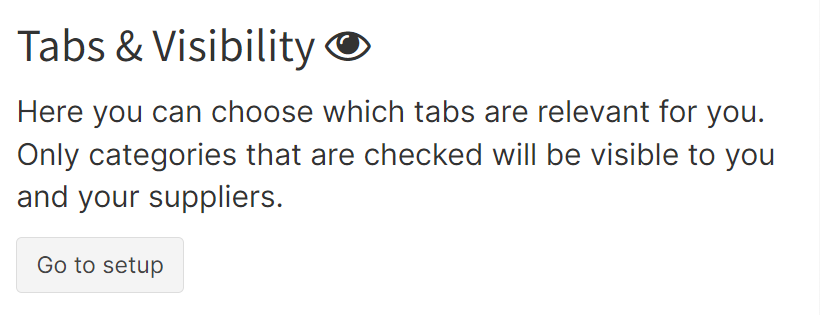
2.6.1 Tabs & Visibility
Here you can choose which tabs are relevant for you. Only categories that are checked will be visible to you and your suppliers.
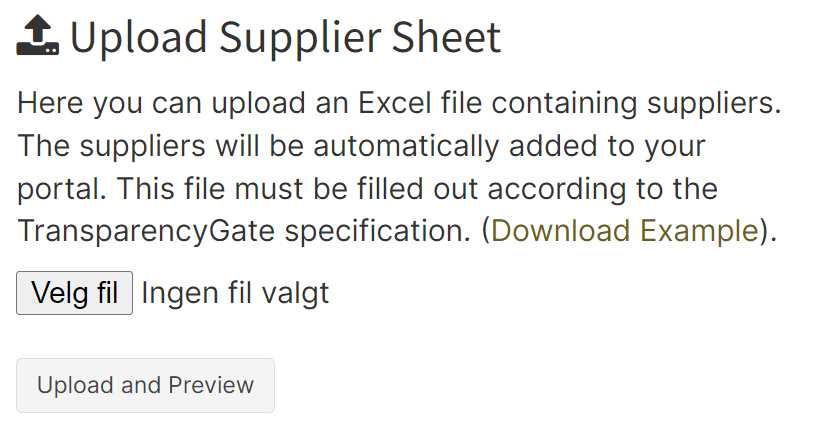
2.6.2 Upload supplier sheet
Here you can upload an Excel file with your various suppliers. It is important to upload the file as a CSV file.
Format for importing suppliers to TransparencyGate:
https://docs.google.com/spreadsheets/d/132aCJy42SwkCz-YwTyvHM1EGHUFeJ0OISG7U32jC_iI/edit#gid=0
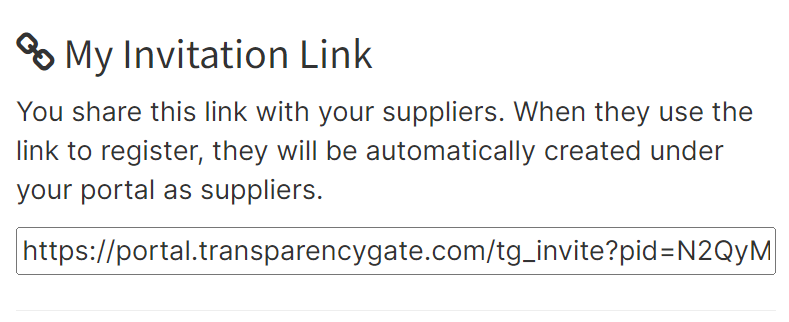
2.6.3 Invitation link
You can share this link with your suppliers to make the registration process easier. When a supplier clicks the link and completes registration, they are automatically associated with your portal. This makes it easier to manage suppliers, since you get a consolidated and updated overview of all linked suppliers in one place.
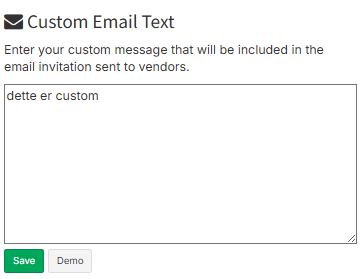
2.6.4 Custom email text
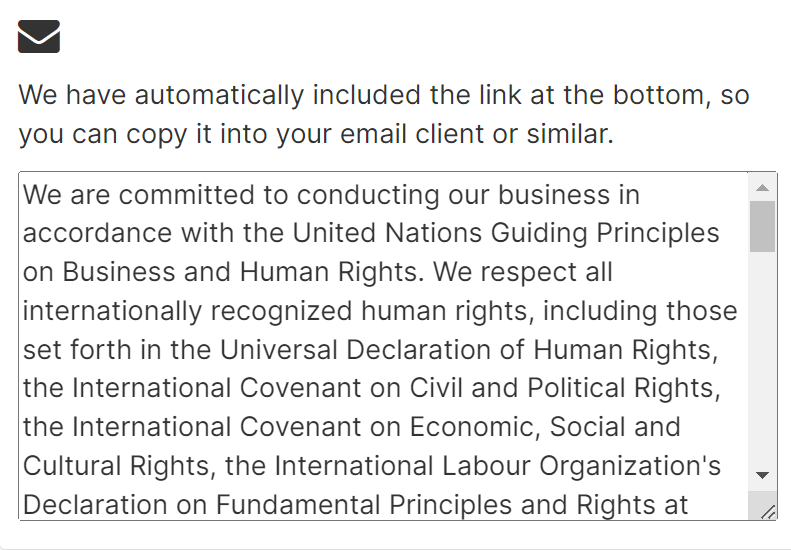
At the bottom of the page, you will also find a ready-made email template you can use if desired; the link is already included at the bottom of the text.
3.0 Administrator
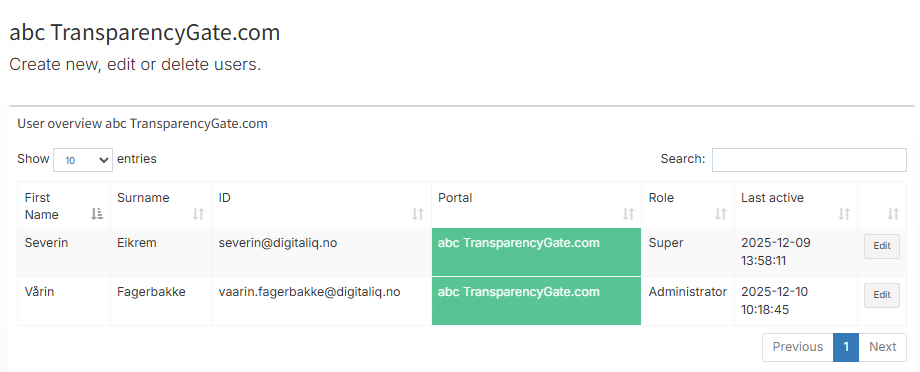
3.1 Users
The user overview gives the administrator an easy way to view and manage all registered users in the portal. Here you can keep track of who has access and manage users information and roles. By clicking “Users” in the menu on the left side, you will see the overview of the users in the portal.
This is what you will find in the user overview:
- A list of all registered users
- Information about users’ roles and status
- The ability to manage access and roles
Under Users, you can see an overview of all users in the portal.
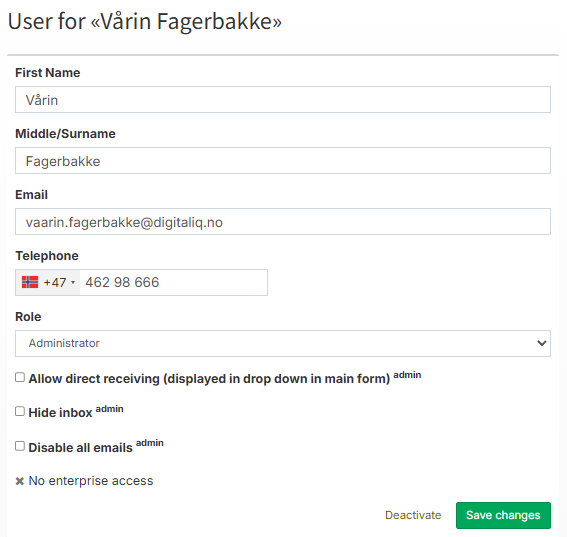
3.1.1 Edit or deactivate users
To edit or deactivate a user in the portal, click “Edit” in the menu for the user overview. Here you can change the user, change roles, or deactivate the user.
When you are finished making changes, click “Save changes” to confirm and update the information.
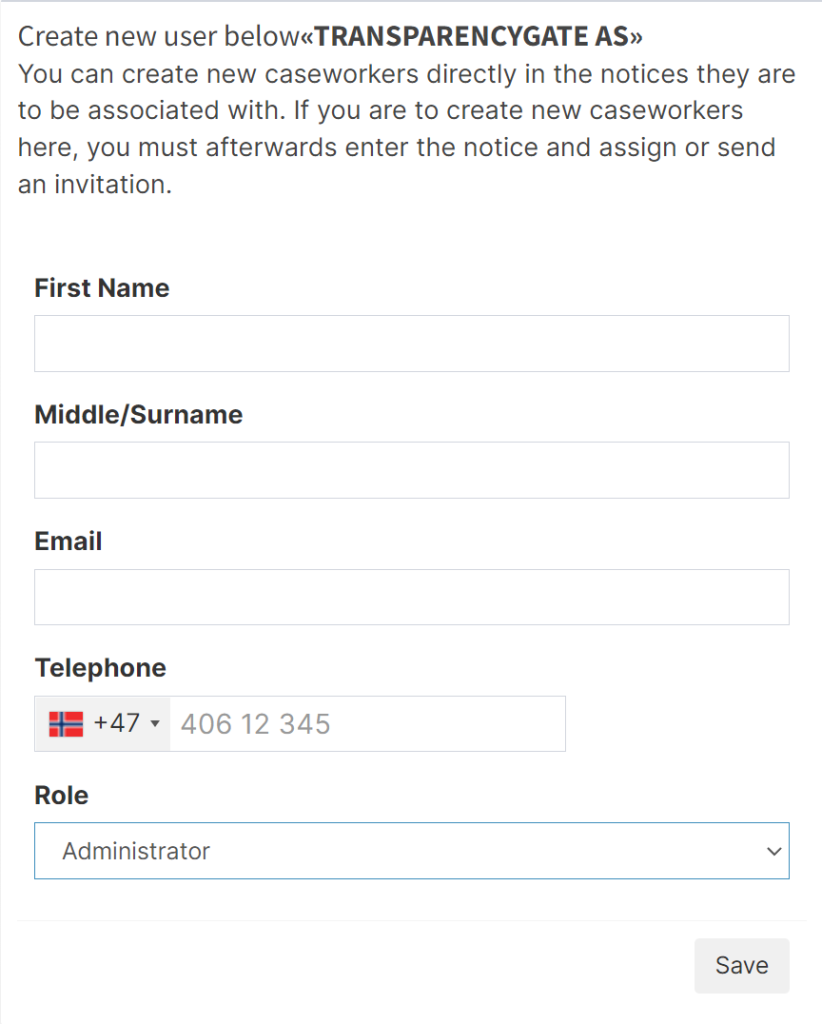
3.1.2 Create new users
At the bottom of the page under Users, you can add a new user to the portal. You do this by filling in the contact information of the person you want to grant access.
3.2 Statistics
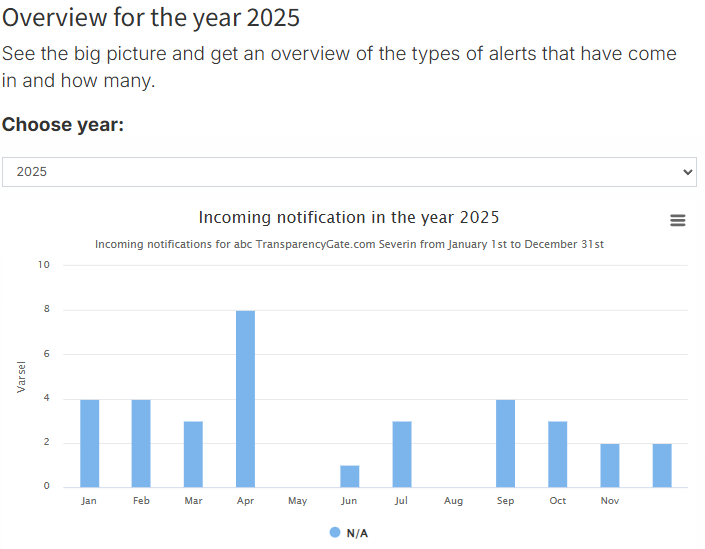
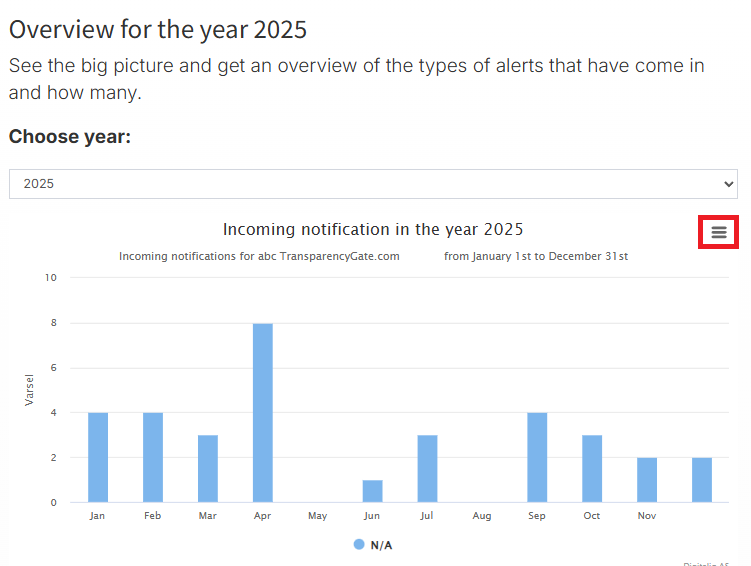
Click “Statistics” in the menu to see the statistics for incoming cases in the portal. The current year is selected by default, but this can be changed by selecting another year from “Select year” in the dropdown menu.
3.2.1 Overview for the year
Overview shows a bar chart with incoming cases by category for the selected year.
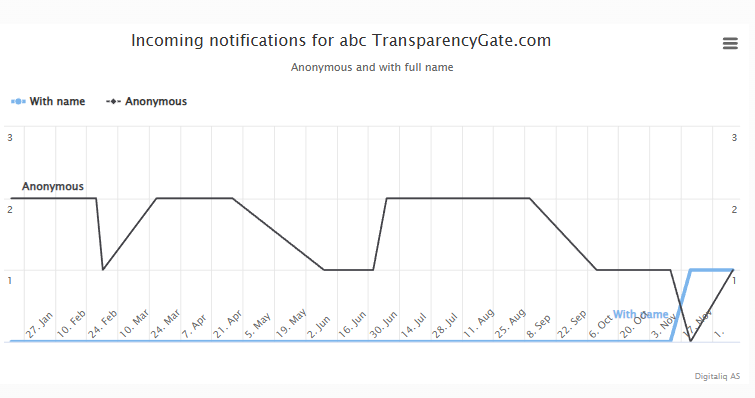
3.2.2 Incoming cases
The graph shows incoming cases divided by whether they were submitted anonymously or with contact information.
3.2.3 Average processing time per month
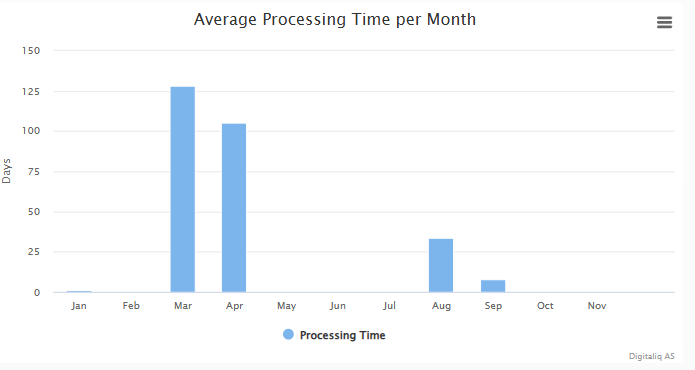
In the section “Average processing time per month,” you can see an overview of processing time month by month in the selected period.
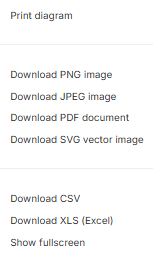
3.2.4 Download statistics
It is possible to download the chart as an image, print, view in full screen, or export by clicking the menu at the top right corner:
3.3 Document Bank
This is where you can upload documents that can be published on the home page.
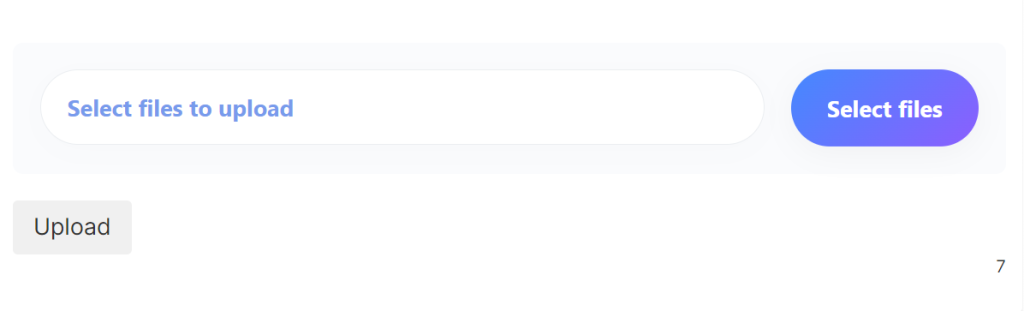
3.3.1 Upload documents
Here you can upload files/documents to your portal. Select a file, and click upload.
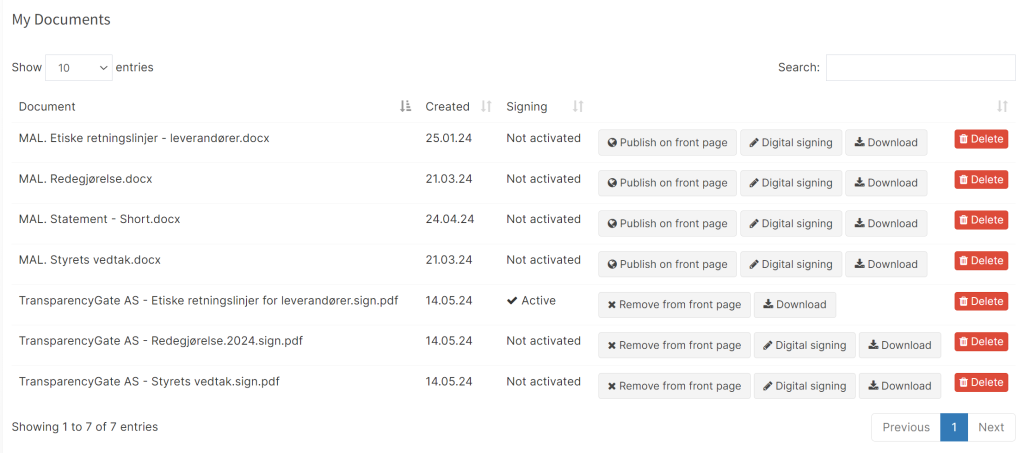
3.3.2 My documents
Here you will find an overview of your documents. You can choose to publish the documents on the home page if you wish.
If you want suppliers to sign the documents digitally, click “Digital signing.”
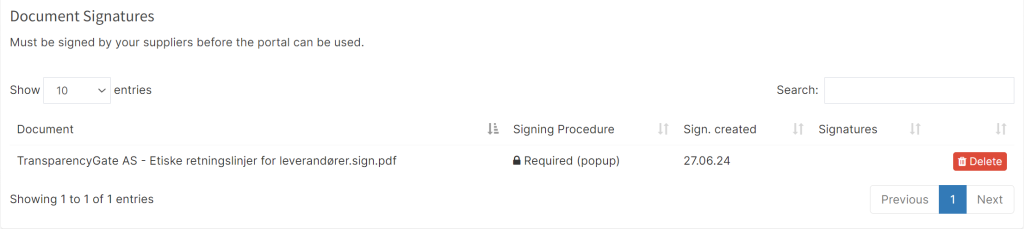
3.3.3 Document signatures
The overview of signatures shows who has signed the documents and allows you to delete documents that have been sent for signing.
3.4 Resources
When you click Resources, you are sent to Google Drive. There you will find several pre-made templates that are available to administrators and can be used as a starting point for various types of documents and processes.

3.5 Settings
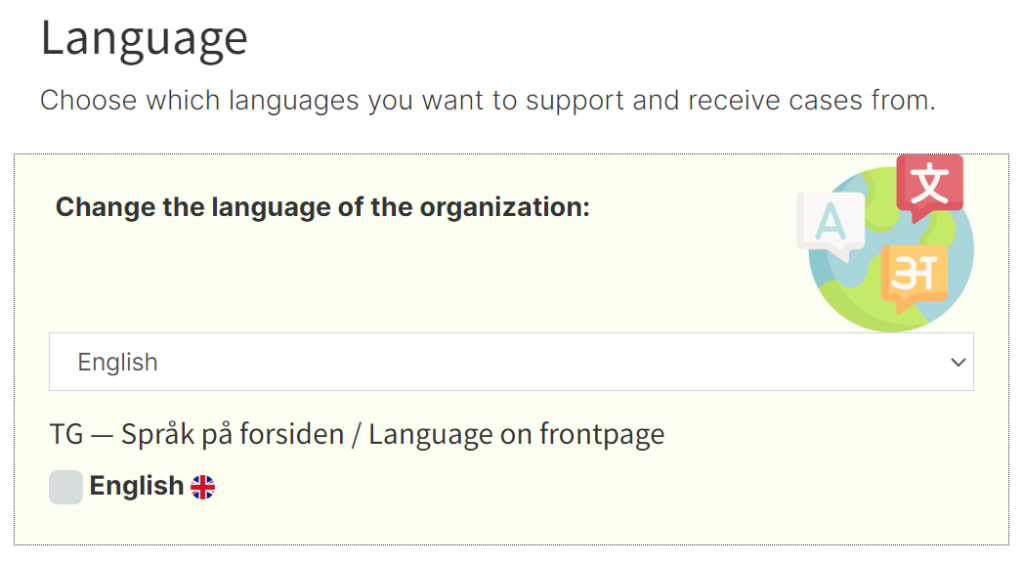
3.5.1 Language
Here it is possible to change the language, either English or Norwegian.
3.6.2 Features
3.6.2.1 Settings for notifier

- Allow requests with name and identity:
- Opens the portal for submitting a case/information request with name and identity.
- Allow anonymous request:
- Opens the portal for submitting a case/information request anonymously.
- Let the sender choose the direct recipient:
- The sender is given the option to choose that the case should go directly to a case handler. This means the case goes directly to the selected case handler, and the administrator does not see the case. The sender can choose from the case handlers who are registered in the portal.
- Let the sender set the category:
- Allows the sender to set the category of the case themselves.
- The sender can choose level/sublevel:
- Allows the sender to choose the level (portal) the case should be sent to. This may be relevant in cases where there is an organization with several levels (sub-portals), for example by region or country. The top level (your portal) must have this activated.
3.6.2.2 Archiving
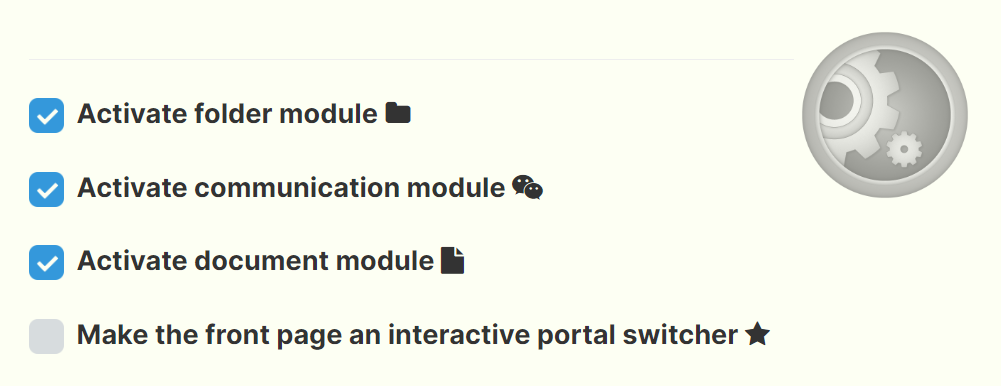
- Enable folder solution:
- Enable folder solutions for information requests and cases.
- Enable communication module:
- Enables the communication module, which allows the case handler to create a dialogue with external parties.
- Enable document module:
- Enables the document module, which makes it possible to create case documents.
- Turn the home page of this portal into a portal selector:
- Activate the home page as a portal selector.
3.6.2.3 Parameters
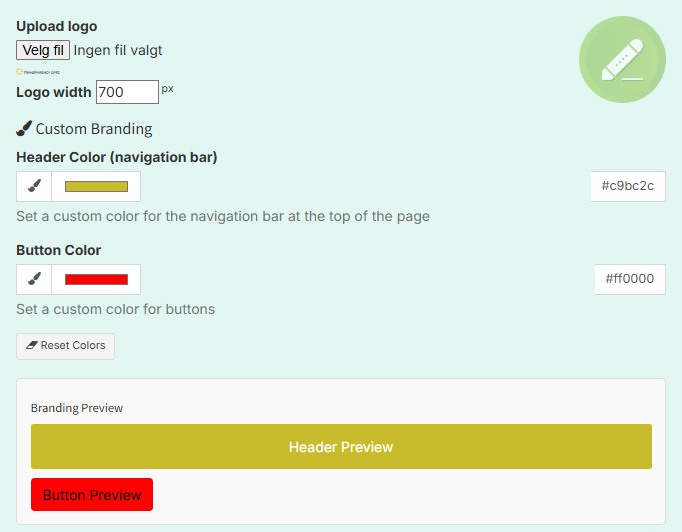
- Upload logo to portal:
- By clicking “choose file,” you can upload the desired logo.
- Logo width:
- If you want to adjust the pixel size of your logo for the home page, you can do it here. The default size is set to 300 px.
- Custom branding:
- Here you can easily change the color of the top bar, navigation bar, or buttons so that the portal has the appearance you want.
3.6.3 Text and content
Create and edit texts that appear on the home page of your portal. You can create texts for the languages you have activated.
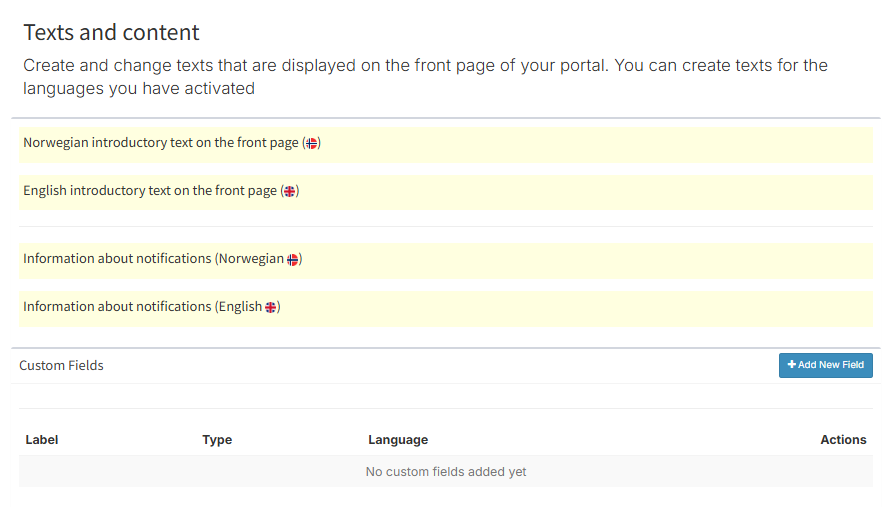

Introductory text on the home page:
If you want to edit the introduction text on the home page, you can do it here.
Introductory about registration (dropdown menu):
Here you can create a dropdown menu on the home page. Here it is important to use “Heading 1” as the text for the title to create a dropdown menu.
3.6.4 SSO
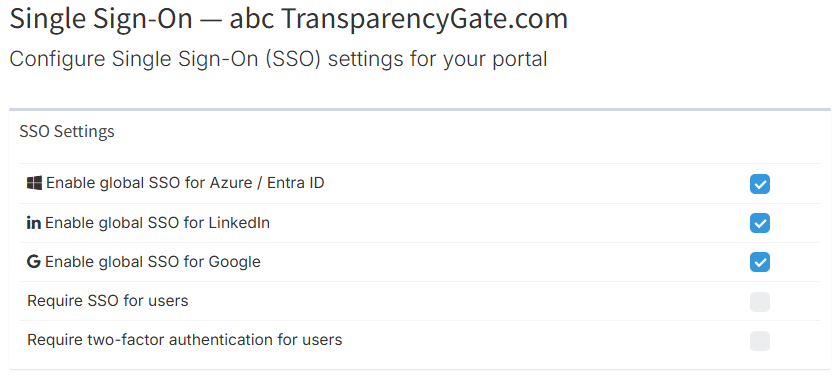
Configure Single Sign-On (SSO) settings for your portal.
- Enable global SSO for Azure / Entra ID:
- Activate SSO from Azure / Entra ID for all users in the given portal.
- Enable global SSO for LinkedIn:
- Activate SSO from LinkedIn for all users in the given portal.
- Enable global SSO for Google:
- Activate SSO from Google for all users in the given portal.
- Require SSO for users:
- Require SSO for all users in the portal (Contact Digitaliq AS to have this activated) ([email protected])
- Require two-factor authentication for users:
- Require two-factor authentication for all users (Contact Digitaliq AS to have this activated) ([email protected]).
3.6.5 Extensions
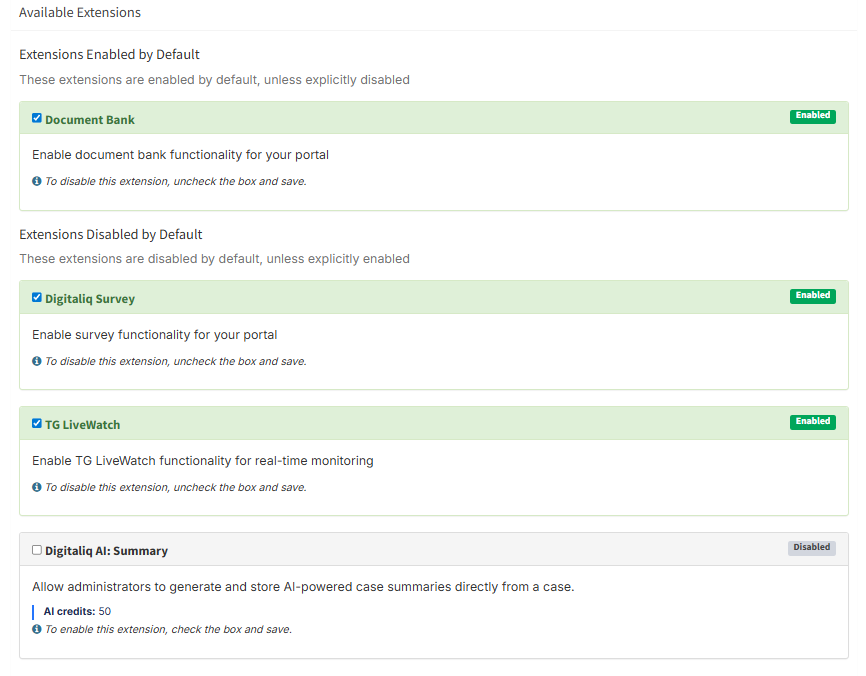
Enable or disable extensions for your portal
- Document Bank:
- Enable document bank functionality for your portal. To disable this extension, remove the checkmark and save.
- Digitaliq Survey:
- Enable survey functionality for your portal. To disable this extension, remove the checkmark and save.
- TG LiveWatch:
- Enable TG LiveWatch functionality for real-time monitoring. To disable this extension, remove the checkmark and save.
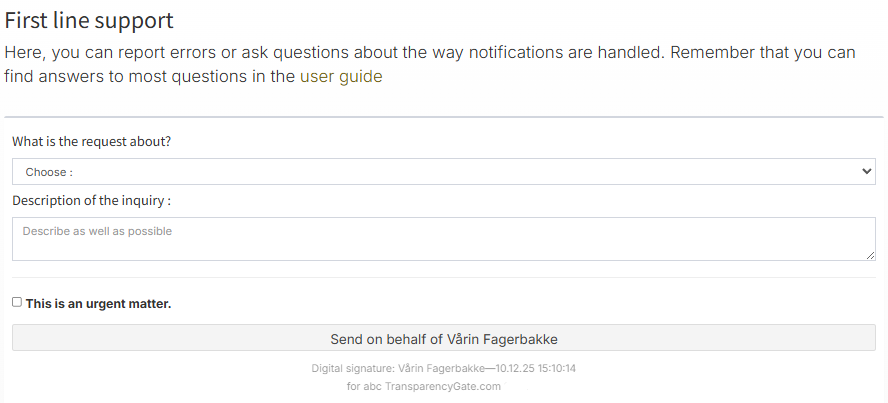
4.0 Help and support
4.1 First-line support
Here you can report errors or ask questions about your portal. Remember that you can find answers to most things in the user guide.